
WARMACHINE MkIV: Painting Orgoth Sea Raiders
by Charles Foster III
Well, the cat is officially out of the bag: WARMACHINE MKIV is upon us! There are so many things to take a look at with the new edition, so today, I’m here to help with the hobby side, and that includes the need for new demo models. For this Insider, we will be tackling the new Orgoth battlegroup, which will be available in a limited supply next week at Gen Con! More on that later—for now, we’ve got some hobbying to do!
To get your Orgoth Battlegroup ready for the tabletop, we’ll analyze the advantages of the new printed resin material, show you how to magnetize the warjacks for modular list building, and, of course, get some paint on your models! So, let’s go!
First and foremost, we need to take a moment to check out the new material, our printed resin. This new material brings some seriously cool advantages over our previous resin and metal models. Sculpts can take on more dynamic poses, they have preset magnet holes, and they’re very lightweight. No more lugging around that 40-lb. bag of metal models at the convention hall. The biggest advantage, however, is that since each model is printed instead of being cast, we no longer have the issues of random mold lines! Model prep and cleanup is now simply removing any build structures left over from the printing process, and doing so couldn’t be easier. Using either clippers or a hobby knife, cut any area you would like to remove. It doesn’t take much force, so light pressure is best. With just a few minutes of little to no effort, my battlegroup is already cleaned up and ready for the next step: magnets.

Magnets!
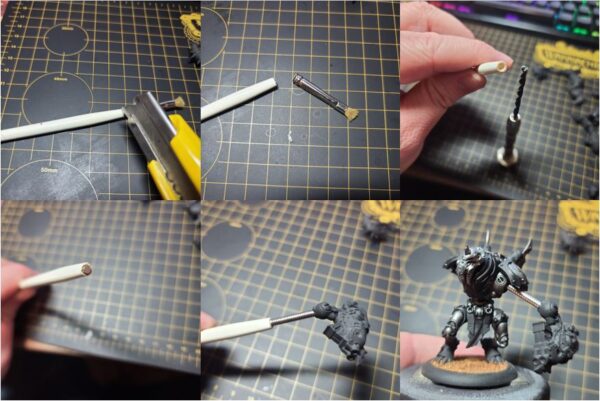
Yes, you read that right—magnets! One of the new features of the MKIV army construction is modular warjacks. Building dynamic lists that can maximize points has never been easier, as a player can simply swap out a warjack head or even arm or two. To get our battlegroups ready, we need to magnetize the Tyrant and the Jackal warjack kits. Polarity on magnets can give even the most celebrated hobbyist a little bit of trouble, so here are few quick and helpful tips to ensure your magnets line up just right.
The best option is to create a tool to always make sure your polarity is facing the same direction. For this you will need an old wooden-handled paintbrush, some extra magnets (not the ones included in the kit), and a drill bit with a pin vise that matches your magnet’s size. For mine, I was able to find some 1/8 ̋ earth-magnets at the local hobby shop. I also grabbed a drill bit and pin vise to match that size. I simply remove the ferrule (that metal bit at the end of the paint brush) using a box cutter. This left me with access to the wooden handle’s core. Using the pin vise and the 1/8 ̋drill bit, I drill down two magnets in size into the brush handle. I want to place two magnets to ensure that I get a good magnetic hold while working on a part. I glue my magnets into place, and bam, we’re ready to go.
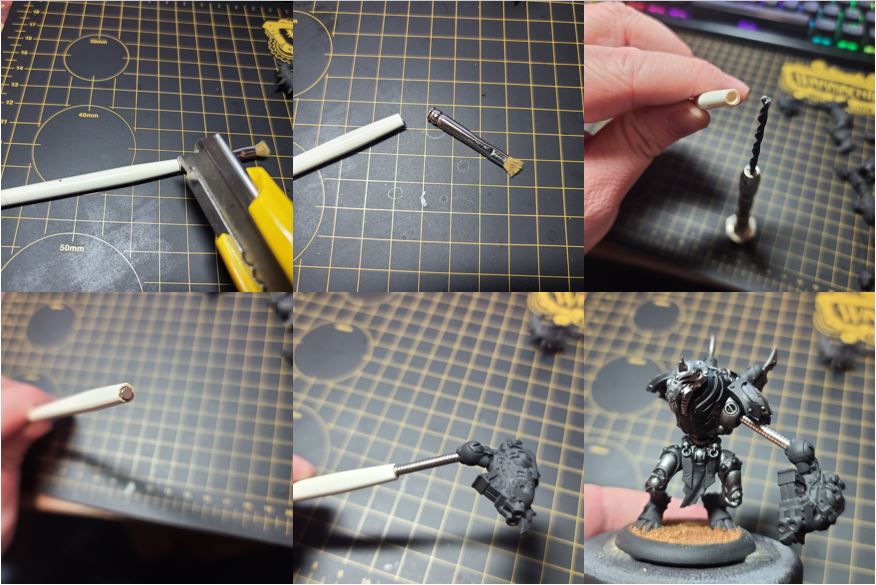
With this simple tool, I can always make sure polarity is going in one direction. Since the majority of the magnets will be glued into the additional arms and heads, I’ll stack the magnets included in my kit up on my tool and then glue them in that direction into the arms and heads. To place the magnets into the body’s core, I’ll put a few magnets on one of the arms and then glue the opposite side into the body. This tool becomes even handier when painting the modular pieces, as it can be used to hold onto the parts while I paint.

If you don’t happen to have any spare magnets laying around or don’t want to build a tool, there is still a very easy way to ensure your magnets are facing the right direction. First, you should stack your magnets in a single line. Using this magnet stick, glue your magnets into the three areas of the body in the same direction. Simply take a few magnets and stack them up from the body; then, using a Sharpie or a dry erase marker, mark the end of the magnet stack. When you go to glue your magnets on, simply put the marked side down to ensure your magnets will connect.
With our magnets in place, we’re ready to do my favorite part: get some paint on them.
Paint!
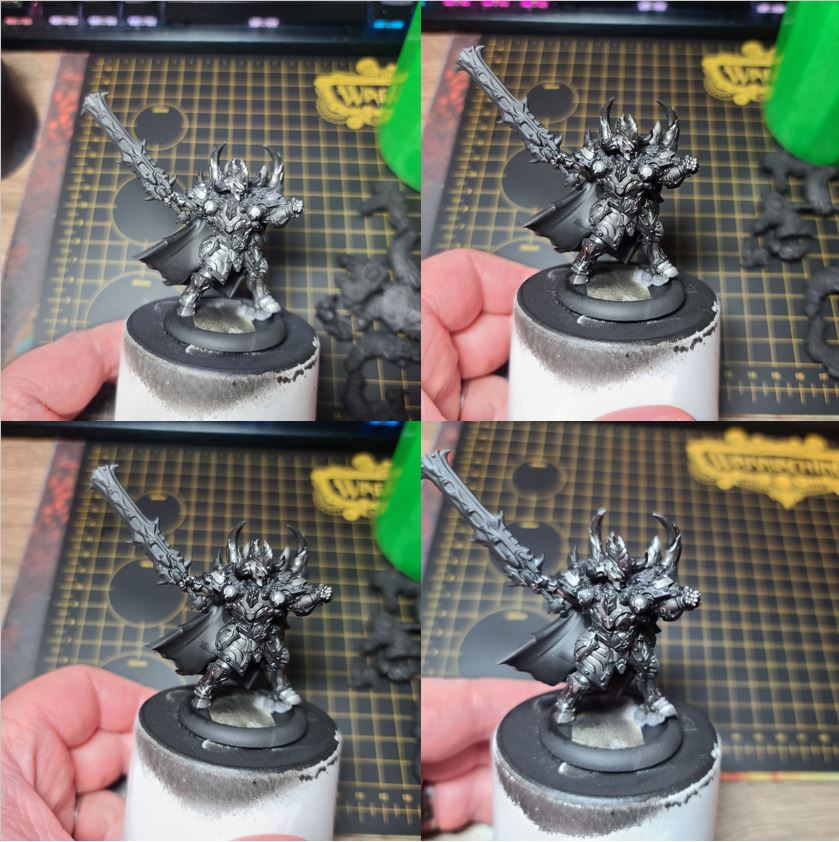
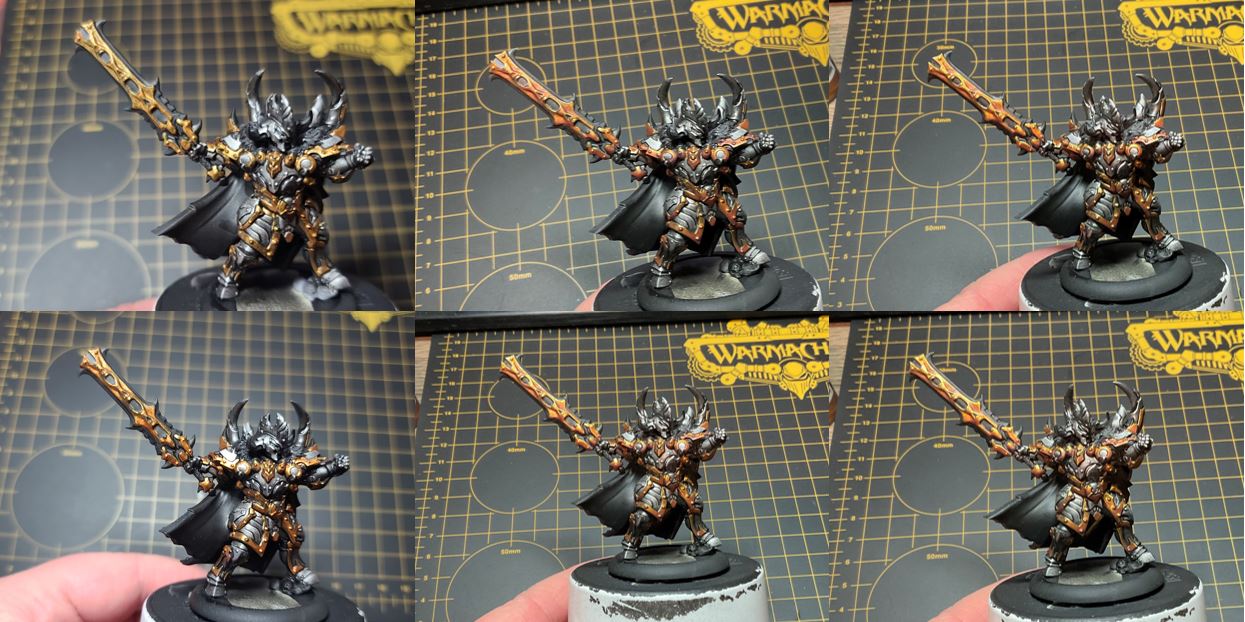
While I’m no master of non-metallic metals like Erik Swinson, who painted the gorgeous studio models, I do think the color scheme looks pretty great on the Orgoth models. So, for this Insider, I’ll be doing my best to replicate something close to that scheme with traditional metallic paints. For the painting guide, I’ll be mostly focused on Horruskh, The Thousand Wraths. Since he has the most materials on him, including fur, painting this model will give everyone more resources when painting their own Orgoth models. I throw a little black primer on the models and all the modular pieces, and we’re off.
Colors Used
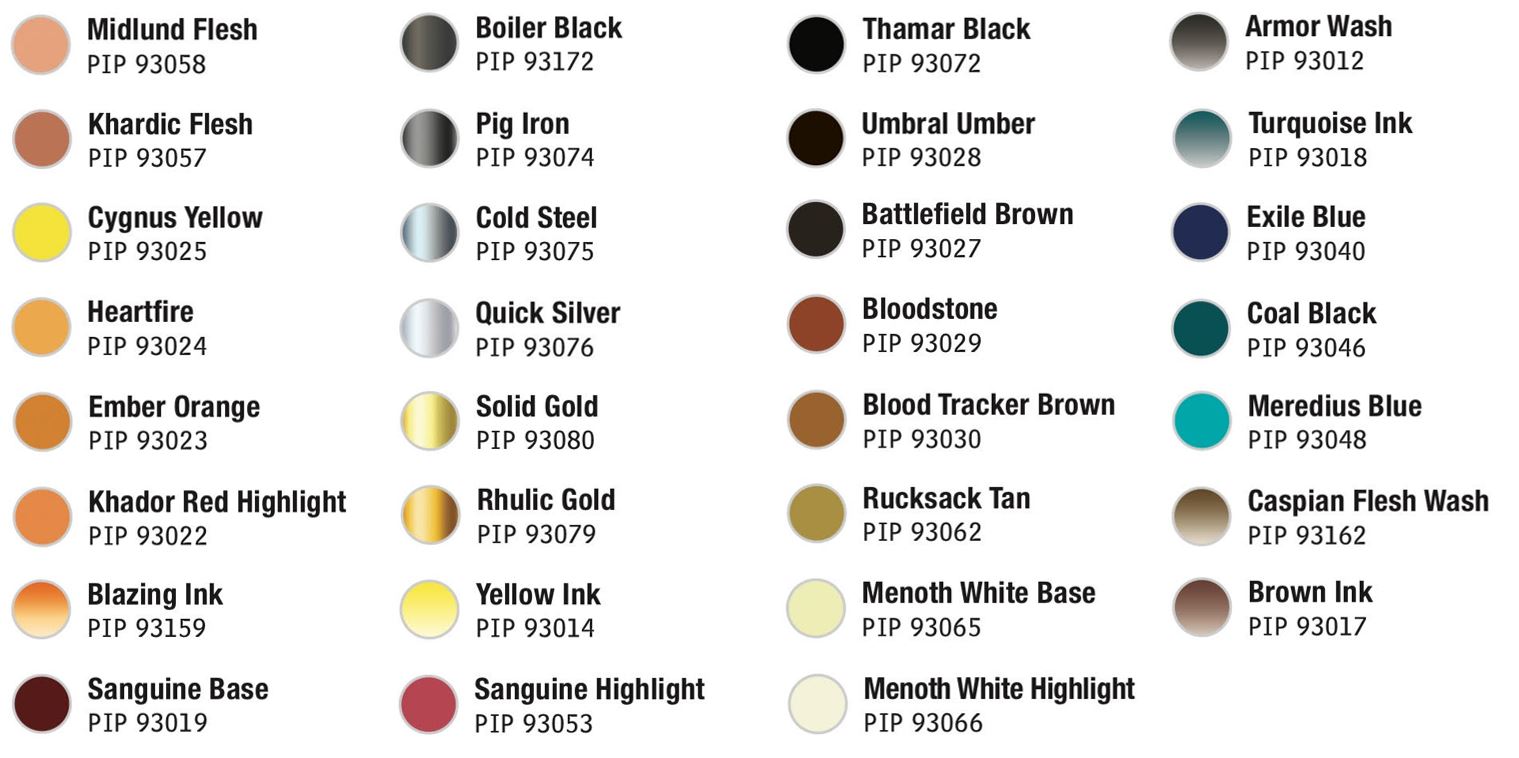
Silver Metals
Step 1) I decided the best way to get this project underway was to do the silver metals. I start with a basecoat of Boiler Black.
Step 2) Next, to create some basic shading, I apply a wash using water to thin out some Armor Wash.
Step 3) The Armor Wash ended up being a little heavier than expected so I return with Boiler Black to reclaim some of the basecoat.
Step 4) Next, I start my highlights with Cold Steel.
Step 5) Finally, after the model has been sealed with a matte sealant, I return with Quick Silver to do some final hard-edged highlights.
Golds
Step 1) Next, let’s head into the yellow golds and start with a basecoat of Rhulic Gold.
Step 2) To create a nice first shade, mix 3 drops of Brown Ink, 2 drops of Yellow Ink, and 4 drops of Rhulic Gold. Apply this first shade to the Rhulic Gold from the step above.
Step 3) To take the shade a little deeper, I mix equal parts Umbral Umber, Sanguine Base, and a drop of Brown Ink. Apply this color to the deepest areas.
Step 4) Solid Gold makes the perfect highlight for the color combination so far. Apply a nice blend using Solid Gold on the higher areas.
Step 5) Finally, after the model has been sealed with a matte sealant, I return with an even mix of Solid Gold and Cold Steel as a final hard-edged highlight.
Blue Steel
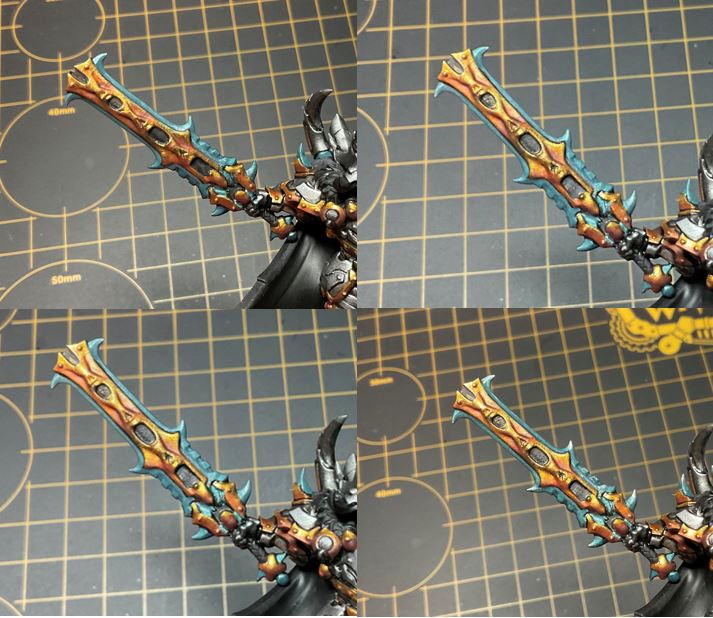
Step 1) Next up, it’s time to make that bluish-colored steel. To get a similar look, I’m going to start with a mixture of Meredius Blue, Pig Iron, and a drop of Turquoise Ink.
Step 2) To shade the color from the previous step, I’ll blend some Coal Black into the recesses.
Step 3) Next, to create a highlight, I’ll mix Cold Steel with Meredius Blue and add a few drops of Turquoise Ink. Apply this color as a first highlight.
Step 4) For the next highlight, I mix even parts of Meredius Blue with Quick Silver and apply as a blended highlight.
Step 5) Finally, after the model has been sealed with a matte sealant, I return to this area with a little Quick Silver only on the highest tips of this area to make a drastic highlight.
Fur Pelt
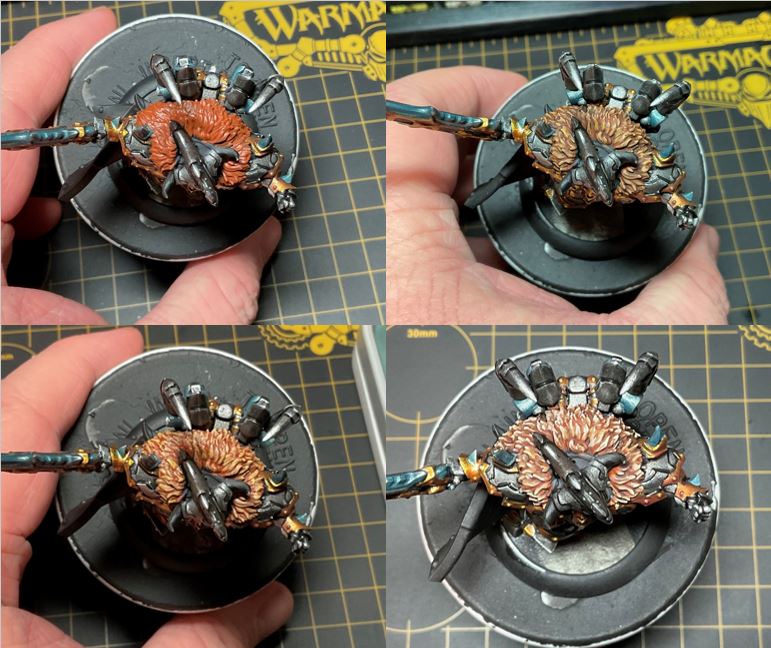
Step 1) Next up, let’s tackle the fur pelt. Start by laying down a solid basecoat of Bloodtracker Brown.
Step 2) Add a layer of highlights using some Rucksack Tan.
Step 3) To blend the layers together, take some Brown Ink and thin it out with a lot of water and apply this as a wash to the area.
Step 4) Once the wash has completely dried, apply a final highlight using Menoth White Base to the tips of the fur.
Cloak
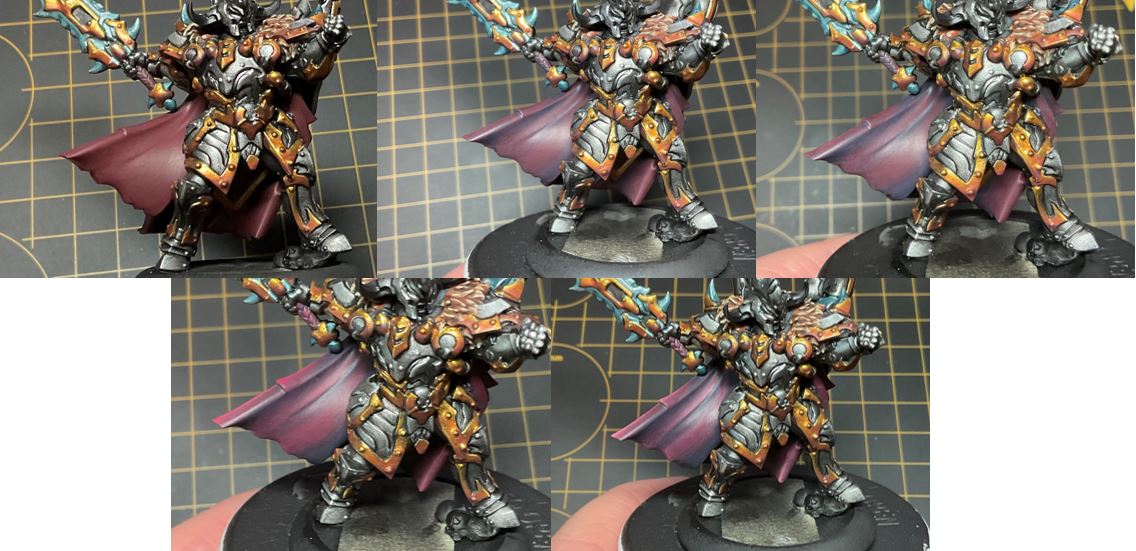
Step 1) Layering thin coats will be key to getting a great-looking cloak. Let’s start by layering on thin coats of Sanguine Base until you have a nice solid basecoat.
Step 2) Next, add a few drops of Exile Blue to Sanguine Base and apply this mixture as the first layer of shading.
Step 3) For the final highlight, add a drop or two of Coal Black to the previous mixture. Apply this color into the deepest recesses as the darkest areas of the cloak.
Step 4) To start highlighting, use Sanguine Highlight in thin layers, building up the color slowly. Once you have a smooth transition, you’re good to move on to the next step.
Step 5) Mix Menoth White Base with an even amount of Sanguine Highlight to create a final highlight using the two-brush blending technique.
Glow

Step 1) Time to get this model glowing! Let’s start off with a nice base of Khador Red Highlight.
Step 2) Next, we build up the glow using Ember Orange, making sure to leave some of the previous layer showing.
Step 3) Continue building on the highlights by adding a layer of Heartfire. Make sure not to cover the previous layers.
Step 4) Now to bring all of the previous layers together, take some Blazing Ink and a small amount of water and apply this as wash over the previous steps. Take care not to let any of it pool up too heavily, as it could take away all the work from the previous steps.
Step 5) to get that final bit of glow, add a highlight using Cygnus Yellow to really make the area stand out.
Face
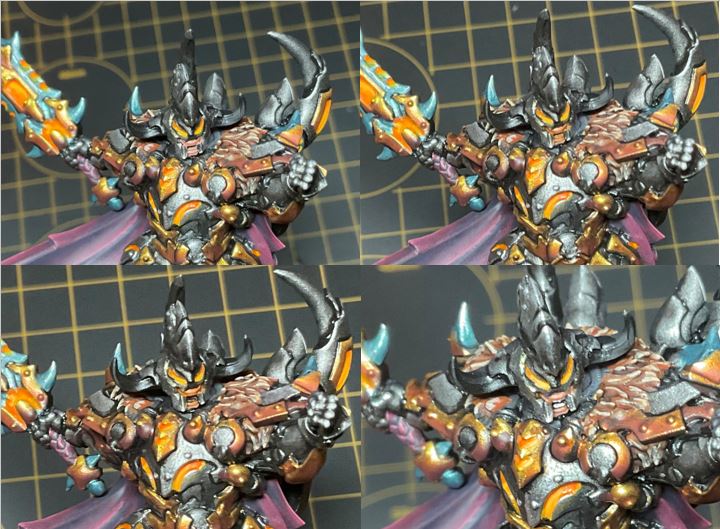
Step 1) Time to do some face painting! Start with Khardic Flesh as a basecoat.
Step 2) To create a nice shade on this color, use Caspian Flesh Wash.
Step 3) To create some depth to the previous steps, I’m going to use some Khardic Flesh again to reclaim some of the areas previously painted, being sure to leave some of the previous layers showing from below.
Step 4) For the final skin tones, I take a small amount of Midlund Flesh and pick out the raised areas of the skin.
Step 5) For the teeth and the mount, I use Thamar Black to black out the areas.
Step 6) Pick out the teeth using Menoth White Highlight. What a good-looking mug they’ve got now, eh?
Horns
Step 1) All good helmets need horns. Battlefield Brown will make the perfect basecoat for this area.
Step 2) Add some highlights using Menoth White Base. Make sure to leave good amounts of the Battlefield Brown still showing through.
Step 3) Add a final highlight of Menoth White Highlight on the highest tips to complete the look.
Basing
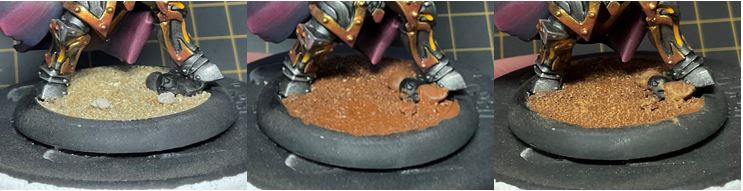
Step 1) Only one thing left to do: drop some basing on. Add in sand and ballast with Elmer’s white glue and let it dry completely.
Step 2) Water down a bit of Bloodstone and apply across the base material to let it soak in. In most cases, I apply a bit of hair dryer to help this process along.
Step 3) Once it’s dry, I drybrush on a little bit of Rucksack Tan.
Step 4) For the final highlight, drybrush on a thin coat of Menoth White Base.
Step 5) Glue on some static grass.

This model turned out great! Now, I know a lot of you are probably reading this and thinking, But Charles, this isn’t an alternative paint scheme. You are exactly correct. This was for a new set of demo models to show off at Gen Con and a great way to get near the studio colors. My alternate paint scheme is planned and waiting, and I’ll share that as we get a little closer to November.
As mentioned before, Gen Con is going to be off the chain! We will have all the new things with us: Orgoth and Storm Legion battlegroups, PESTS, Borderlands and Beyond, and so much more! Be sure to swing by and check us out at the booth in Indianapolis. If you’re unable to make it out to Gen Con, no worries—we have you covered, too. While we are at Gen Con, our webstore at store.privateerpress.com will also have a selection of items available for order that will be available at the booth (#429).

Join me next time as we tackle the Storm Legion MKIV battlegroup! Looking forward to seeing everyone at a convention very soon!
The post WARMACHINE MkIV: Painting Orgoth Sea Raiders appeared first on Privateer Press.