
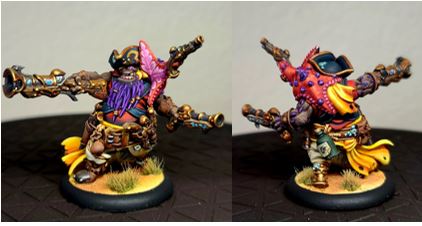
Paiting Captain Firequill
Welcome to another hobby Insider! This one kicks off my road to Warfaire Weekend series—from now until I head out the door to the airport, I’ll be doing a painting insider each week (or at least giving it my best to do so). Warfaire Weekend runs November 3rd–5th in St. Louis and is coming up fast; at the time of this writing, it’s only a month away. And it will be a jampacked weekend of WARMACHINE and good times. (My hope is to try and get in at least 20 games over that weekend!) But the number-one thing I want to accomplish is showing up with my models fully painted. To get ready, I definitely need some more paint on my Brineblood Marauders. Follow me over these next couple of weeks as I try to get as much color on my Brinebloods as humanly possible…and preview a few models along the way.
Last time, I threw some paint at a Pyg Boarding Party. For this one, let’s brush up Captain Firequill. So, it’s time to grab your paint and your brushing-up brushes and get to it.
Paints Used
Skin Tones
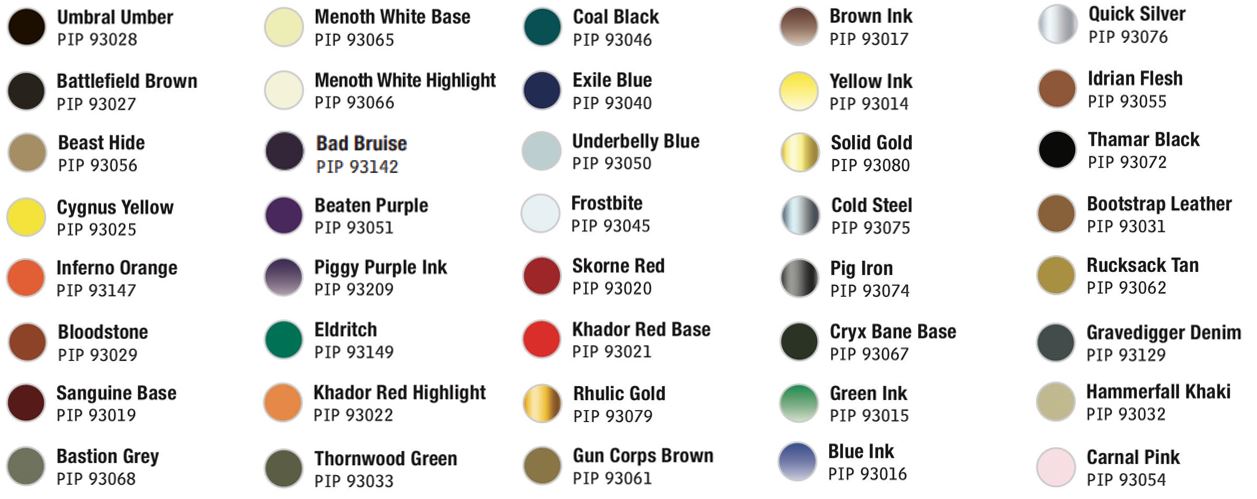
- Step 1) I start off the skin tone with a solid basecoat of Umbral Umber.
- Step 2) With the basecoat as the darkest color, I start working my highlights up. For the next layer, I apply Battlefield Brown.
- Step 3) Continuing with the highlights, I mix Battlefield Brown with Beast Hide, applying this as my next layer.
- Step 4) Finally, for the highest edges and raised areas, I use straight Beast Hide.
Red Shirt
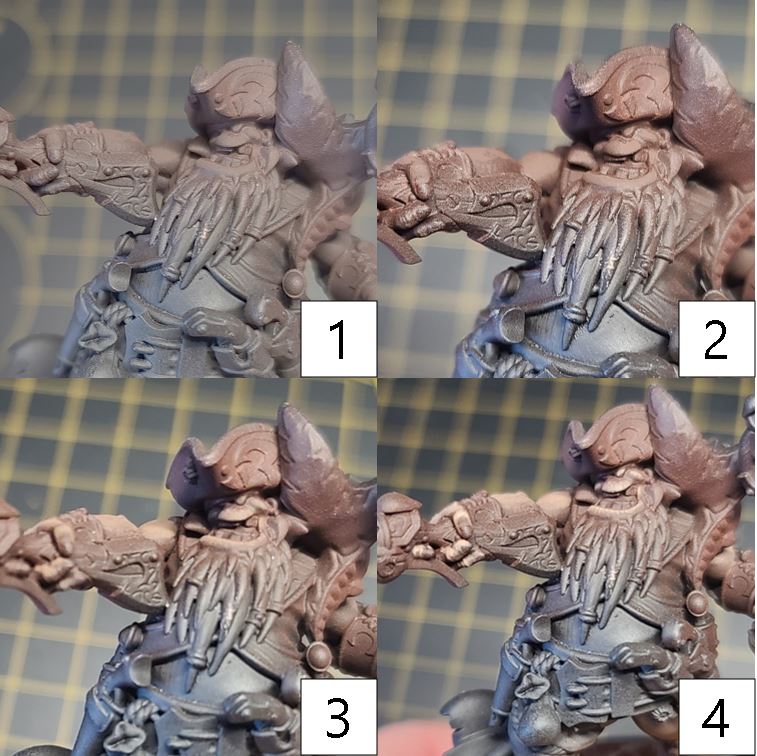
- Step 1) With the skin tones locked, it’s time to put a shirt on the captain. Start with a basecoat of Exile Blue.
- Step 2) Working up in layers, apply a highlight of Sanguine Base. Make sure to leave portions of the lower layers showing through as you continue working up in color layers.
- Step 3) Once the previous step is dry, continue working the brightness of the shirt up with a layer of Skorne Red.
- Step 4) Finally, to finish off the highlights of the shirt, apply Khador Red Base to highest raised areas and those hard edges you would like to define.
Yellows
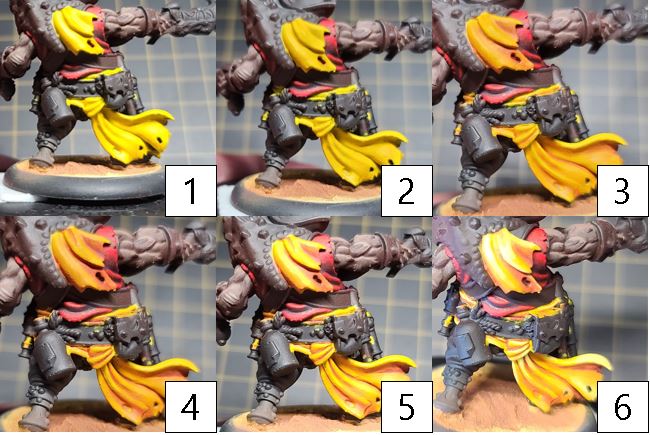
- Step 1) Next up, I’ll tackle the yellow bandana and sash on the almighty Firequill. To do this, I start with a solid basecoat of Cygnus Yellow. Take your time and get a smooth, even, consistent base. It usually takes me three coats to get it built up to where I like it. A lot of work, I know, but worth it for sure when you see the final results.
- Step 2) For the first layer of shade, I mix Cygnus Yellow, Inferno Orange, and Bloodstone. Using this color, I blend in my first shade to the area.
- Step 3) Continuing shading, I mix Bloodstone with Inferno Orange and blend this into the deeper areas to create additional contrast.
- Step 4) For my final shade, I take Sanguine Base and mix it with Umbral Umber. Blend this into the deepest areas of the yellow.
- Step 5) With my shading complete, its time to move on to my highlights. I start off with Cygnus Yellow mixed with Menoth White Base. Blend this over the raised areas.
- Step 6) Finally, to finish off the yellows, mix Menoth White Highlight to the previous step and apply to the uppermost raised areas and hard edges—this should finish off with a vibrant yellow.
Black Leather
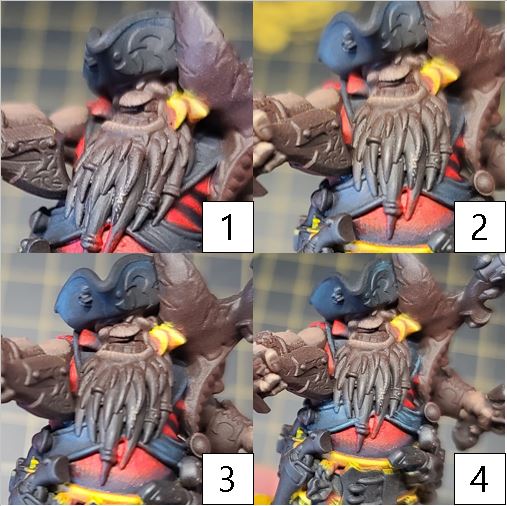
- Step 1) Time to take on the black leather belts. If you have gotten a little sloppy on the shirt (like I did), take a moment and apply a solid basecoat of Thamar Black.
- Step 2) Next, continue working the highlights up for this area by mixing Coal Black, Exile Blue, and Thamar Black together and applying this mixture generously to the area. Take time to make sure, of course, to leave areas of the Thamar Black showing through.
- Step 3) For the next layer, add a few drops of Underbelly Blue to the previous mixture. Apply this as the penultimate highlight, again leaving areas of the previous color showing through.
- Step 4) Finally, create a final highlight by adding a few drops of Frostbite to the previous mixture and applying some stark highlights to the area.
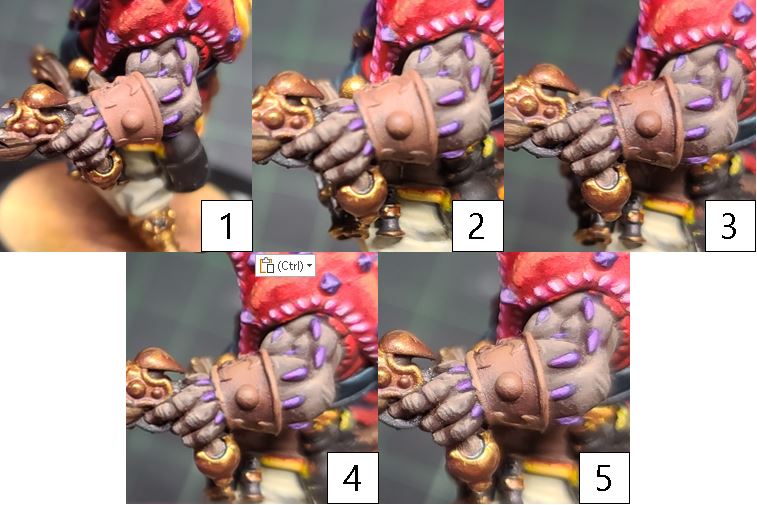
Purples

- Step 1) With the black leather belts finished off, I move onto the chitin of the model. I start the areas with a solid basecoat of Bad Bruise. (Save these steps for later when we get to the chitin on the back of the starfish.)
- Step 2) I keep working the purples up with a layer of Beaten Purple. Once again, make sure to leave areas of the basecoat showing through.
- Step 3) Add another layer of highlights by mixing Beaten Purple with Menoth White Base. Use this on the hard edges of the rocky formations and add a few lines here and there to show light bouncing off the crystal-like structures.
- Step 4) Next, to add some depth and shadows, thin out Piggy Purple Ink with water into a glaze mixture. Using thin coats, apply a few layers of this to the chitin. I take time to let each layer fully dry before applying the next. Make sure to avoid letting any of the mixture pool up—we want to keep the coats nice thin and even across the surface areas.
- Step 5) Finally, I return for one more layer of highlights to reclaim some of the brightness with a mixture of Beaten Purple with Menoth White Highlight.
White Pants
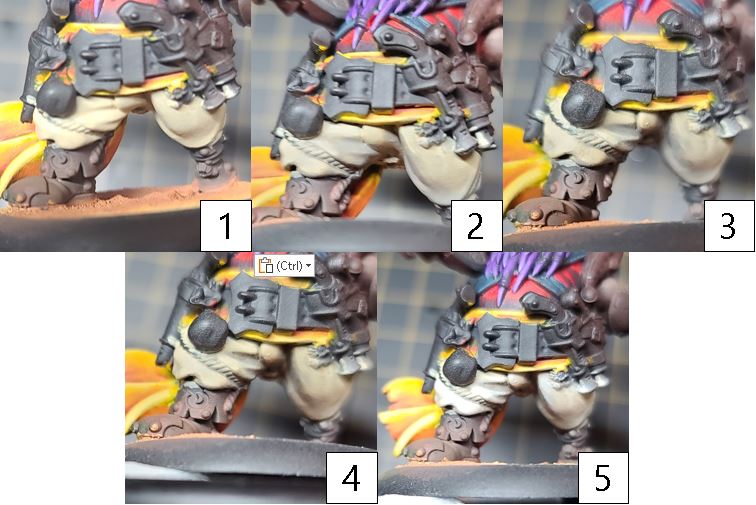
- Step 1) With the purples completed, let’s move on to the pants. Start this area with a solid basecoat of Menoth White Base.
- Step 2) Next, using the two-brush blending method, apply your first shade of Cryx Bane Highlight to create the shadows.
- Step 3) To darken the shadows on the pants, apply a second shade of Bastion Grey. Make sure to leave some of the previous shade showing through.
- Step 4) Finally, for the darkest areas and crevasses on the pants, apply a final shade of Thornwood Green.
- Step 5) Finish off the pants by highlighting the raised areas and hard edges with Menoth White Highlight.
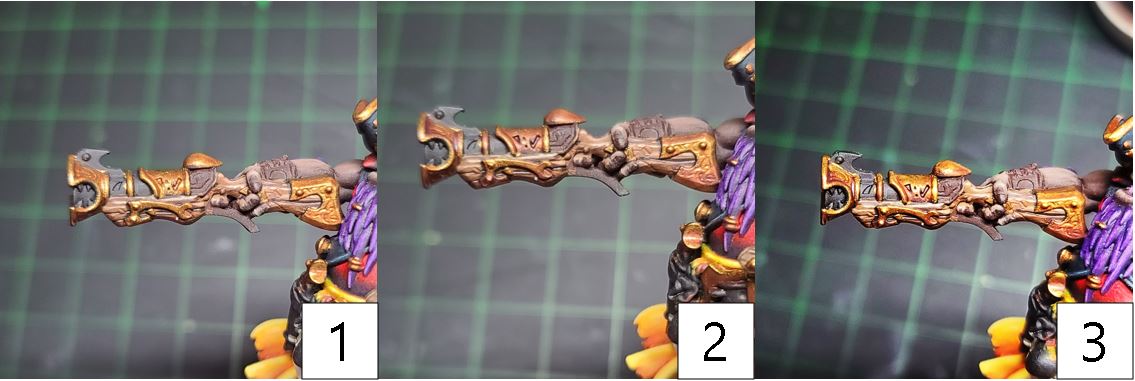
Woodgrain
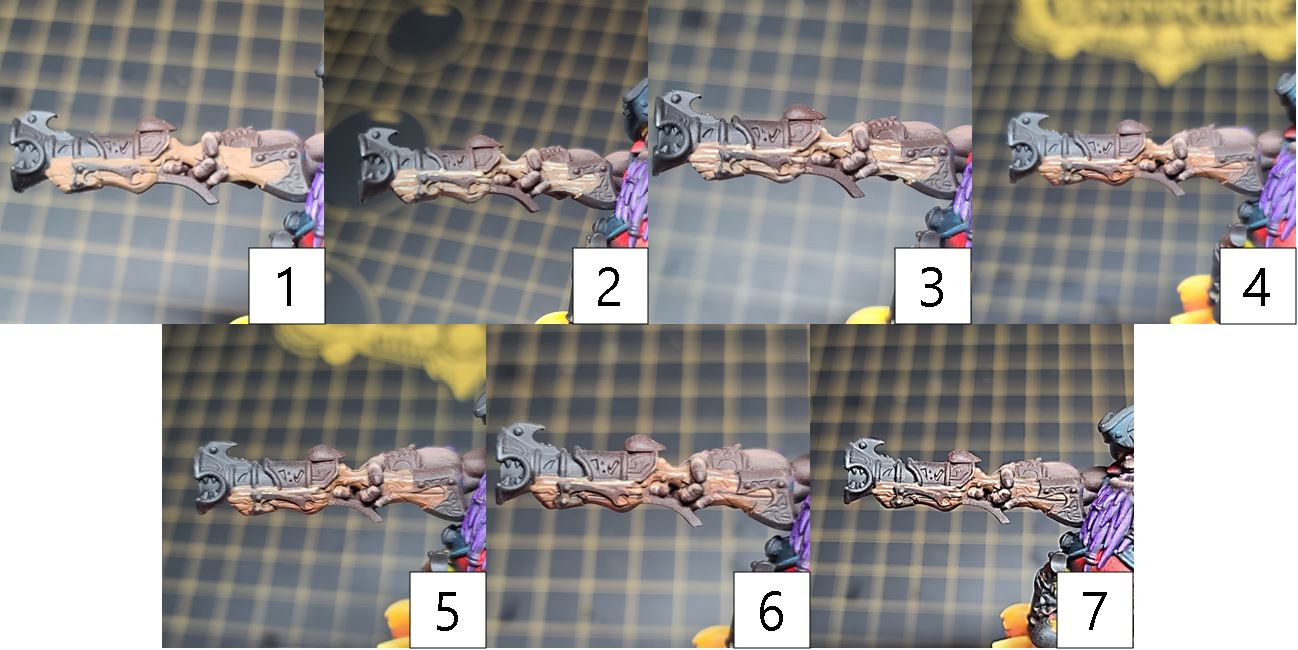
- Step 1) I’ll be using the same tried-and-true method of wood from my past Insiders. I start with a basecoat of Gun Corps Brown.
- Step 2) Next, I use Menoth White Base to draw lines parallel to the wood cracks. Every now and then, I add a dot or a slight swirl to define some rings in the wood.
- Step 3) Similar to the previous step, I use Umbral Umber and follow along the areas of Menoth White Base, creating three layers of similar lines: Menoth White Base, Gun Corps Brown, and Umbral Umber.
- Step 4) To get that stained-wood look, I take Bloodstone, Yellow Ink, and Brown Ink in a 3:2:1 ratio and two-brush blend in some shade. I start at the bottom areas and work my way toward the upper areas of the wood. I make sure to take my time and not go all the way up, as this will help create the stained look and wear.
- Step 5) I repeat the same color as before, but this time I only go about half of the distance. This will create a deep color to the woodgrain.
- Step 6) Next, I add a single drop of Blue Ink to the previous step’s mixture and apply a final shade, again going half of the distance as the previous step to create the deepest shade in my wood.
- Step 7) Finally, to really bring the effect together, I add a drop of Thamar Black to the previous mixture. Using this new color, I go along any wood paneling or places where I would like to define separate from the wood area.
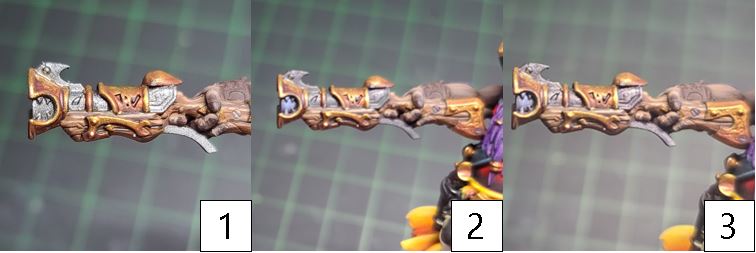
Golds
- Step 1) For the golds, lay down a basecoat using Rhulic Gold.
- Step 2) Begin shading your gold areas with a mixture of Rhulic Gold, Yellow Ink, and Brown Ink. Blend this mixture into the shadows.
- Step 3) To darken the shade and add some color, mix Umbral Umber, Sanguine Base, and Brown Ink together. Apply this as your deepest shadow.
- Step 4) Next, add your first layer of highlights using Solid Gold.
- Step 5) Once the model has been sealed with a matte sealant, return to the area with a mixture of Solid Gold and Cold Steel. Use this mixture to reclaim some of the vibrancy lost by the matte sealant and to punch up the highlights.
Silvers
- Step 1) For my silvers, I apply a basecoat of Pig Iron.
- Step 2) I start my shade with a mixture of Exile Blue and Brown Ink. I lay this color down in glaze, making sure to not let the color pool up in the recesses.
- Step 3) For my final shade, I mix Cryx Bane Base, Green Ink, and Brown Ink together. I blend this color into the deepest recesses and darkest areas.
- Step 4) Finally after the model is sealed, I return to the area with Quick Silver to punch up the final highlight and return some of the shininess lost by the matte sealant.
Teeth and Fingernails

- Step 1) Next, let’s put some ugly on those teeth and nails. Start with a basecoat of Bloodstone.
- Step 2) Now work up your highlight using Rucksack Tan. Make sure to let areas of the previous color show through on the bottom.
- Step 3) Finally, add a few edged highlights of Menoth White Base to get that weathered teeth and nails look.
Starfish
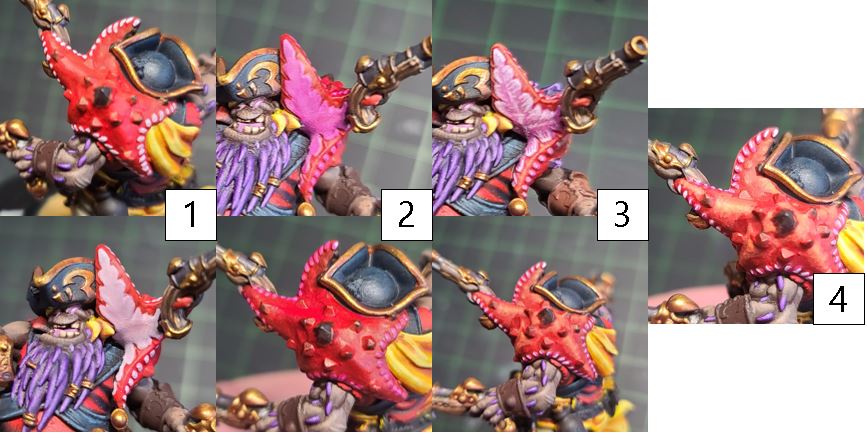
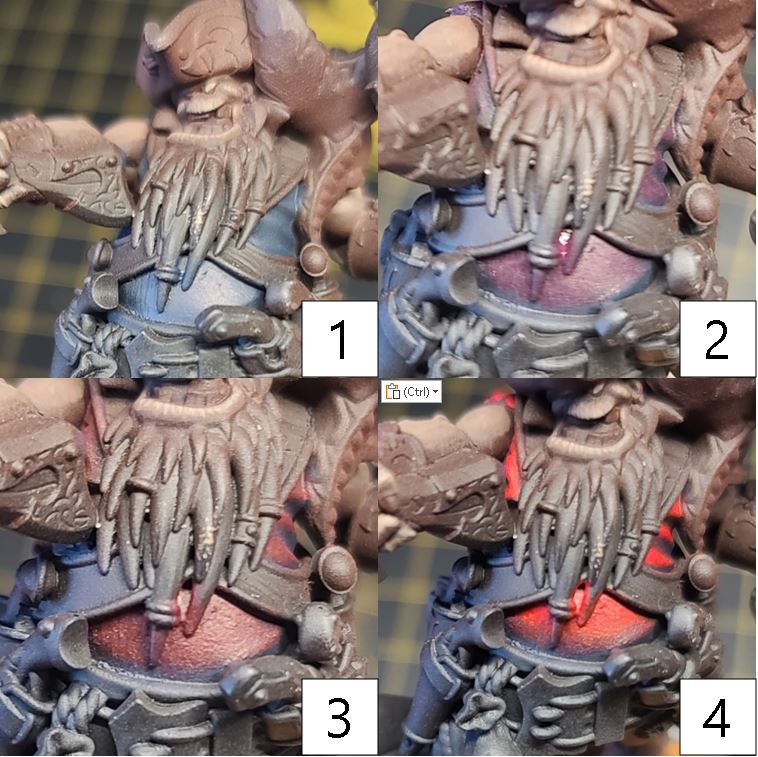
- Step 1) Time for the part I struggled with the most on this model: the starfish. I tried four or five different colors and variants before determining this process. So, here it is: I start with Khador Red Base for any area of the main body and with Carnal Pink on the lighter areas.
- Step 2) To create some shades across the whole area, take Piggy Purple Ink and thin it out to a glaze with some water. I usually go 16 drops of water to one drop of Piggy Purple Ink. Apply thin coats of this color across the area, making sure that the mixture doesn’t pool up in any of the recesses. I’m just looking to shift the base colors here to create my shadows.
- Step 3) Next, I reapply the base colors over the area, making sure to leave areas of the previous steps showing through.
- Step 4) Finally for the upper highlight on the red tones I apply Khador Red Highlight to the uppermost areas. Additionally, I apply a few drops/splotches to area to give it that starfish skin look.
- Step 5) For the purplish areas, I go back and use the same Purple formula as before.
Brown Leathers
- Step 1) For the brown leathers, start by laying down a solid coat of Idrian Flesh.
- Step 2) Next, blend Umbral Umber into the recesses to create your first shade.
- Step 3) For your next shade, mix Brown Ink and Thamar Black together and apply to the deepest areas and any area you need to show separation in the leathers.
- Step 4) Begin highlighting using a layer of Bootstrap Leather.
- Step 5) Finally, pick out the most raised areas, hard edges, or anywhere you want to show the leather wearing by mixing Bootstrap Leather with Rucksack Tan.
Barnacles
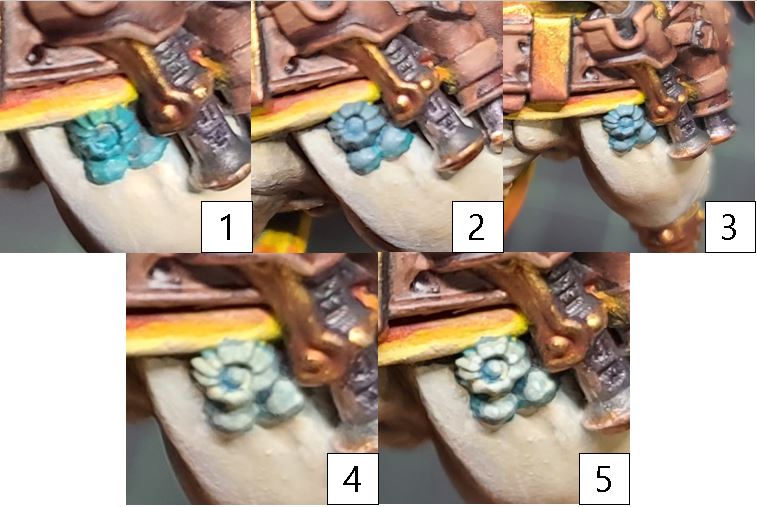
- Step 1) Lastly, let’s knock out the barnacles on Firequill. I start with a mixture of Gravedigger Denim and Eldritch. Apply this to the areas as a basecoat.
- Step 2) I begin my highlights with a layer of Gravedigger Denim, making sure, as always, to leave some of that previous layer showing through.
- Step 3) Continuing to build up the highlights, I mix Gravedigger Denim and Hammerfall Khaki.
- Step 4) Time to shift the colors toward white with a layer of Menoth White Base.
- Step 5) Finally, to finish off the barnacles, I add a few upper highlights of Menoth White Highlight.
With that, Captain Firequill is ready to take control of the battlefield…er, ocean…field.

Join me next time for part 2, where my list will “start to take flight”!
The post Paiting Captain Firequill appeared first on Privateer Press.