
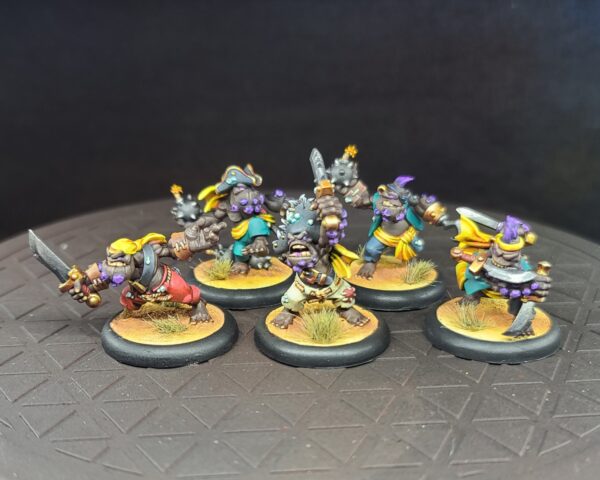
Painting the Pyg Boarding Party
by Charles Foster III
Welcome back to another hobby Insider! A few weeks ago, I set out to get my Brineblood Marauders painted in a single weekend: colors chosen, models assembled and primed. Everything started out just as planned…until about three hours into the project when I started to feel ill. Sadly, a trip to the doctor the next day confirmed the worst: I had COVID, and the models weren’t going to get painted in a single weekend (the doctor didn’t tell me that; I surmised it on my own). While disappointing, it did present an opportunity to turn them into a few Insiders to share with you here.
With Warfaire Weekend only a few more weeks out, I gotta get these models painted. For the first Insider, I want to get some model variance, so I can test out my paint scheme. To achieve this, I’m going to go ahead and tackle the Pyg Boarding Party unit from the Brineblood Marauders starter. Time to grab some paint and brushes to get my alternate Brineblood Marauders paint scheme rolling!
Colors Used
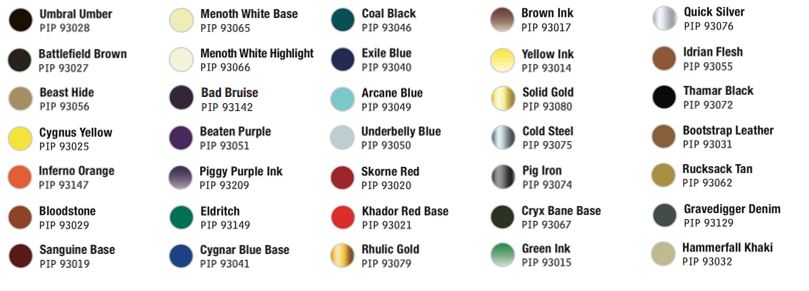
Skin Tones
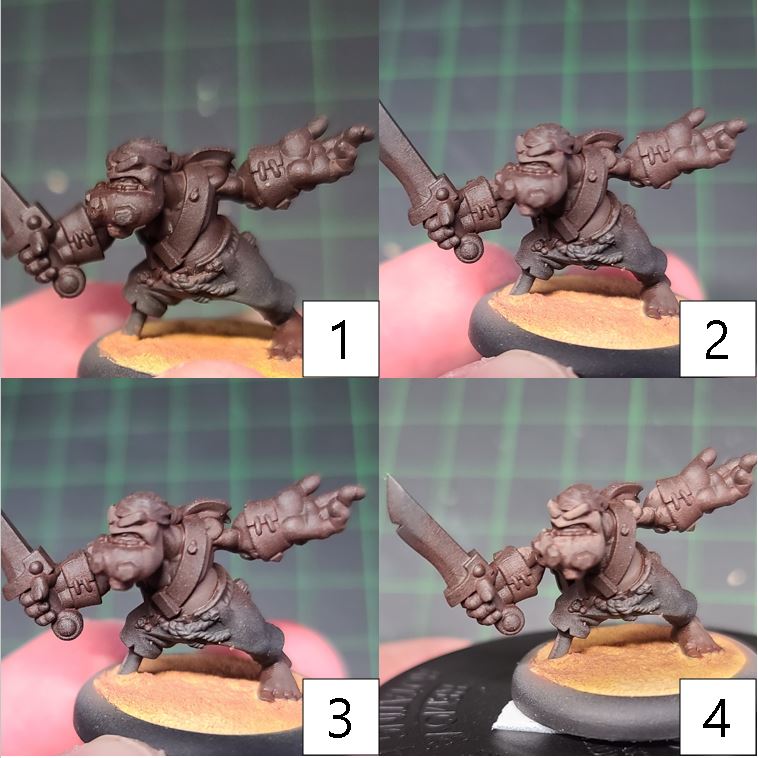
- Step 1) To start my crew of Marauders off, I base the skin in Umbral Umber. To help speed up the painting, I use an airbrush and lay down this basecoat on all the models.
- Step 2) Since I’ve started off with the darkest color for my skin tones, I’ll be working up through layers of highlights to create the definition. For my first highlight, I’ll add a layer of Battlefield Brown.
- Step 3) For the second layer of highlights, I add a few drops of Beast Hide to Battlefield Brown and apply this to the raised areas on the skin tones.
- Step 4) For the final highlight, I apply Beast Hide to the highest points and edge highlights.
Yellows
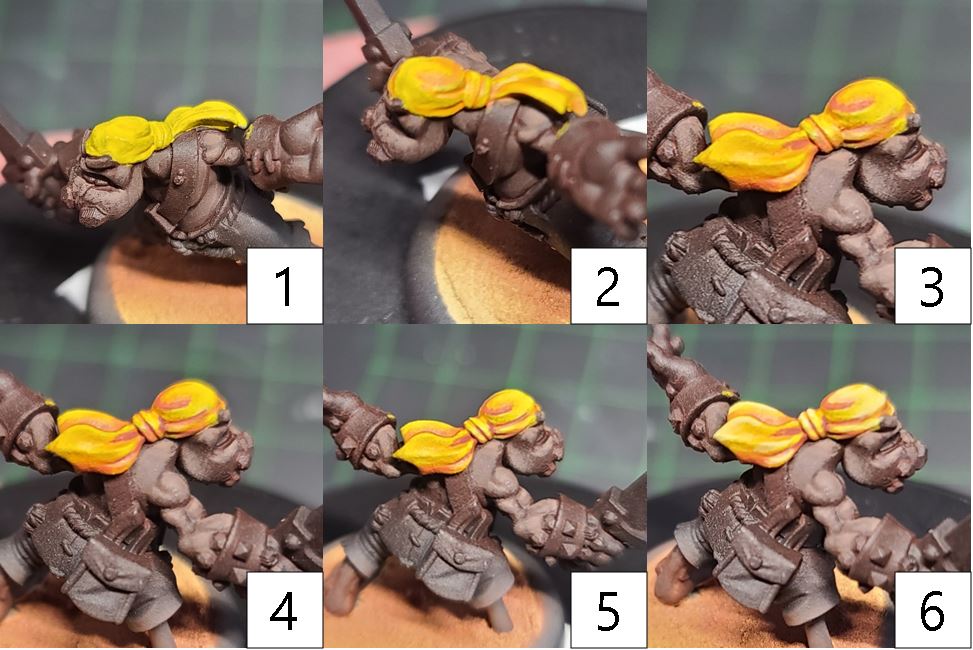
- Step 1) With the skin tones wrapped up, it’s time to add a bright focal point to the models, and I think adding a yellow will complement the skin. Looking at the models, you’ll note that all have a sash or bandana, so these will probably be the best areas to add a similar color on the models. Basecoat each area using Cygnus Yellow.
- Step 2) Start shading the color with a mixture of Cygnus Yellow, Inferno Orange, and Bloodstone. Blend this mixture into the recesses of each area.
- Step 3) Next, continue your shading by mixing Bloodstone with Inferno Orange.
- Step 4) For the final shading, add a drop of Sanguine Base and Umbral Umber to the previous step and blend this into the deepest areas of shadow on the model.
- Step 5) For the first layer of highlights, mix Cygnus Yellow with a few drops of Menoth White Base. Apply this mixture to any raised surfaces and higher points on the cloth areas.
- Step 6) Finally, to bring this all together and make the colors pop, add a few drops of Menoth Highlight to the previous mixture for a final highlight to the areas.
Purple
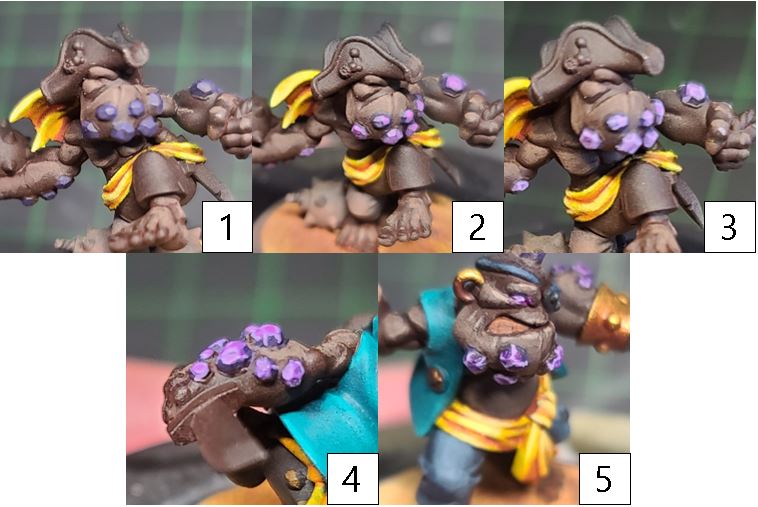
- Step 1) With a bright yellow on the cloth and brown color for the skin tones, I decide on purple for the chitins. I start off with a basecoat of Bad Bruise.
- Step 2) I use Beaten Purple as my first highlight. I make sure to leave areas of the Bad Bruise showing through.
- Step 3) To continue my highlights, I mix Beaten Purple with Menoth White Base and apply to the hard edges of the rocky features.
- Step 4) To blend these colors together, I take Piggy Purple Ink and thin it out with water. I usually do about 14 drops of water to 1 drop of Ink. I want this really thinned out, and then I start applying some glazes of ink all over the chitin areas. Be patient—it can take 8–14 layers to build up the look we’re going for.
- Step 5) Finally, to make the areas pop, I mix Beaten Purple with Menoth White Highlight and apply a few spots of hard-edged highlights to the rocky formations.
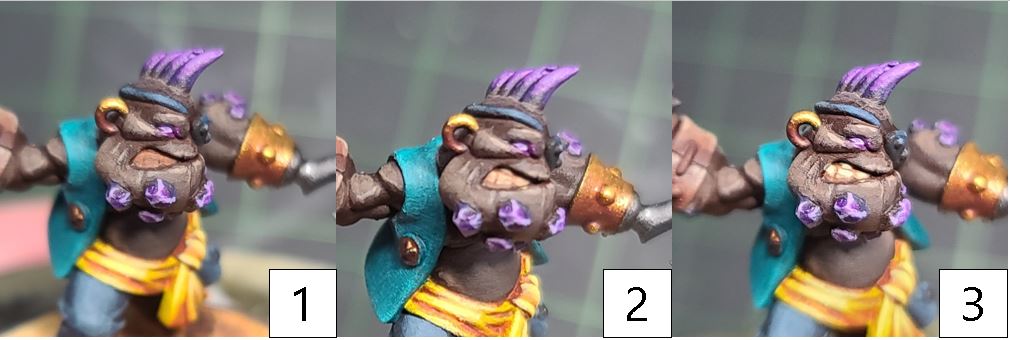
Teal
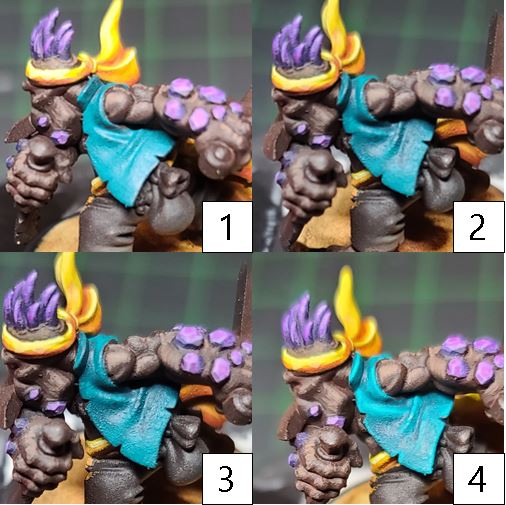
- Step 1) With the purple complete, it’s time to continue the bright colors with some teals. Start your teal areas off by mixing Eldritch with a drop of Cygnar Blue Base.
- Step 2) To shade your teal areas, mix Eldritch with Coal Black and a drop of Exile Blue. Blend this mixture into your shadows and recessed areas. Be careful with the Exile Blue, as it can quickly overtake the Eldritch if you use too much in your mixture.
- Step 3) For your first highlight, mix Eldritch with Arcane Blue. Apply this color to your raised areas.
- Step 4) Finally, to add that special pop to the color, add a drop of Underbelly Blue to the previous mixture and apply to the highest edges.
Red Pants
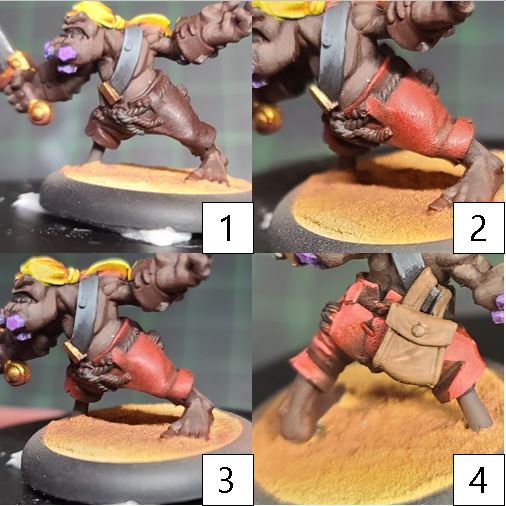
- Step 1) To make sure I get all of the best ’80s color pallets together, I think adding in some red pants are called for. I start off the red pants by laying down a dark brownish red with a solid basecoat of Umbral Umber.
- Step 2) Working up in highlights again, I’ll add a layer of Skorne Red. I take time to make sure some of that Umbral Umber is showing through from the layer below.
- Step 3) Next, I continue working my highlights up by adding a layer of Khador Red Base.
- Step 4) Finally, I mix Khador Red Base with Menoth White Highlight and apply a few hard-edge highlights to really define the area.
Gold
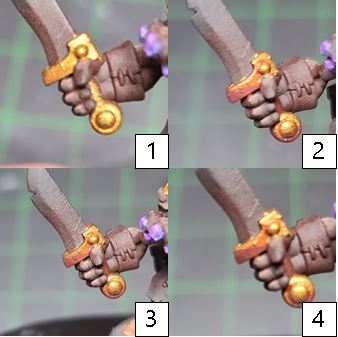
- Step 1) Every pirate needs a little gold! Start your gold areas off with a basecoat of Rhulic Gold.
- Step 2) Using two-brush blending, shade the previous step with a mixture of Rhulic Gold, Brown Ink, and Yellow Ink.
- Step 3) Continue shading the areas with a mixture of Umbral Umber, Sanguine Base, and Brown Ink. Apply this mixture to the deepest shadows and recesses on the model.
- Step 4) For highlights, start off with applying Solid Gold to the highest edges and raised areas.
- Step 5) Finally, after the model is sealed with a matte sealant, return to the area with a mixture of Solid Gold and Cold Steel for a few hard-edged highlights to return that metallic look to the model.
Silvers
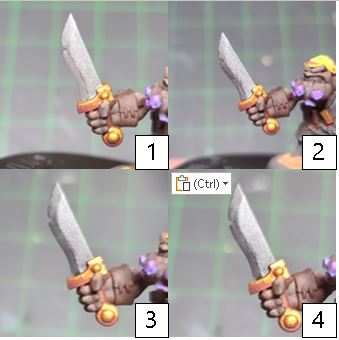
- Step 1) Next up, time to tackle all of the silver metals on the model. I begin by basecoating the areas in Pig Iron.
- Step 2) I start my shading off by blending a mixture of Brown Ink and Exile Blue into the shadows of the area.
- Step 3) I continue my shading with a mixture of Cryx Bane Base, Green Ink, and Brown Ink, using this color to define the darkest areas and any place that needs separation from another.
- Step 4) Finally, once the model is sealed with a matte sealant, I’ll return to the area with Quick Silver for my highlights to make the silver areas shine bright.
Leathers
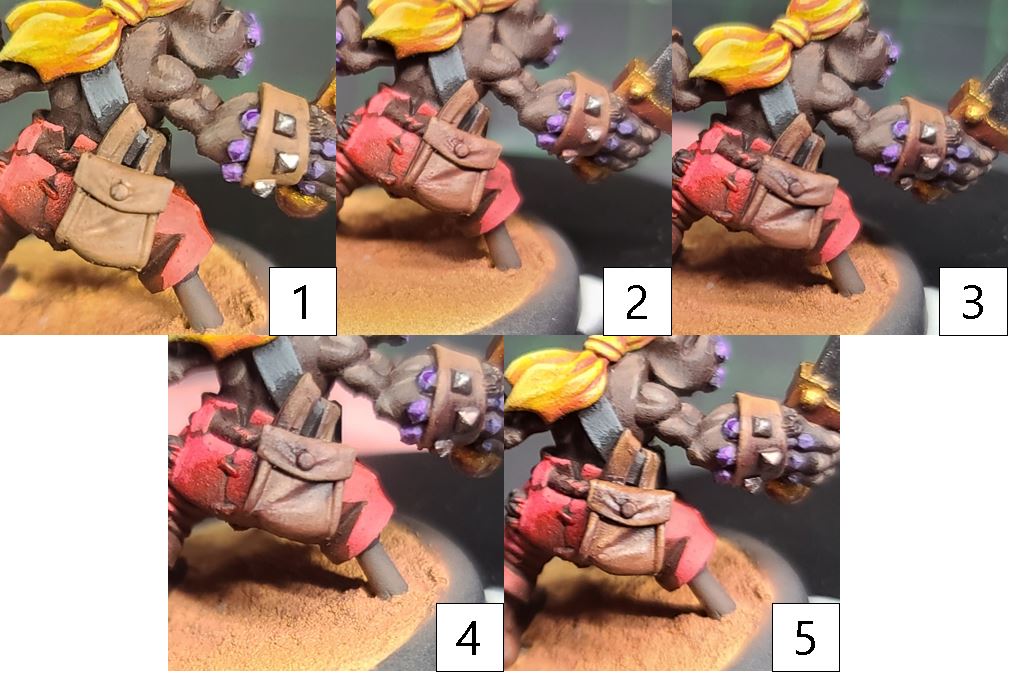
- Step 1) For all leather areas on your models, start with a solid base of Idrian Flesh.
- Step 2) For the first layer of shading on your leathers, blend Umbral Umber into the recesses of the area.
- Step 3) Continue shading by creating a final shadow of Brown Ink mixed with a dot of Thamar Black. Blend this into the deepest areas on the leather.
- Step 4) For the first highlight, use Bootstrap Leather and blend a highlight from the uppermost areas towards the mid-tone of the first step.
- Step 5) Finally, mix Bootstrap Leather with Rucksack Tan and apply a few final highlights to the leather surfaces.
Teeth and Fingernails
- Step 1) Time to add some flavor to the models with dirty fingernails and yellowed teeth. I start with a basecoat of Bloodstone to any of the teeth, fingernails, and toenails.
- Step 2) I continue working up the color with a layer of Rucksack Tan. I make sure to leave the previous color of step 1 showing through in some areas.
- Step 3) For my final highlight, I use Menoth White Base, applying this to the uppermost areas. Look at that smile!
Ropes
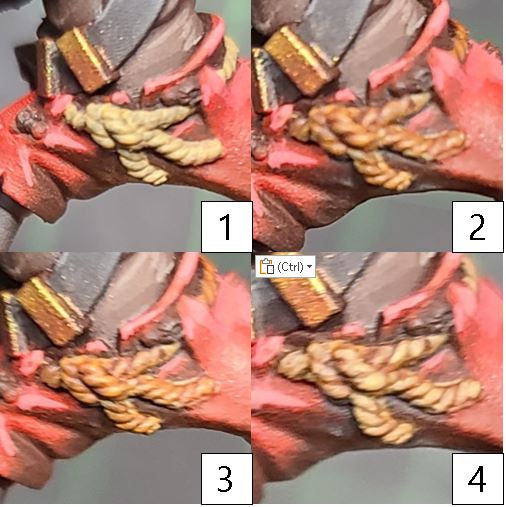
- Step 1) For the ropes on the models, start with a basecoat of Rucksack Tan.
- Step 2) To shade the area, use Brown Ink and add water. With this thinned-out ink, apply an even coat over the area and allow to dry before continuing.
- Step 3) Once the ink is dry, apply Rucksack Tan to the upper raised areas. The ink from the previous step creates a perfect natural shade for the ropes and the Rucksack Tan creates the perfect highlight.
- Step 4) Finally, to finish the look on the ropes, apply Menoth White Base as the last highlight to the areas.
Barnacles
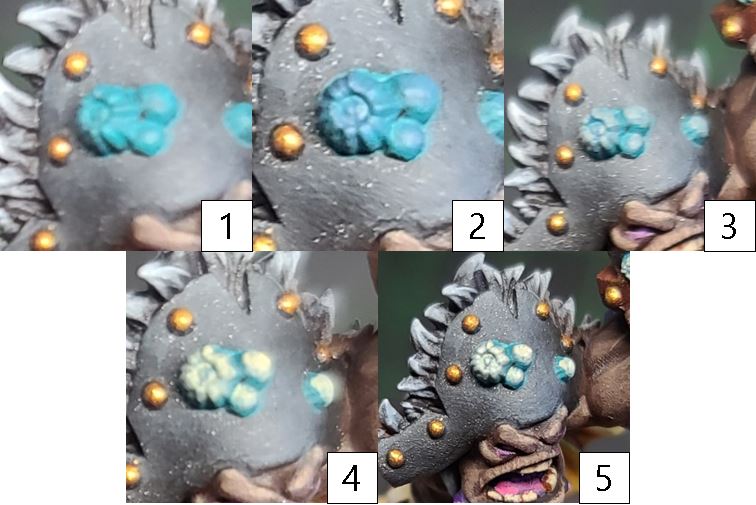
- Step 1) To finish off the models, it’s time for some barnacles. I start the barnacles off by basing the areas in Eldritch.
- Step 2) For the first highlight, I mix Gravedigger Denim and Eldritch and apply this color to the areas, making sure to leave the color from the previous step showing through slightly.
- Step 3) For the second highlight, I use Hammerfall Khaki. I again apply this color so as to leave sections of the previous colors showing through.
- Step 4) For the third highlight, I add some lines of Menoth White Base to the previous section.
- Step 5) Finally, I apply a small amount of Menoth White Highlight to the highest raised areas.

And with that, the Pygs are ready to board the tabletop! I think I’m really going to have some fun with this paint scheme, so join me next time as I get my first ’caster ready with Captain Firequill!
The post Painting the Pyg Boarding Party appeared first on Privateer Press.