
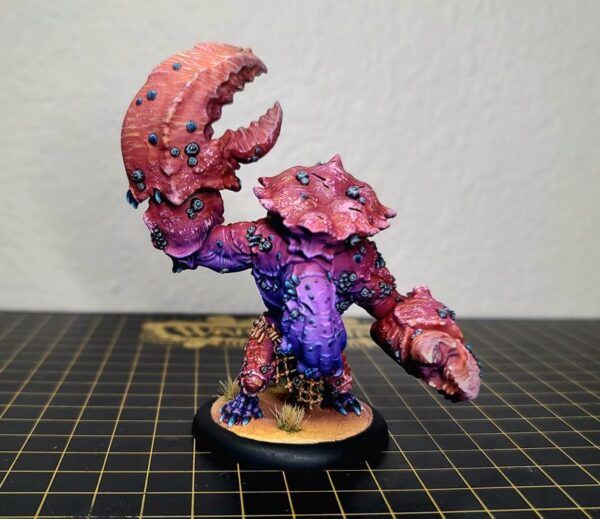
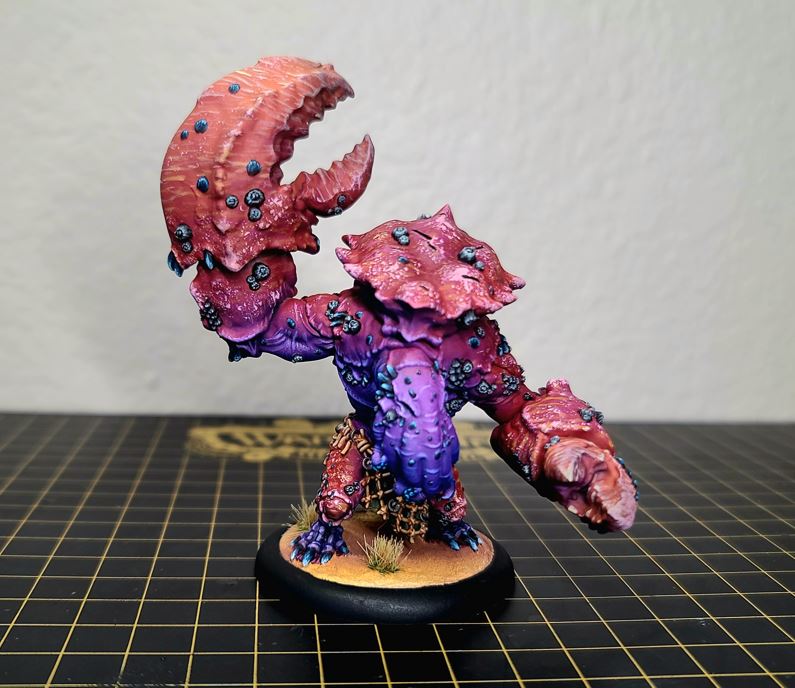
Painting The Great Old One
by Charles Foster III
Hello, Hobbyists, and welcome to another painting Insider!
With the clock running short, I did manage to put together a final hobby Insider on the road to Warfaire Weekend series. Sadly, I ran out of time to get the photos and text uploaded before leaving for the event. So, although the weekend has come and gone, I’m happy to share with you how I painted the Great Old One! Grab some brushes and paint and let’s get to it together!
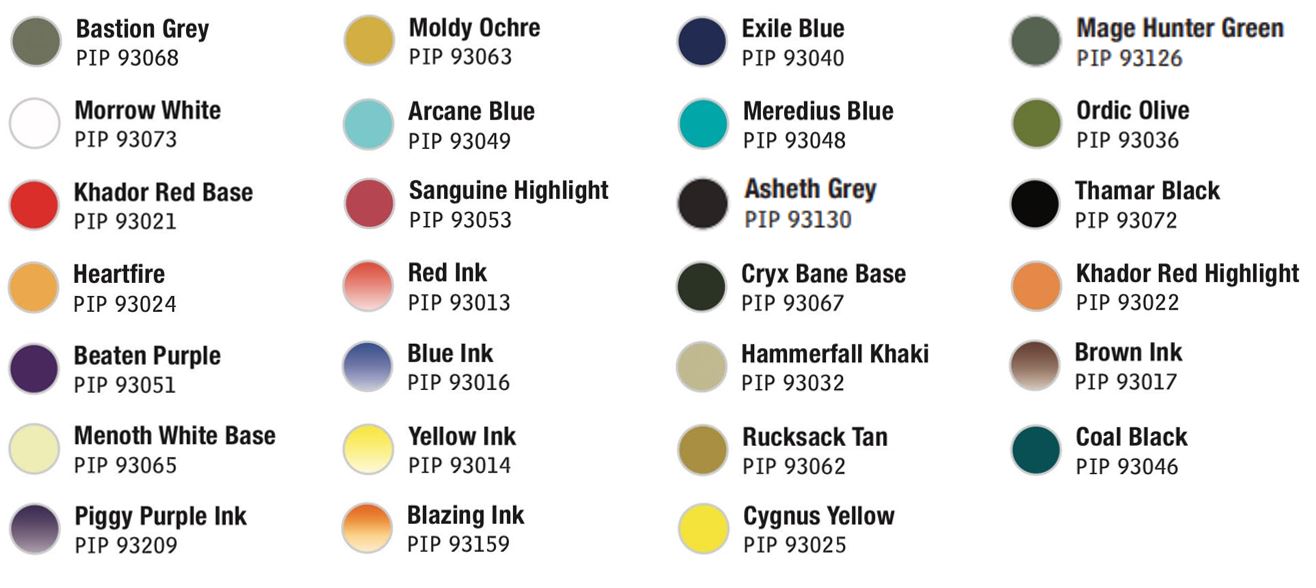
Colors Used
Priming Setup
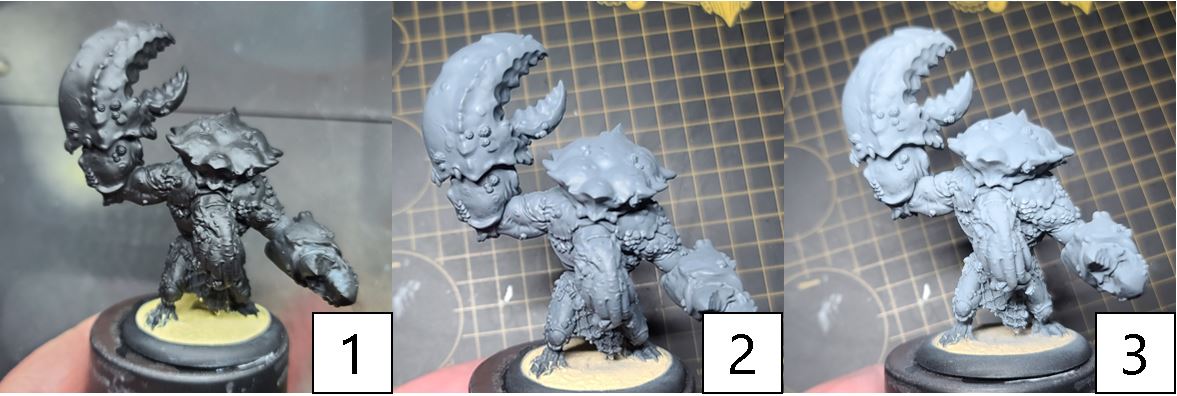
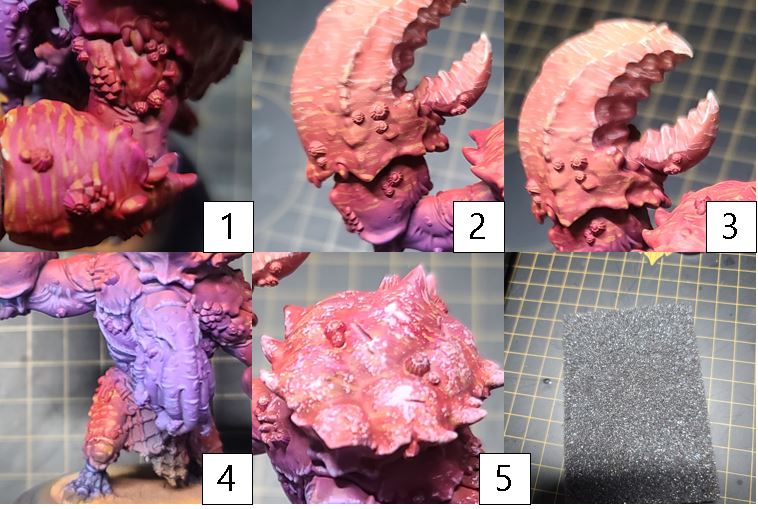
Step 1) To set up this crustacean for success, I want to use a common airbrushing painting trick known as a “zenithal highlight.” Just as with most models, I start off with a solid coat of black primer.
Step 2) Next, using an airbrush, I create the area of the mid-colors by spraying a layer of Bastion Grey around a 45-degree angle, focusing on the middle and upper areas of the model.
Step 3) Finally, for the upper area, I spray on Bastion Grey mixed with Morrow White directly over the top of the model. Spraying color over the top of this will create natural highlights and smooth transitions to deep shadows without requiring all of the typical blending.
Basecoats and First Wash
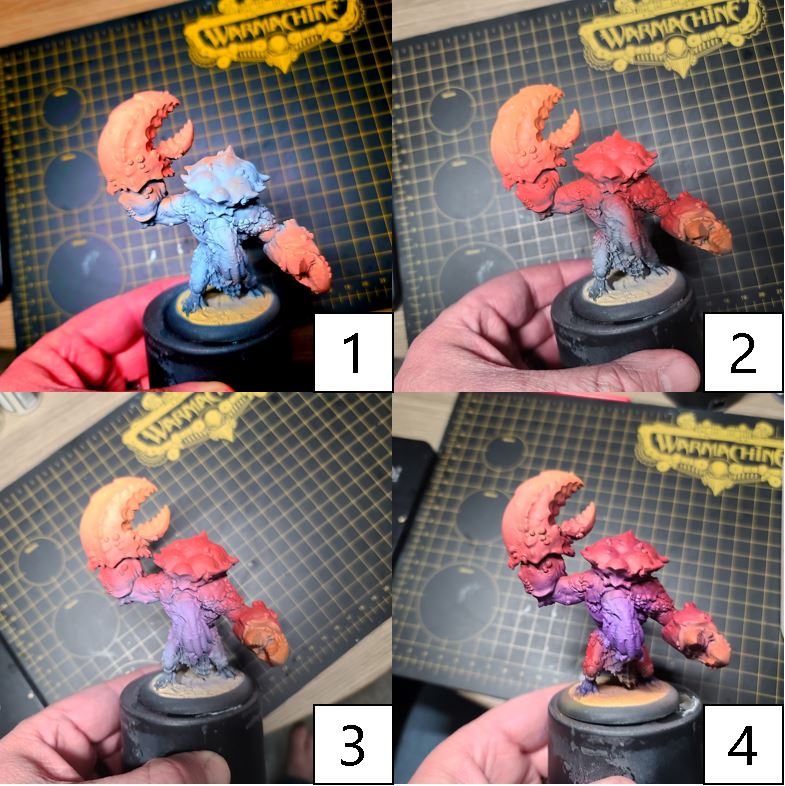
Step 1) Time to add some color to the model! Start with your airbrush and spray on a basecoat of Heartfire mixed with Khador Red Base plus a drop of Menoth White Base. Focus on the claws with this color.
Step 2) Next, add in the main color of the red by airbrushing on Khador Red Base. This goes over the main upper body areas and the upper legs.
Step 3) Finally, to finish off the main colors, airbrush on Beaten Purple with Menoth White Base.
Step 4) To blend the colors together, use Piggy Purple Ink thinned way down with water. (Typically, a ratio of 16:1 of water to Piggy Purple Ink gets a great-looking result.) Lightly add this color to the areas in order to help transitions and to shift the tone of the model to a more unified feel. For the best results, don’t let any of the ink pool up—take your time and do small areas as you move across the model.
Building Areas of Interest
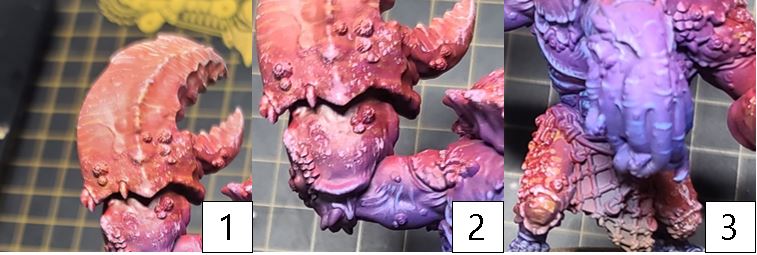
Step 1) I want to develop areas of interest on the model to catch your eye. To do this, I mix Cygnus Yellow with Khador Red Highlight. Instead of pursuing normal highlights, I do small lines of lateral striations running across the red areas.
Step 2) For the orange areas, I use Menoth White Base and a small dot of Khador Red Highlight—again, applying them in striation patterns running across the area.
Step 3) At the tips of the orange area, I continue my striation pattern by mixing Moldy Ochre with Menoth White Base.
Step 4) For the violet areas, I mix Beaten Purple with Arcane Blue and apply both striations as in the previous steps, and I add a few small areas of normal highlights to the chest and leg areas.
Step 5) Finally, I bring it all together with some sponge. What I mean by that is that I mix Sanguine Highlight with Menoth White Base and apply splotches of this color using a piece of old foam.
Ink It Up!
Step 1) Time to start creating depth in the colors and blending the transitions together. For all of the red areas, thin out Red Ink and Piggy Purple Ink with water in a 3:1:16 ratio and apply sparingly.
Step 2) For the purple areas, we can darken the shadows and bring a bit more vibrancy to the color. To do this, take a drop of Blue Ink, thin it out with water, and apply this ink to the shadows.
Step 3) Finally, for the orange areas, we can add color by mixing Yellow Ink with a drop of Blazing Ink and thinning it out with water before applying this color sparingly to the area.
Growths

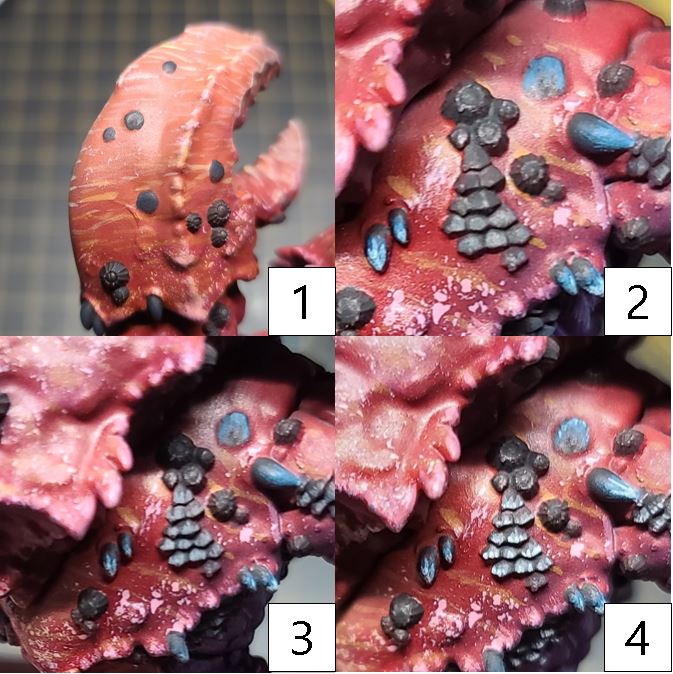
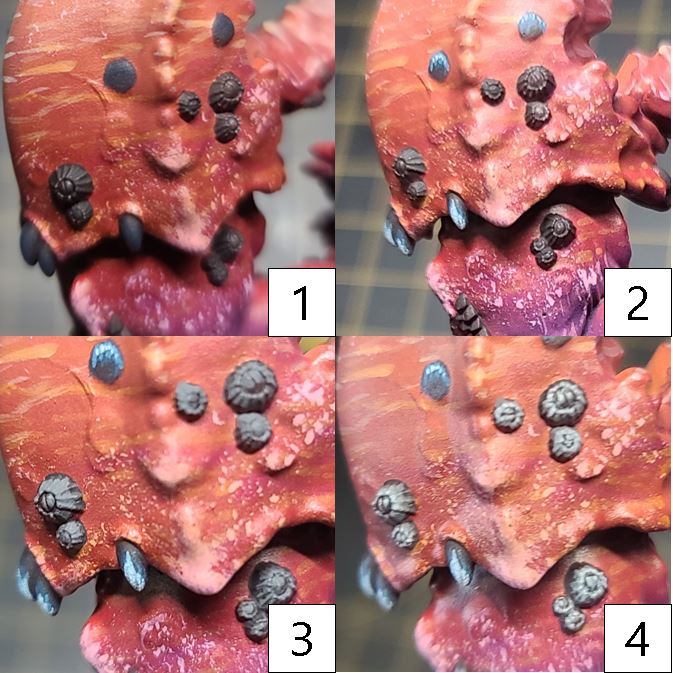
Step 1) Time to tackle the growth and raised areas. Since the rest of the model is extremely vibrant, using darker colors on the growths, muscles, and barnacles will really help make the colors stand out even more. I start all of the areas off with a solid basecoat of Thamar Black.
Step 2) For the growth’s first highlight, I mix Coal Black, Exile Blue, and Thamar Black together.
Step 3) For my second highlight, I mix Coal Black, Exile Blue, and Meredius Blue, making sure that as I apply it, I leave areas of the previous steps showing through.
Step 4) Finally, I add a few lined highlights of Arcane Blue.
Muscles
Step 1) For the muscles, as I did previously, start with a basecoat of Thamar Black.
Step 2) We want to differentiate the three dark areas with slightly different colors. Since we went with blue hues on the growth, let’s stay on the neutral side using greys here. Start your first highlight with Asheth Grey.
Step 3) To continue highlighting, mix a heavier amount of Asheth Grey and just a drop of Morrow White to form the final highlight.
Barnacles
Step 1) Since we’ve done neutral grey and blue-grey, I think it’s time for a greenish grey. For the barnacles, I start by basing the areas with Thamar Black again.
Step 2) To move the highlights toward green, I apply a first highlight of Cryx Bane Base.
Step 3) Making sure to leave the colors from the previous steps showing through, I add Cryx Bane Base and Hammerfall Khaki together for my next layer of highlight.
Step 4) Finally, I use a little Hammerfall Khaki to bring some brighter highlights to the area.
Cloth
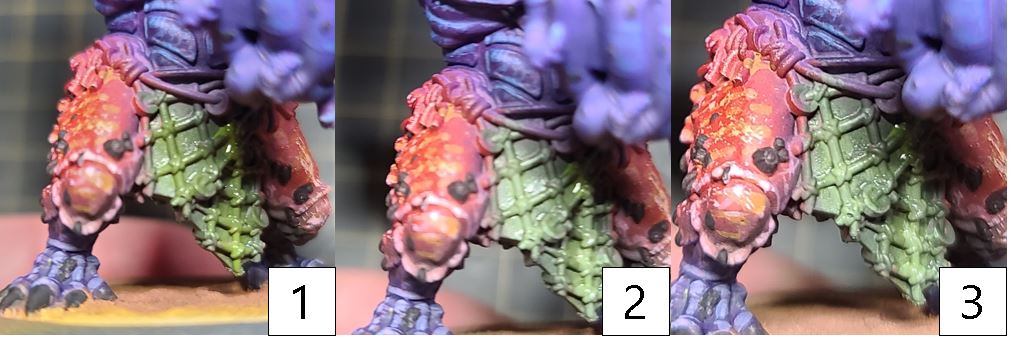
Step 1) While we could just paint the netting and call it done, the fabric in the loin cloth provides another area to add just a little bit of contrast and additional color. So, start this area with a solid basecoat of Ordic Olive.
Step 2) To highlight this area, mix Mage Hunter Green and Ordic Olive together and then apply this to the slightly raised areas of the fabric.
Step 3) Finally, on the highest areas of the cloth, add additional highlights using Mage Hunter Green.
Net
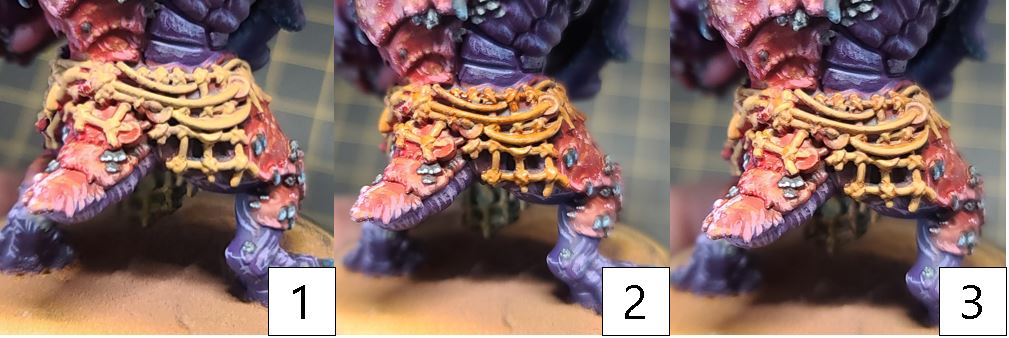
Step 1) Lastly, we need to finish off the net! I start off by basecoating the material in Rucksack Tan.
Step 2) To create some natural shading for the area, I thin out some Brown Ink with water and apply it as a wash over the area. I take care not to get any greens on the cloth below.
Step 3) Next, to reclaim some of the base color, I’ll return to the area with Rucksack Tan. I make sure to leave areas of the previous steps showing through, of course.
Step 4) Finally, I add a highlight of Menoth White Base to any raised areas to finish off the net…and this model!
I’ve been painting non-stop for the last three weeks leading up to Warfaire Weekend. So much paint, but it was 100% worth it—and what a great time it was! I’m already inspired for my next projects by everyone I encountered throughout the event. But we are now entering into the fulfillment stages for the Kickstarter Into the Deep Wild, which will take the majority of my time for the rest of 2023. I hope to have one or two more articles still to close out the year, and I’m already getting pumped up for my 2024 projects. To everyone who came by to check out the painting or chat about the hobby aspects, thank you so much!
Until next time, Hobbyists!
The post Painting The Great Old One appeared first on Privateer Press.