
Painting The Deepborn Dire Troll
by Charles Foster III
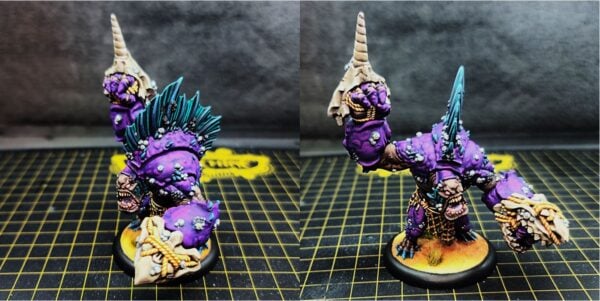
Hello, painters and hobbyists! Welcome back to another Painting Insider. Last time, we threw paint on the Orgoth Cadre warcaster Oriax. This time, we’re going back to the Brinebloods and getting an alternate paint scheme on the Deepborn Dire Troll. So, let’s grab some paint and get rolling!
Colors Used

Skin Tones

Step 1) I start off with the darker color on the skin using a basecoat of Umbral Umber.
Step 2) Next, I continue working the color up by adding a layer of Battlefield Brown.
Step 3) For the next layer, I mix in a few drops of Beast Hide to the Battlefield Brown and apply this to the upper areas and raised edges.
Step 4) Finally, to finish off the skin tones, I apply a few stark highlights of Beast Hide to the uppermost areas and raised edges.
Purples

Step 1) For the next area of the model, it’s time to tackle the purple crustacean shell. Start with a solid basecoat of Bad Bruise.
Step 2) Next, continue building up the color with a layer of Beaten Purple. Make sure to leave areas of the Bad Bruise showing from the previous step to help create depth.
Step 3) Finally, take some Beaten Purple and a few drops of Menoth White Base and apply this to the upper areas and the raised edges of the model. Don’t worry if this looks too bright—we will be glazing it in the next step to bring it all together.
Step 4) Now, take some Piggy Purple Ink and thin it down with some water. I typically go for a 14:1 ratio of ink to water. Using this thinned-out color, apply a glaze to the area. Use even, thin coatings and do your best not to let it pool up on the model. This step is used to shift the colors and create a more saturated hue.
Step 5) Finally, using Beaten Purple and a drop of Menoth White Base, apply some final edge highlights.
Quills and Spikes

Step 1) With the purples completed, it’s time to move onto the quills and spikes. I start with a mixture of Exile Blue and Coal Black.
Step 2) Next, I continue bringing the color up by adding a drop of Cygnar Blue Base to the previous mixture and working it into the raised areas.
Step 3) I continue to build up the blue color by adding Meredius Blue to the previous mixture and applying this as an additional highlight.
Step 4) Finally, I apply use Arcane Blue to add one final highlight to the tips and raised areas to make the fin stand out.
Fin Webbing

Step 1) With the quills of the fin done, it’s time to get in there and tackle that webbing between them. Start off with a mixture of Eldritch and Coal Black.
Step 2) Next, build up on the highlight by applying Eldritch over the previous area. Allow for the previous darker color to show throw in several places to create depth on the recesses.
Step 3) Finally, mix Eldritch with a drop of Menoth White Base and apply this as the highest highlight for the area.
Bone

Step 1) Next, I move on to the Shark Skull Gauntlet and the Narwal Spear Gauntlet. I start my bone color off by mixing Battlefield Brown and Bootstrap Leather together and applying this as my basecoat.
Step 2) I continue building up the highlight by adding a drop of Menoth White Base to the previous step and applying it over the area, being sure to leave areas of the previous step showing through.
Step 3) For my next highlight, I mix Trollblood Highlight and ’Jack Bone together and apply to the area, focusing on raised edges and protruding details.
Step 4) For my final highlight, I mix Trollblood Highlight and Menoth White Highlight together and apply this mix to the uppermost raised surfaces and any hard edges I would like to draw attention to.
Step 5) Finally, to bring it all together, I make a glaze by mixing Battlefield Brown and Gnarls Green together and watering it down very thin. I apply this across small areas to create some weathering and depth.
Mouth

Step 1) Time to work on the mouth! Basecoat the tongue with Midlund Flesh and Carnal Pink.
Step 2) Then, apply a thinned highlight of Menoth White Highlight over the raised surfaces. Additionally, during this step, mix Midlund Flesh with Coal Black and apply a few spots to the base of the tongue.
Step 3) To create some depth and color, create a glaze for the whole tongue with Murderous Magenta, Red Ink, and water. Concentrate the mixture toward the base of the tongue, making sure to use enough water to thin out the glaze so that the spots can show through. Apply this step in multiple layers if needed.
Step 4) Finally, make a second shade of Bastion Grey plus a drop of Blue Ink. This will complement the blue fins and purple shades on the crustacean parts.
Teeth

Step 1) Next up, I tackle the pearly whites on this cohort. I start by basecoating the teeth in Bloodstone.
Step 2) I add a highlight over the area using Rucksack Tan, making sure to leave some of that Bloodstone showing through.
Step 3) Finally, I lay down a few lines of Menoth White Highlight to bring it all together.
Rope

Step 1) With all bone and teeth completed, it’s time to move onto the ropes. Start by applying a base color to the area of Rucksack Tan.
Step 2) Next, take some Brown Ink and thin it out with water to make a wash and apply this to the rope areas.
Step 3) Once dry, reapply Rucksack Tan to the areas. Make sure to leave some of the previous steps showing through especially the spaces between the notches on the rope.
Step 4) For a final highlight, apply a small line of Menoth White Base to the upper area of the ropes.
Mussels

Step 1) For the mussels, a.k.a. the clam growths, I apply a basecoat of Asheth Grey.
Step 2) Then, I add a highlight of Greatcoat Grey to the raised surfaces.
Step 3) Finally, to give it the crisp look, I add a few sparse highlights of Ironhull Grey.
Barnacles

Step 1) Only one thing left to do: get some paint on those pesky barnacles. Start with an even basecoat of Gravedigger Denim.
Step 2) Next, apply a highlight of Hammerfall Khaki, making sure that some of the Gravedigger Denim shows through from the previous step, especially around where the barnacle contacts the model.
Step 3) Finally, add a few highlights of Menoth White Highlight to the uppermost raised surfaces and hard edges.
With that, the Deepborn Dire Troll is ready for the tabletop, and it’s time to update the painting counter for 100 painted models in 365 days. Join me next time when I tackle pirate-themed objectives for this army! And let me know in the comments on Facebook or on the poll below: do you think objectives should count toward the 100 painted models or not? See you all next time!

Paint Counter: 011/100.
Poll: Should SR 2024 objectives count as part of the 100 models painted?
The post Painting The Deepborn Dire Troll appeared first on Privateer Press.