
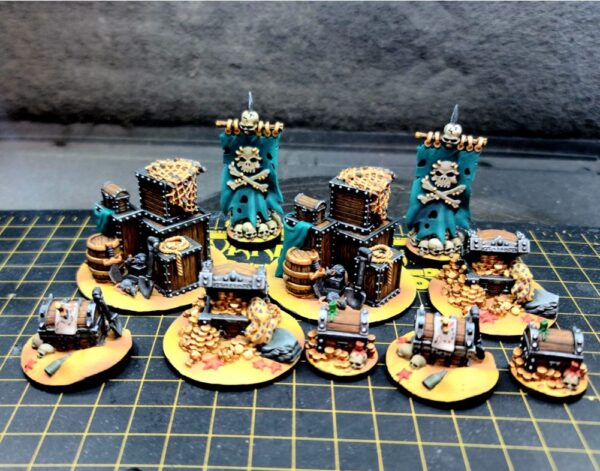
Painting Pirate Objectives
Hello, hobbyists, and welcome back to another Painting Insider!
If you’re like me, you’ve shown up too many times at the local store for events with shameful unpainted objectives to play scenarios like Steamroller 2024. Well, with another event looming on the horizon this upcoming week (at the time of writing, anyway), I’ve decided to be unpainted no more! So, join me while I grab some paint and brushes and get some color on my Pirate Objectives.
Colors Used

Basing

Step 1) With time on the clock very short for me, I need my paint scheme for these objectives to look like my Brineblood army but to take the shortest amount of effort possible. So, for this article, I will be focused on speed and minimalist effort with maximum return to make sure everything gets done quickly—and before the event. Unlike my other models, there isn’t a need for basing materials here, as it is part of the model itself. To basecoat the models, I use Menoth White Base and airbrush this over the models to save time. This and the following steps can totally be done with a normal brush, but an airbrush, if available, will greatly save time.
Step 2) Next, I apply Borgin Brown to the shadows and areas I would like to show definition in. Making sure to leave areas of that Menoth White Base showing around the tips and edges helps give a nice color palette to the area.
Step 3) To finish off the basing color, I add a drop of Amethyst Rose to the previous mixture and blend/airbrush this into the deepest areas and ridges of the sand. I’m careful not to add too much Amethyst Rose to the previous color—we’re looking for a nice almost rusty color here.
Wood

Step 1) With the basing complete, it’s time to tackle all of the wood on the various objectives. Previous Insiders have shown a seven-step process that makes a very rich vibrant wood, but with time short, let’s see if we can cut a few steps out and still get something that looks great. Start with a basecoat of Battlefield Brown.
Step 2) Next, create a highlight layer using Bootstrap Leather. Make sure to leave the deeper areas of color showing through to help define the wood structure look.
Step 3) For the final layer highlight, use Menoth White Base to draw in the woodgrain to the area by drawing in small linear lines with the occasional break.
Step 4) To bring the look together, thin out some Brown Ink with water and apply this to the area in an even glaze. Try not to let the Brown Ink build up or collect in the areas. We want to make sure we get nice, even coats and shift the color tones to look more like grainy wood. Apply each layer and let it fully dry before applying the next until the desired look is achieved.
Gold

Step 1) It’s time to fill the treasure chests and the rest of the model with the golds. I start with a solid basecoat of Rhulic Gold.
Step 2) For shading, I make a wash by mixing equal parts Sanguine Base, Yellow Ink, and Brown Ink. I apply this evenly across the areas and into the recesses.
Step 3) For my first highlight, I apply Solid Gold to the raised areas and surfaces.
Step 4) Finally, after the model is sealed, I return to the area for one more final glinting highlight of Solid Gold mixed with Cold Steel.
Silver

Step 1) Next, it’s time for some quick and dirty silver metals. Basecoat the areas with Pig Iron.
Step 2) To shade the area, apply a wash of Armor Wash. Be careful not to get any of this on other areas such as the woodgrain or the gold.
Step 3) With the wash dry, apply a highlight of Cold Steel to the raised surfaces and hard edges.
Step 4) Similar to the gold metals, after this model has been sealed with a matte sealant, return for one final glinting highlight of Quick Silver.
Teal Cloth

Step 1) To get some vibrancy on the models and make them stand out, I have decided to do a teal color on the cloths. I mix Eldritch and Trollblood Base together and apply it to the areas as my basecoat.
Step 2) For shading, I add Coal Black to the previous step and blend it into the shadows and darker areas of the cloth.
Step 3) Finally, I mix Menoth White Base with Eldritch and Trollblood Base to create a bright highlight for any raised surfaces or edges.
Skulls

Step 1) Next up: all of the various skulls. Start by mixing Battlefield Brown and Bootstrap Leather together and applying this as a basecoat.
Step 2) For a first layer of highlight, add a small amount of Menoth White Base to the previous step and apply it over the area, being sure to leave areas of the previous step showing through.
Step 3) Next, mix Trollblood Highlight and ’Jack Bone together and apply to the area, focusing on raised surfaces while making sure that the previous step’s colors continue to show throw.
Step 4) For the final highlight, mix Trollblood Highlight and Menoth White Highlight together and apply this mix to the uppermost raised surfaces and any hard edges.
Step 5) To finalize the dirty bleached look, make a glaze by mixing Battlefield Brown and Gnarls Green together and watering it down very thin. Apply this across small areas to create some weathering and depth.
Ropes

Step 1) With all the bones wrapped up, it’s time to move on to the ropes and nets. I start by applying a base color to the areas using Rucksack Tan.
Step 2) Next, I take Brown Ink and thin it out with a small amount of water to make a wash and apply this to the areas.
Step 3) Once this is dry, I go back with Rucksack Tan to the areas and pick out raised surfaces. I make sure to leave some of the previous steps showing through, especially the spaces between the notches on the rope and nets.
Step 4) For a final highlight, I apply a small line of Menoth White Base to the upper areas and hard edges to make it all stand out.
Rat

Step 1) Time to get some paint on the rats. (The models, that is—skip this step if you’re thinking about painting a real rat.) Start with a basecoat on the furry areas with Asheth Grey.
Step 2) Add a layer highlight of Greatcoat Grey to the fur.
Step 3) To really make the fur stand out, apply a final layer highlight of Ironhull Grey.
Step 4) For the fleshy bits, start off with a basecoat of Khardic Flesh.
Step 5) Next, wash the area by watering down some Flesh Wash and applying it to all of the flesh tones.
Step 7) Reclaim some of the area by applying Khardic Flesh to the raised surfaces.
Step 8) To wrap up, using Midlund Flesh, apply a final layer of highlights.
Red Candle

Step 1) Another chance to add some color to the model presents itself in the candles. I think for these models, I will use red and green candles. I start by basing the red candle with Skorne Red.
Step 2) Next, I continue to work the red color up by adding a highlight layer of Khador Red Base.
Step 3) For the final highlight, I pick out some of the raised edges with Khador Red Highlight.
Green Candle

Step 1) For the green candle, start off with a basecoat of Gnarls Green.
Step 2) Continue working up the color by adding a highlight of Iosan Green to raised surfaces and areas.
Step 3) Finally, use Necrotite Green to pick out a few of the raised surfaces and hard edges to really make the color stand out.
Rocks

Step 1) For the rocks underneath the octopus on the 40 mm objective, I start with a basecoat of Cryx Bane Base.
Step 2) I continue working up the highlights by mixing Cryx Bane Base and Cryx Bane Highlight and picking out the raised surfaces and hard edges.
Step 3) For my final highlight, I pick out the edges and highest points with Cryx Bane Highlight and a drop of Menoth White Highlight.
Step 4) To add some additional depth to the model, I blend Exile Blue into some of the shadows.
Octopus

Step 1) For the octopus, let’s do something different—let’s paint this up like a blue-ringed octopus. Start by basecoating the model in Rucksack Tan.
Step 2) To shade, blend Borgin Brown into the recesses in order to create depth and shadow.
Step 3) For highlights, begin by adding a layer of Menoth White Base to the raised areas.
Step 4) For a final highlight, use Menoth White Highlight sparingly on a few of the raised surfaces.
Step 5) To create the blue rings, start with a dot of Umbral Umber in various locations.
Step 6) Next, draw circles in those dots with Thamar Black. Make sure to leave some of the Umbral Umber visible in the center.
Step 7) Using Exile Blue, draw a thinner circle inside the Thamar Black circles you just drew.
Step 8) Finally, with Cygnar Blue Highlight, make another circle inside the previous circle of Exile Blue to get those vibrant rings the octopus is known for.
Starfish

Step 1) Time for the part I struggled with the most, the starfish. I tried four or five different colors and never really felt satisfied. I’m not sure why echinoderms are so difficult for me, but here is what I ultimately went with. I start off with Skorne Red.
Step 2) I continue working up the color using Khador Red Base. And I make sure to leave areas of the previous color showing through.
Step 3) Next, I add some final hard-edged highlights of Khador Red Highlight.
Step 4) Finally, to bring it all together, I thin out some Red Ink with some water and apply it to the raised surfaces to get a rich colorful look.
With that, my objectives are painted and ready for the tabletop. No longer will I bask in the embarrassment of unpainted objectives, distracting my army from seizing the win.

Now I can successfully blame bad strategy and list building.
I hope everyone enjoyed this Insider. Before I go, thanks to the results of the poll, you said to count these as models, so it’s time to move that paint counter forward 021/100. Wow—I still have a long way to go, and the year is quickly getting away from me. I’ve got to start speeding up the brush if I’m going to hit that goal!
The post Painting Pirate Objectives appeared first on Privateer Press.