Painting Oriax, the Soul Weaver
by Charles Foster III
Hello, hobbyists, and welcome to another Painting Insider! Last time, I tackled the lava of Krueger, Wrath of Blighterghast. Today, I’m popping open my Cursebound Cadre box and throwing some paint on my Oriax, the Soul Weaver. So, grab some brushes and paint and let’s get to weaving some color!
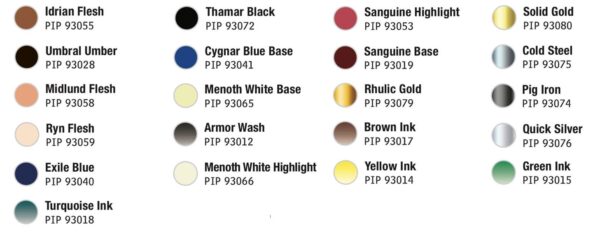
Colors Used
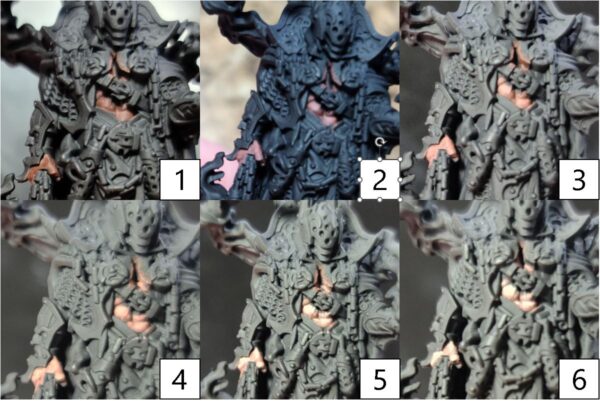
Skin Tone
Step 1) I start off with the skin tones on the model. For my basecoat, I mix Idrian Flesh and Umbral Umber together and apply this to any areas of flesh.
Step 2) Next, I take the previous mixture and add a few more drops of Idrian Flesh to it to brighten up the color. With this slightly lighter shade, I continue to work up the skin tones.
Step 3) For my third highlight, I use Idrian Flesh by itself. As I work up the layers, I make sure that the previous colors have areas that still show through.
Step 4) I continue highlighting the skin tones with a mixture of Idrian Flesh and Midlund Flesh.
Step 5) For the penultimate highlight, I mix Midlund Flesh with a small amount of Ryn Flesh, focusing on the raised or upper areas.
Step 6) And for the last highlight, I use Ryn Flesh and apply this color only to the uppermost areas and where the light would be almost reflecting.
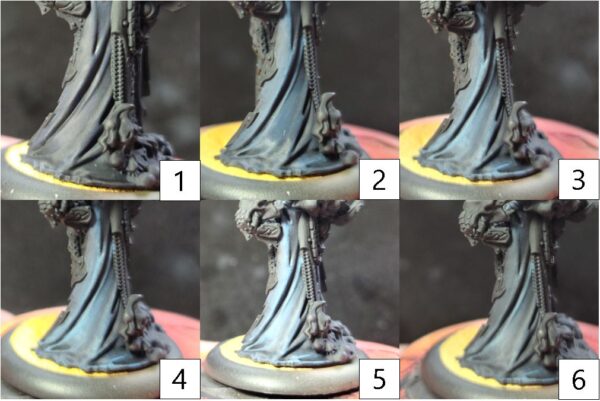
Black Cloth
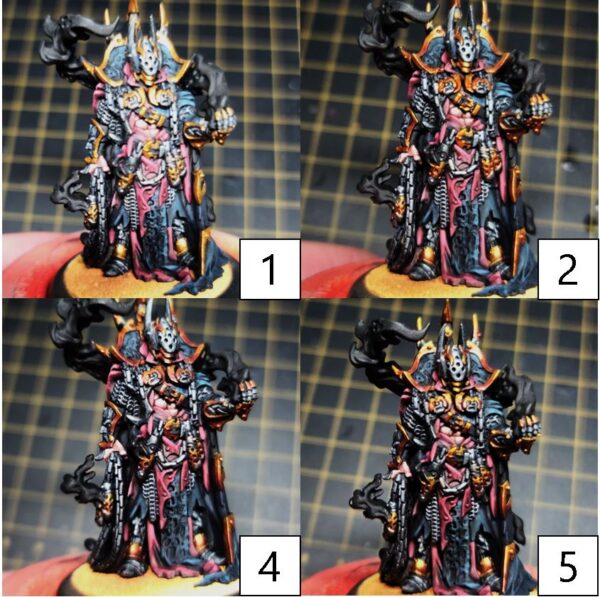
Step 1) Next, it’s time to tackle the black cloth on Oriax. Start by mixing Exile Blue and Thamar Black together and applying this mixture as the basecoat over the area. In the deepest areas, feel free to leave some of the black primer showing through to help deepen the look.
Step 2) Continue working up the highlights by adding Cygnar Blue Base to the previous step’s mixture and applying it over the raised areas, but make sure to allow the previous color to show through in some areas.
Step 3) For the third highlight, mix Exile Blue, Thamar Black, and Menoth White Base. Apply this color to the raised surfaces and edges to keep building up the colors.
Step 4) continue working the highlights up with a mixture Cygnar Blue Base with Menoth White Base. The areas are going to start looking brighter and brighter. This is okay, however—the final step will be an application of washes that will blend it all together.
Step 5) Finally, for the most raised and highest edges, mix a small amount of Menoth White Base and Mixing Medium to create smooth glinting highlights on the black cloth.
Step 6) Once the previous step has completely dried, it’s time to bring all of it together with a few layers of glaze to get the tone we’re looking for. Mix Armor Wash with water and Mixing Medium. Using this mixture, apply even coatings across the black cloth. Make sure to not let this mixture build up into the recesses. Use thin coatings to build up, then dry, and then reapply to get the look we want. On this model, I laid down 11 layers. Pro-Tip: A hair dryer on low will greatly speed up this step.
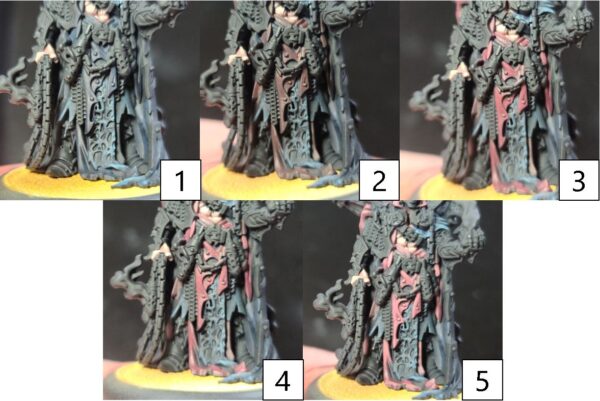
Burgundy Cloth
Step 1) Time to tackle the burgundy-colored cloth. I start by mixing Exile Blue and Thamar Black and applying a solid, even basecoat.
Step 2) Next, I work up the highlight by blending Sanguine Base over the previous step.
Step 3) To continue building the color, I use Sanguine Highlight and blend this over the previous colors.
Step 4) For my penultimate highlight, I mix Sanguine Highlight and Menoth White Base together and continue to build up my highlights.
Step 5) Finally, for the highest and uppermost raised edges, I mix Sanguine Highlight with Menoth White Highlight for the final emphasis.
Silvers
Step 1) Moving on, time to add in the silvers of the model. I start by laying down a basecoat of Exile Blue over any of the white metal areas.
Step 2) Next, I begin working up the colors by adding a layer of Pig Iron. Make sure to leave the Exile Blue showing through via the cracks and in the deep areas.
Step 3) I continue highlighting the silver areas with a hard-edged highlight of Cold Steel to any raised surfaces or edges.
Step 4) To bring all the colors to an even look, I apply a wash of Armor Wash.
Step 5) Finally, after the model is sealed with a matte sealant, I return for one final highlight of Quick Silver.
Gold
Step 1) Time to tackle the warm gold of the model. Start by laying down an even basecoat of Rhulic Gold.
Step 2) Begin shading the gold areas with a mixture of Rhulic Gold, Brown Ink, and Yellow Ink, blending this mixture into the shadows.
Step 3) Continue shading by mixing Sanguine Base, Brown Ink, and Umbral Umber together and blending this into the deepest shadows and recesses on the model.
Step 4) For highlighting, apply a layer of Solid Gold to the upper edges and raised surfaces.
Step 5) Finally, after the model has been sealed with a matte sealant, return to the area for one final glinting highlight of Solid Gold mixed with Cold Steel.
Ghostly Glow
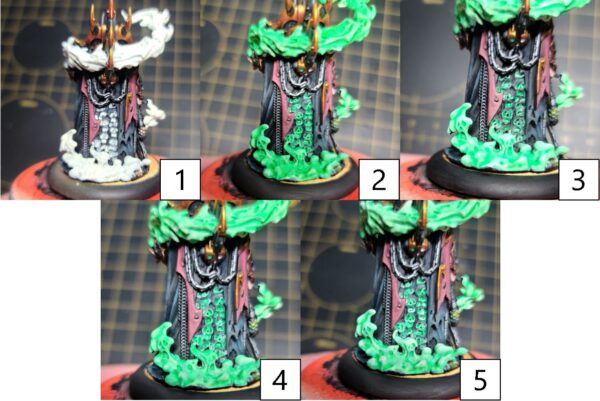
Step 1) Finally, to bring this model to life, we need to add some color to the souls. Start by applying a solid basecoat of Menoth White Highlight on anything that is going to make the soul glow.
Step 2) Next mix Green Ink, Turquoise Ink, and water to create the first wash. Apply this wash across the area.
Step 3) Once the wash has completely dried, apply another layer of Menoth White Highlight over the raised surfaces and areas.
Step 4) Thin out some Green Ink with water and apply this across the area for some great-looking soul glow. If you want to go brighter, you can always replace the Turquoise Ink with Yellow Ink for a different effect.
Step 5) Finally, for that perfect finishing touch, blend a final highlight of Menoth White Highlight over the raised areas.
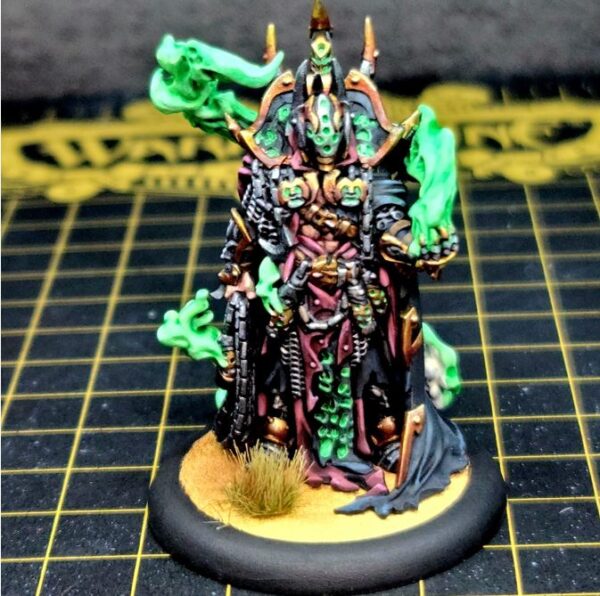
And there you have it! Oriax is ready to head to the table and cull a batch of souls! Join me next time when I show off my alternate paint scheme for my Brineblood Marauders Deepborn Dire Troll!
The post Painting Oriax, the Soul Weaver appeared first on Privateer Press.

