

Painting Magnus and Invictus
by Charles Foster III
Two for the Road
Hello, hobbyists, and welcome back to another painting Insider. Last time, we tackled the high seas of the Brineblood Marauders with a painting guide to the Reef Troll. This time, I’m turning my attention to the newly released mercenary Magnus the Unstoppable and Invictus. Grab your brushes and let’s get to this twisted pair!
Green Armor
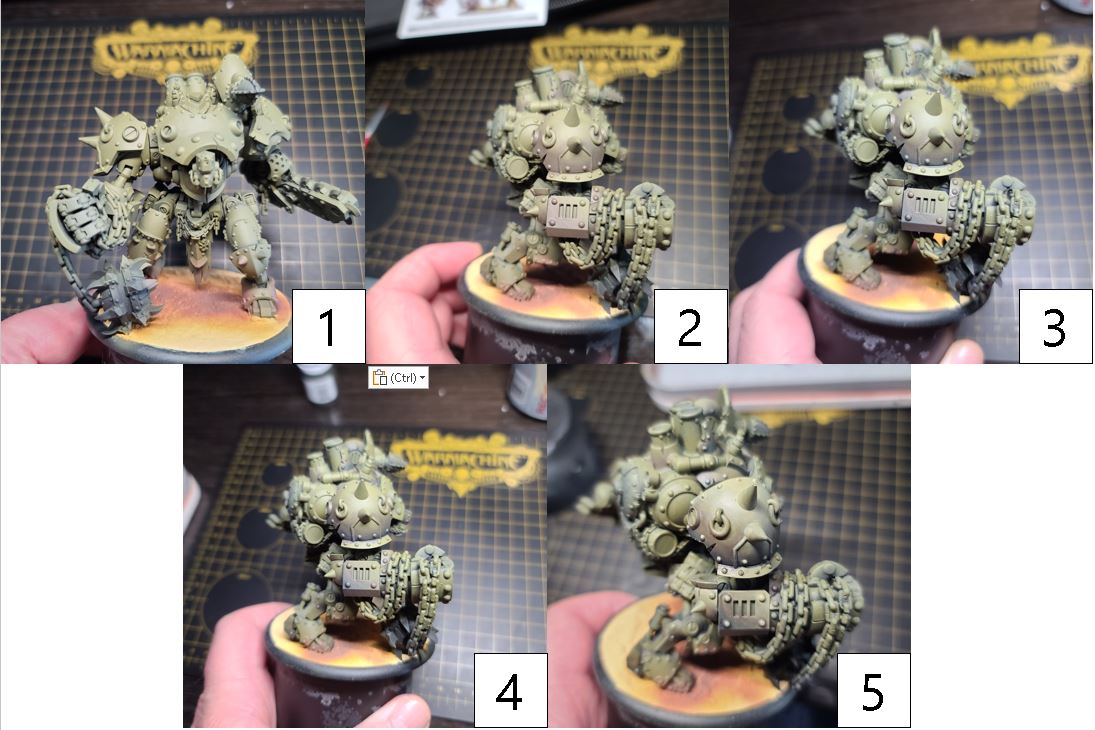
- Step 1) For my Magnus and Invictus, I wanted to go with a more traditional Mercenary paint scheme of green. To start off the green plates, I lay down a basecoat with an airbrush of Traitor Green. This step can be done with more a traditional brush, but with such a large surface area, I’m cutting a corner and using an airbrush for my basecoat.
- Step 2) For my first shade, I use a traditional brush and blend in Thornwood Green to the area.
- Step 3) To darken the shadow and enrich the green look, I blend in a second highlight using Cryx Bane Base.
- Step 4) Finally, to create my deepest shade, I mix Brown Ink and Coal Black together. I apply this mixture to the deepest recesses and in any area that I want to separate the green from other surfaces.
- Step 5) For my highlight, I mix Traitor Green with Thrall Flesh and apply it to the upper raised areas and surfaces.
Black Armor
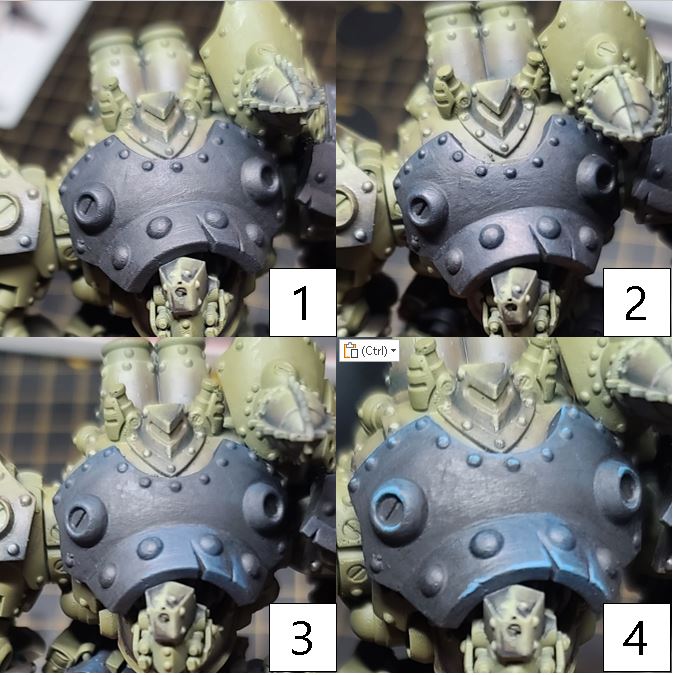
- Step 1) With the green armor plates done, it’s time to tackle the black armor. Start by basecoating the area in Thamar Black.
- Step 2) Next, mix Coal Black, Exile Blue, and a drop of Thamar Black. With this color, apply your first layer of highlights to the area.
- Step 3) Continue highlighting the black armor by adding Underbelly Blue to the previous mixture and blending it lightly through the area.
- Step 4) Finally, add Frostbite to the previous mixture and apply this color to the uppermost edges and raised areas.
Steel
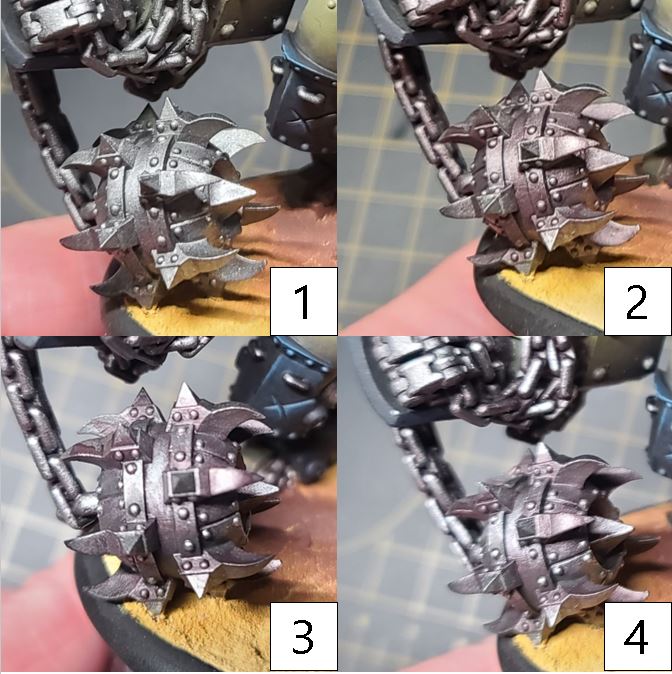
- Step 1) Time to get metals on the metallic monster of a ’jack! I start off with a basecoat of Boiler Black to all of my steel areas.
- Step 2) I start my shading off with a mixture of Brown Ink and Exile Blue. I blend this color down into the shadows of the area.
- Step 3) To darken the shadow and add depth, I mix Green Ink, Brown Ink, and Cryx Bane Base together and apply this to the deepest recesses.
- Step 4) For highlights, I use Cold Steel and apply it to the raised surfaces and upper areas with a smooth blended transition.
- Step 5) Finally, after the model has been sealed with a matte sealant, I’ll return to the area and apply Quick Silver as a hard-edge highlight to return any vibrancy that was lost from the matte sealant.
Brass
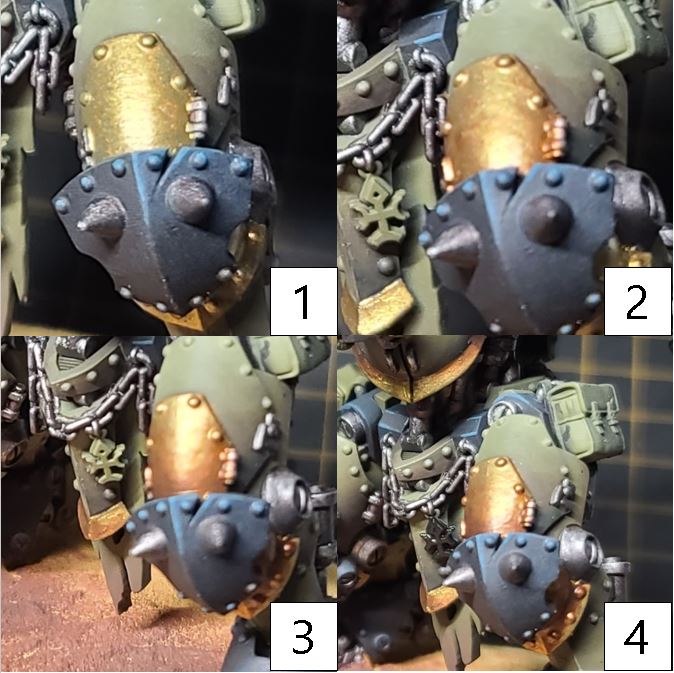
- Step 1) Next up: the mercenary brass. Start by laying down a basecoat of Brass Balls on these areas.
- Step 2) For a first layer of shading, two-brush-blend Molten Bronze into the recesses to create the shadows on the brass.
- Step 3) To darken the shade, mix Molten Bronze, Brown Ink, and Gnarls Green and then add this color to the deepest recesses.
- Step 4) Finally, after applying a matte sealant to the model, return with a mix of Cold Steel and Solid Gold for a few glinting highlights.
Beige Clothing
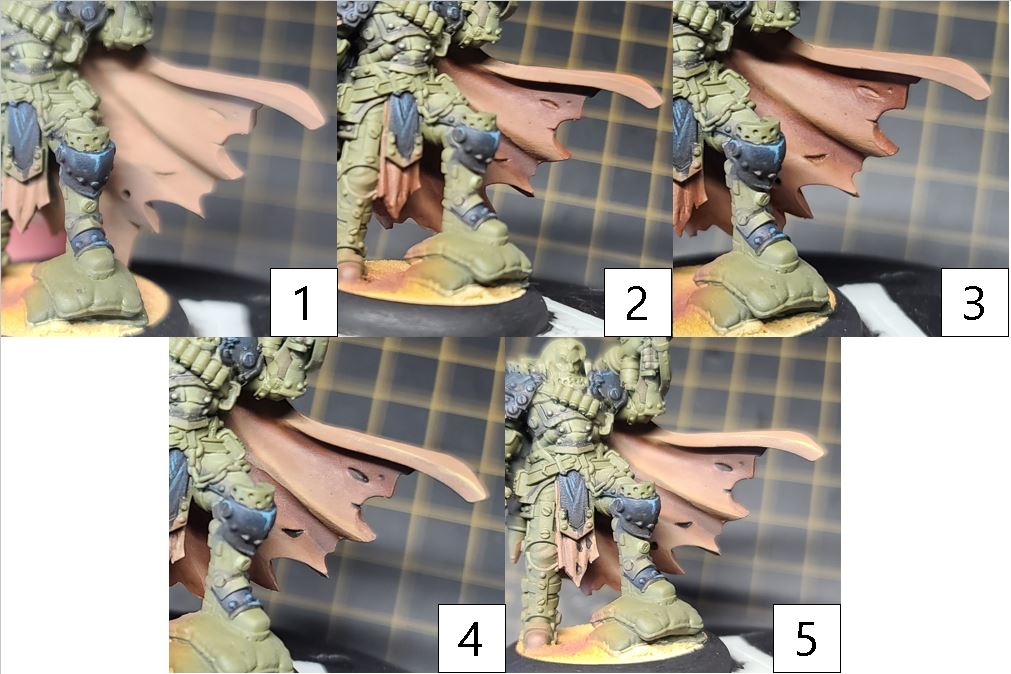
- Step 1) To start Magnus’ cloak, I base the area with a mixture of Cygnus Yellow, Rucksack Tan, and Idrian Flesh.
- Step 2) Next, I begin my shading of the area using Idrian Flesh and blending it into the recesses of the cloak.
- Step 3) For my final shade, I mix Idrian Flesh with Umbral Umber and blend this into the deepest areas on the cloak.
- Step 4) For my first highlight, l return to that earlier Cygnus Yellow, Rucksack Tan, and Idrian Flesh mix. I use this to reclaim any areas where I got carried away with the shading. For this mixture, I lean heavier into the Cygnus Yellow to ensure that I’m still progressing the highlighting.
- Step 5) Finally, I mix Cygnus Yellow, Rucksack Tan, and a small amount of Menoth White Highlight to create my final highlight.
Leathers
- Step 1) There are quite a few leather bits all around Magnus and Invictus. So, start your leathers off with a basecoat of Idrian Flesh.
- Step 2) For the first shade, blend Umbral Umber into the areas.
- Step 3) To create more depth, apply a second shade using a mixture of Brown Ink and a drop of Thamar Black. Blend this into the deepest areas.
- Step 4) To highlight your leather, apply Bootstrap Leather to the highest areas and edges.
- Step 5) Finally, to really make the leather stand out, add a final highlight using Bootstrap Leather mixed with Rucksack Tan.
Skin Tones
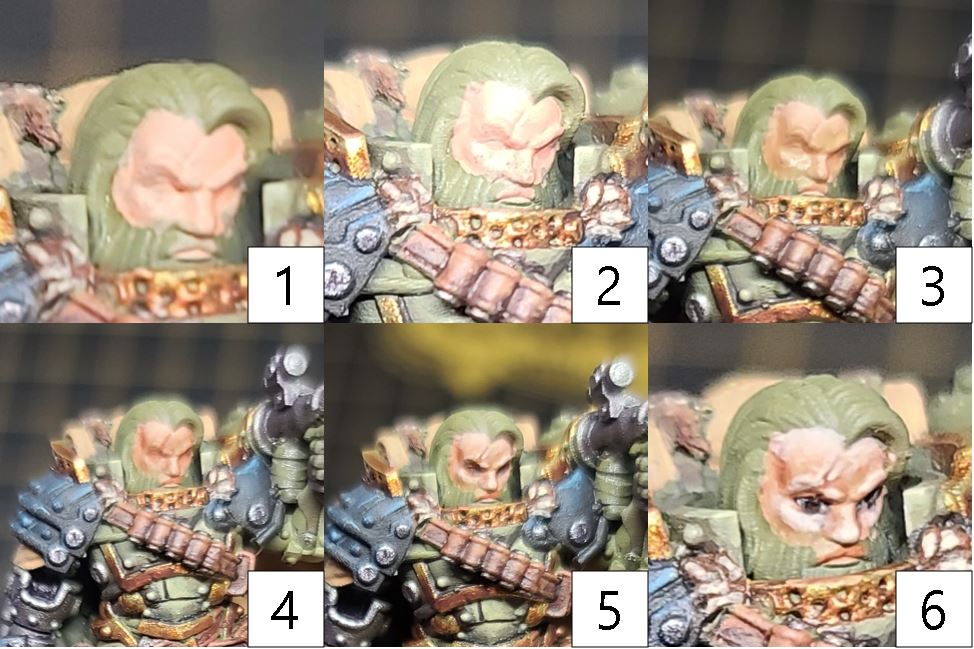
- Step 1) Time to tackle the skin on Magnus. I start off my flesh tones with a basecoat of Midlund Flesh.
- Step 2) I start my three-part shading by mixing Skorne Red and Midlund Flesh together and blending this into the recesses of the face.
- Step 3) To create balance in the skin tones from the red color, I mix Battledress Green and Midlund Flesh together and apply this as my second shade to the face.
- Step 4) Finally, for the deepest areas, I mix Skorne Red and Battledress Green and apply this to the deepest areas of the face.
- Step 5) For my first highlight, I add Midlund Flesh to Ryn Flesh and apply it to the raised areas along the face. I focus on the eyebrows, the cheekbones, the nose, etc.
- Step 6) Finally, I use a small amount of Ryn Flesh to pick out any areas where the light is hitting the uppermost areas of the face.
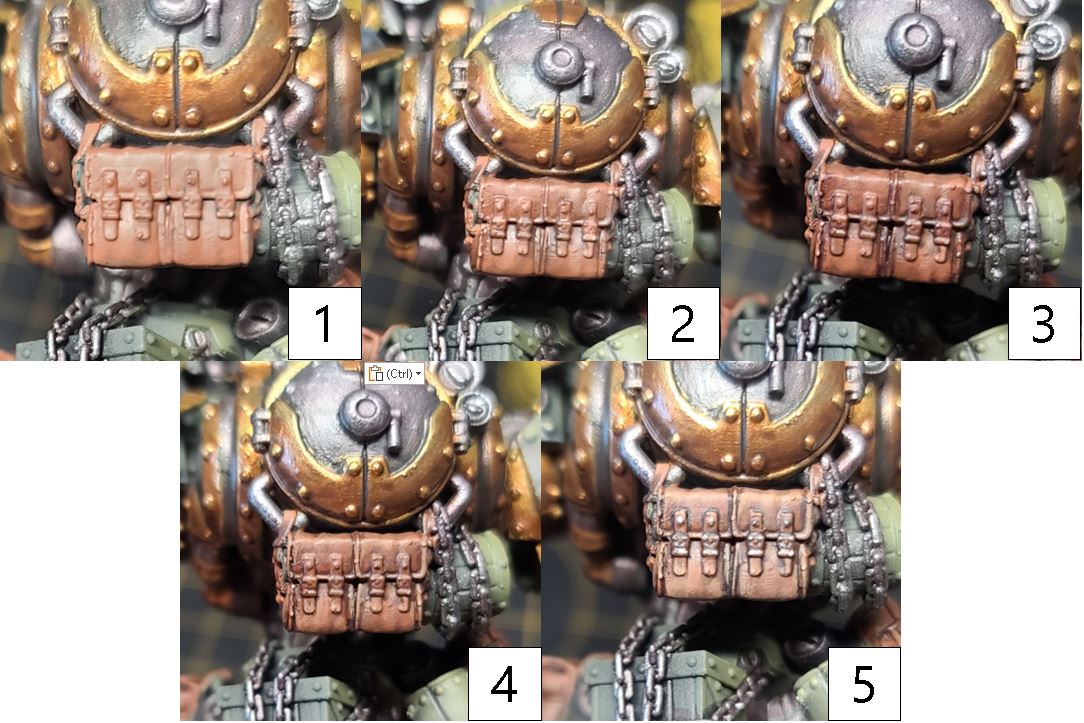
Crates and Barrels
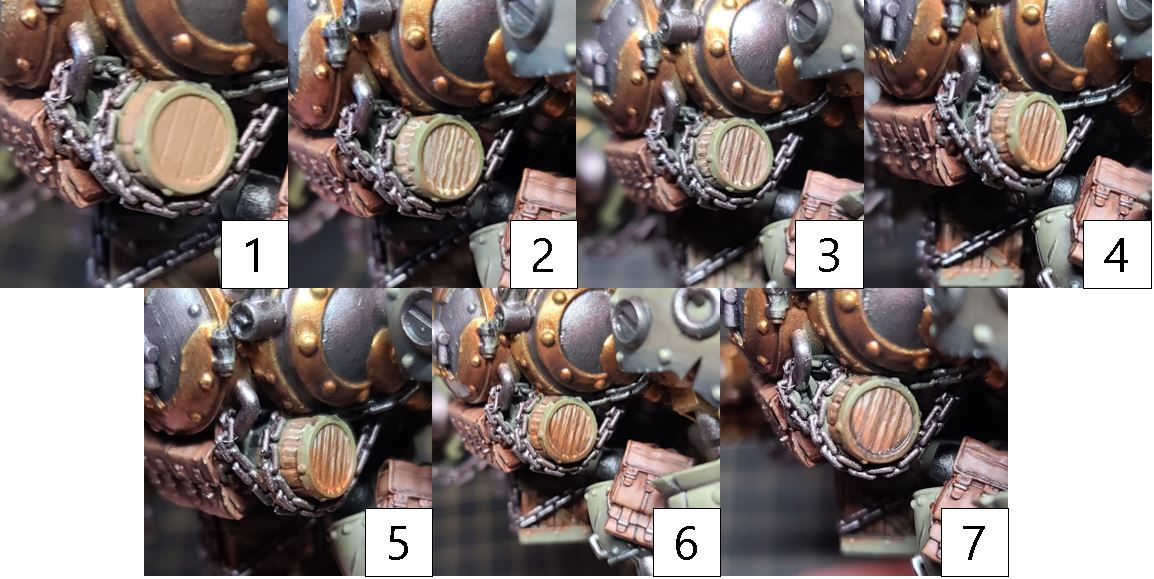
- Step 1) There are a few crates and barrels on the back of Invictus, so now it’s time to give them color. Start off by basing the areas in Gun Corps Brown.
- Step 2) Next, define the wooden planks by drawing out the lines with Menoth White Base.
- Step 3) Follow next to the areas of the previous step with a line of Umbral Umber, essentially making a sandwich of Umbral Umber, Menoth White Base, and Gun Corps Brown.
- Step 4) To get that wood-stained look, mix Bloodstone, Yellow Ink, and Brown Ink together. Blend this color from the bottom of the model upward.
- Step 5) Using the same color, repeat the previous step, but only go half the distance as before.
- Step 6) Continue to shade by adding a small drop of Blue Ink to the previous mixture. Again, blend up from the bottom but only go half of the distance of the previous step.
- Step 7) Finally, add a drop of Thamar Black to the previous step and use this to go over any of the areas in between the wooden planks. This will really define the boards and make the area stand out.
Hair Colors
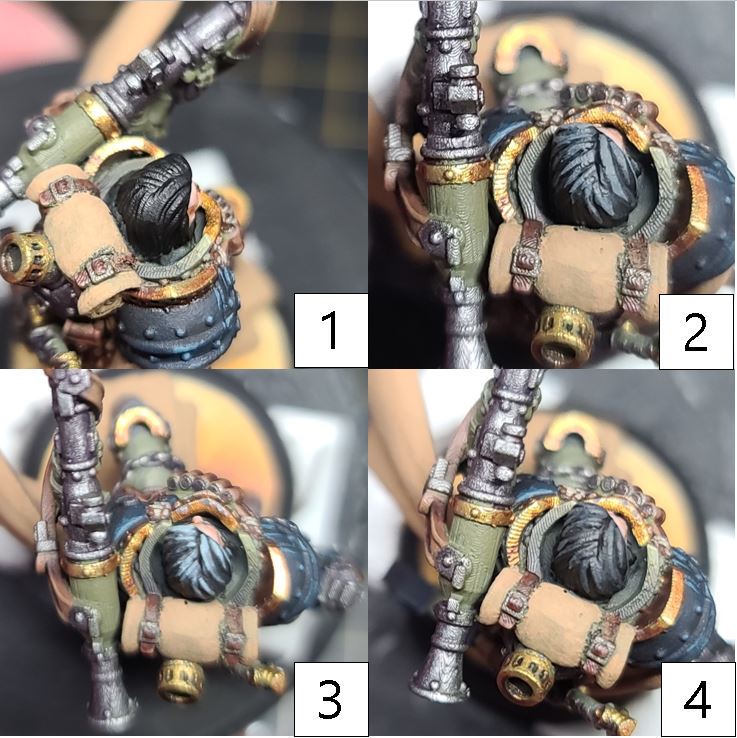
- Step 1) Last but not least, let’s get some hair on Magnus. I start by basecoating Thamar Black onto the area.
- Step 2) I begin lighting the hair color by adding a highlight of Asheth Grey.
- Step 3) I continue highlighting the area with Bastion Grey.
- Step 4) Finally, for those few aged strands of hair, I mix Menoth White Highlight and Trollblood Highlight together and apply to the few strands that I really want to define.
With that, Magnus and Invictus are ready to attack the tabletop!

There are only a few more weeks until Warfaire Weekend—it’s the show that really gets me the most hyped up to paint, play games, and enjoy the best that WARMACHINE and the community have to offer. If you haven’t made plans to attend yet, you’re going to be missing something of monstrous proportions.
Next time, I’ll start getting my army ready for the tabletops by showing off my alternate paint scheme for my Brineblood Marauders with a Pyg Boarding Party. So, see you next time, painters!
The post Painting Magnus and Invictus appeared first on Privateer Press.