
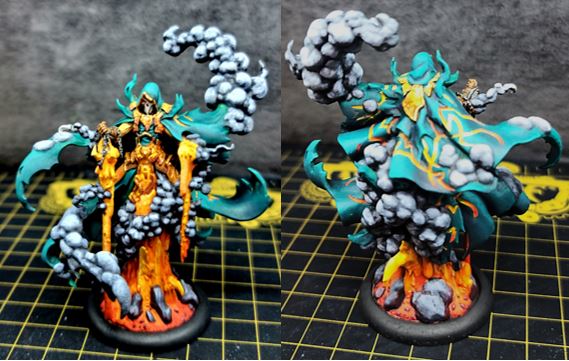
Painting Krueger, Wrath of Blighterghast
by Charles Foster III
Hello, hobbyists, and welcome to another Hobby Insider! Still on the road to painting 100 models in 365 days, and the paintbrush is moving again this week while I tackle Krueger, Wrath of Blighterghast. So, grab your paint and brushes, and here we go!
Colors Used
Fire/Lava
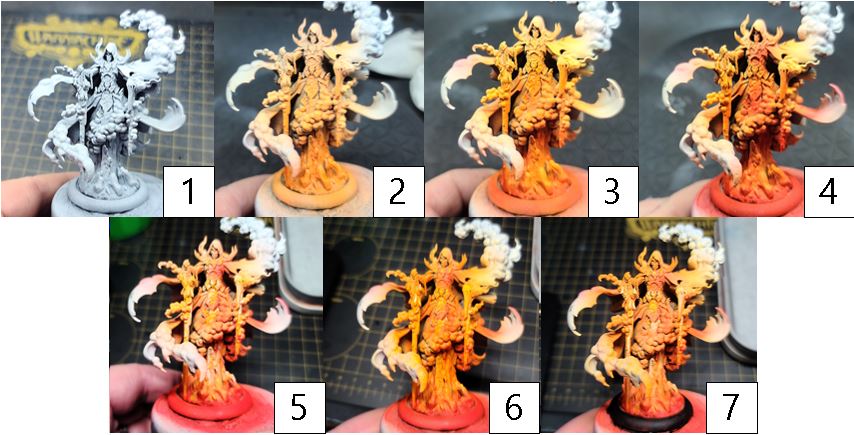
Step 1) This model will have a lot of bright colors all across it due to the fire/lava. To help create a brighter, more vibrant base, I prime with white primer this time.
Step 2) This next steps can be done by hand, if you prefer; for my own work, I’m going to use an airbrush and spray on a base color of Ember Orange.
Step 3) To begin shading, I’ll start by adding Heartfire into the shadows, making sure to leave some of that Ember Orange on the raised and upper areas.
Step 4) For a second layer of shading, I work Inferno Orange into the deeper areas to help build up a vibrant color. No worries about making everything perfect—this is lava, after all, and besides, we’ll bring all of the areas together later with a wash.
Step 5) For the final shade, I use Khador Red Base, focusing on the rocks and areas farthest from the brighter upper lava areas.
Step 6) For a highlight, I mix Ember Orange with Menoth White Base and apply this to the source of the lava. It’s okay if this all still looks a little muted or off; the next step will be to balance everything out.
Step 7) To bring all of the colors together, it’s time to use Blazing Ink and apply some layers of glazes. I take Blazing Ink and add water in a 1:14 ratio. I then apply this thinned-out ink evenly across the model, making sure to not let any of it pool up. I want to shift the colors on the model to a more saturated orange tone; so, to achieve this, I apply 12–15 layers of glaze, being sure to let each layer completely dry before moving on to the next. Pro tip: Using a hair dryer on low and from a distance can speed this step up. But don’t rush things—if it doesn’t dry completely before you move on to the next layer, it is possible to damage the previous layer of glaze.
Step 8) For the final bright highlight to the lava, I mix Morrow White and Ember Orange together and apply this to the highest raised edges and sources of lava flow.
Cape/Cloak
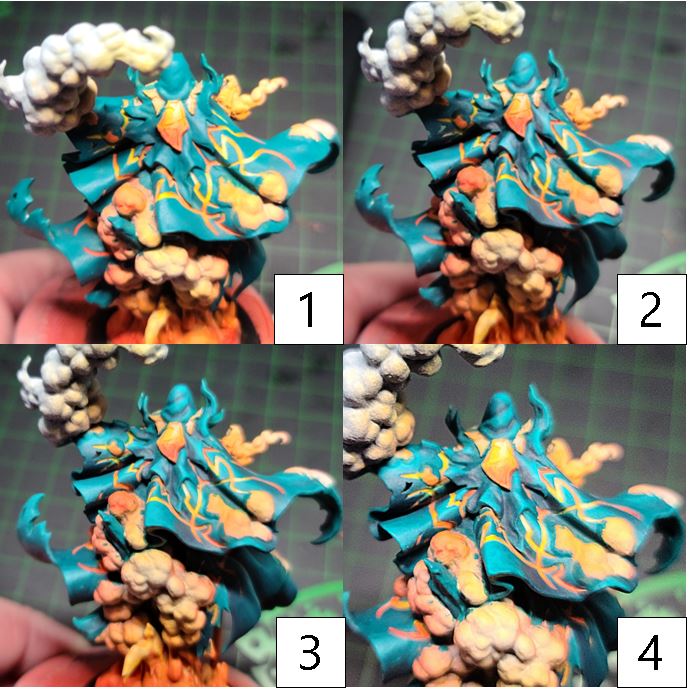
Step 1) Next up, time to tackle the cloak on the model. Start your basecoat off by mixing Eldritch mixed with Iosan Green and laying this down across the area.
Step 2) To shade this color, mix Eldritch with Coal Black and blend this color into the shadows.
Step 3) For the first highlight, mix Eldritch, Iosan Green, and Menoth White Highlight in even amounts and apply this to the highest raised areas working toward the shaded areas.
Step 4) Finally, for the highest points and raised edges mix, Eldritch with Menoth White Highlight and apply this to brightest and most raised areas. Less is more when applying this final highlight!
Smoke/Rocks
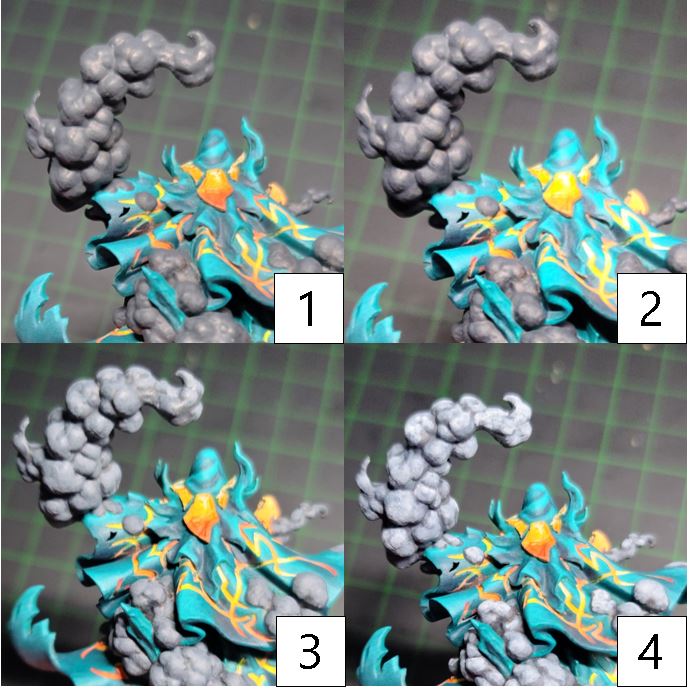
Step 1) For the smoke and rocks, I start off with a solid basecoat of Asheth Grey to the area.
Step 2) Next, I continue working my highlights up by applying a layer of Greatcoat Grey, being sure to leave some of that darker grey showing through.
Step 3) For the second shade, I begin working a highlight of Ironhull Grey, applying this to the upper areas and hard edges.
Step 4) Finally, I add a final highlight by mixing Ironhull Grey with Morrow White.
Golds
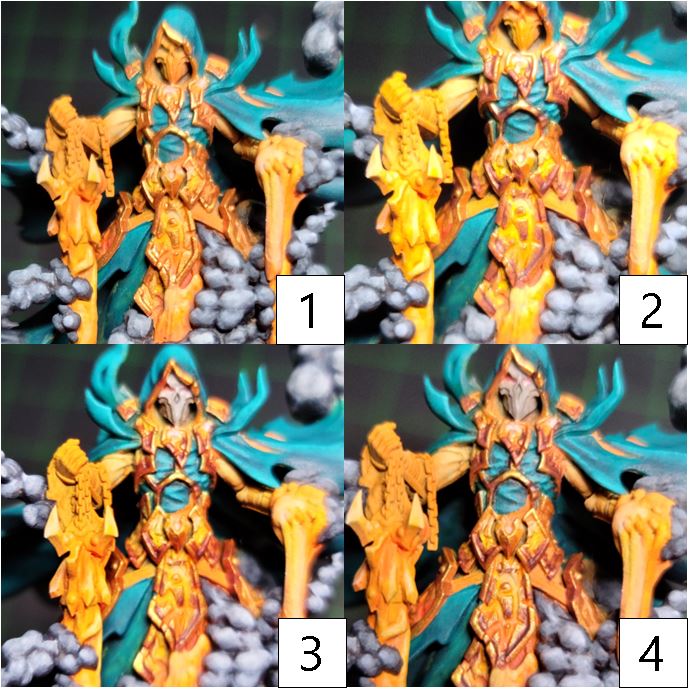
Step 1) Start your gold areas off with a basecoat of Rhulic Gold.
Step 2) Using two-brush blending, shade the previous step with a mixture of Rhulic Gold, Brown Ink, and Yellow Ink.
Step 3) Continue shading the areas with a mixture of Umbral Umber, Sanguine Base, and Brown Ink. Apply this mixture to the deepest shadows and recesses on the models.
Step 4) For highlights, apply Solid Gold to the highest edges and raised areas.
Step 5) Finally, after the model is sealed with a matte sealant, return to the areas with a mixture of Solid Gold and Cold Steel for a few hard-edged highlights to return that metallic look to the model.
Bone Mask
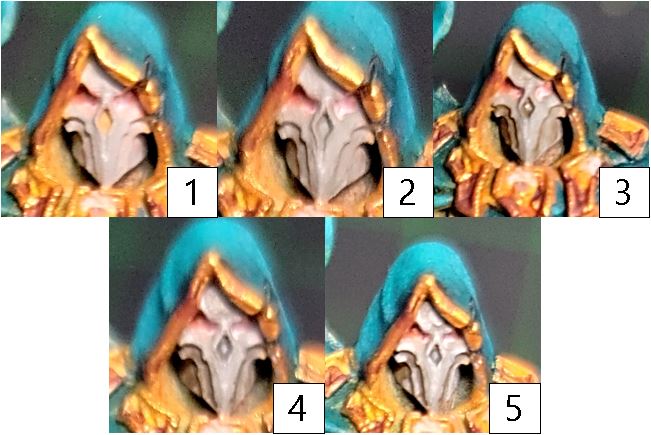
Step 1) For the bone mask, I apply a solid basecoat to the area of ’Jack Bone.
Step 2) Next, I make a wash out of Cryx Bane Highlight and water and apply this to the areas I would like to have shadows on.
Step 3) I apply a second layer of shading with a mixture of Gun Corps Brown and Thornwood Green, blending this mixture into the recesses. I make sure to leave the previous step showing through.
Step 4) I apply a second layer of shading by mixing Battlefield Brown and Greatcoat Grey and working this into the deepest shadows.
Step 5) Finally, I take a mixture of Menoth White Highlight and ’Jack Bone to highlight the bone.
Steel
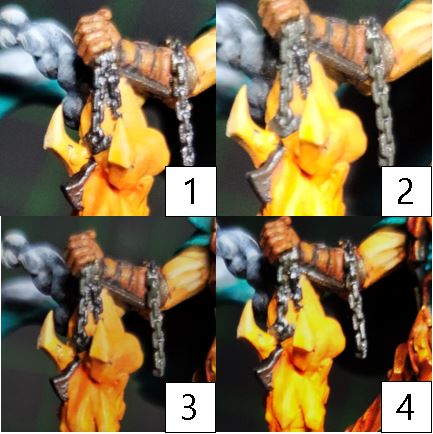
Step 1) Basecoat the steel areas with Pig Iron.
Step 2) To begin shading your steel, mix Cryx Bane Base with water and apply this wash over the metal surfaces.
Step 3) Continue to shade the metal with a mixture of Brown Ink and Green Ink along with Thamar Black. I’ve found that a really good mixture is 4:2:1 Brown Ink, Green Ink, and Thamar Black.
Step 4) To begin the highlights apply Cold Steel to the highest areas and raised edges.
Step 5) Finally, after the model has been sealed with matte sealant, return to the area for a final quick highlight using Quick Silver on the uppermost raised areas and places where the surfaces of the metals would be the shiniest.
And with that my Krueger, Wrath of the Blighterghast, is ready to tackle the tabletops. Only thing is… I don’t currently have an army for him to go with on the tabletop… Why, hello, Cursebound! Time to get some Orgoth models going!

Join me next time as I crack open my Cursebound Cadre and start to work on my Orgoth! Just gonna go ahead now move that paint counter up: 007/100.
The post Painting Krueger, Wrath of Blighterghast appeared first on Privateer Press.