

Insider 08-31-2015

While the full rules for the Battle for the Athanc campaign will be posted closer to the end of this series, the basics the players needed to kick off the campaign were relatively straightforward. For anyone who has ever played in a GM-style campaign before, you know this is usually the case, as most of the complexity is handled organically between the GM and players.
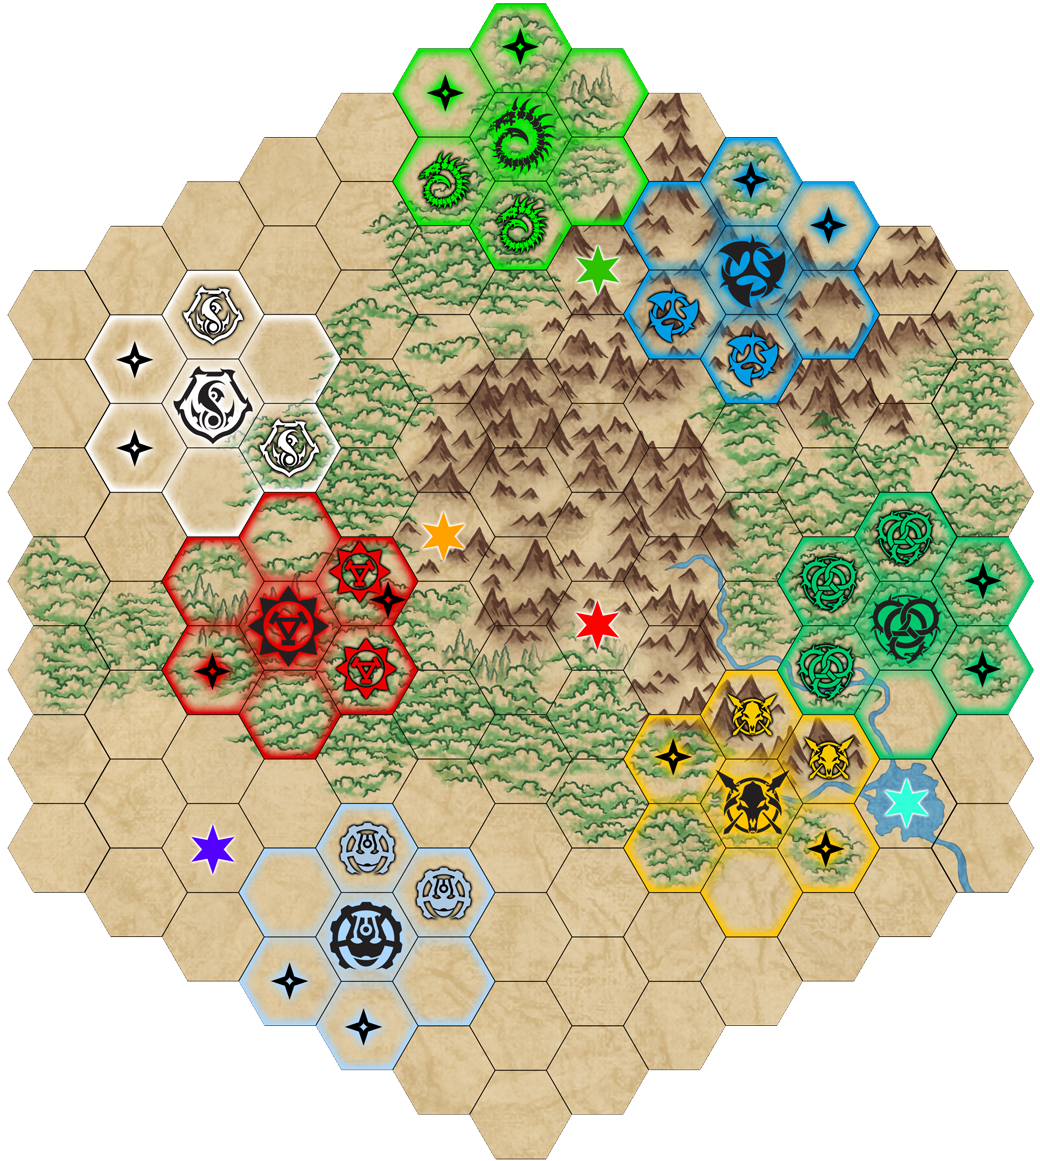
Battle for the Athanc takes place on a hex-grid map, with each hex representing a map tile. While the majority of the tiles were generic, there were five special location tiles that provided additional benefits to players who controlled them. The primary objective of the campaign revolved around controlling the most map tiles, as doing so would provide an edge in the final race to claim the Athanc Wagon in the finale.
Army construction in the campaign was quite a bit different from a standard game of WARMACHINE or HORDES. Players were allotted 75 army points at the start of the game to construct their armies. Unlike in a standard game, the point sizes for individual games were not determined by the players beforehand or by a set amount. Instead, players were allowed to create up to three army banners of any size as long as each banner was at least 25 points. Once created, the contents of an army banner would only change if players purchased more points for the banner in later rounds or through battlefield casualties during play. This means when players fought, it was entirely possible the point totals would be mismatched.

In addition, when building army banners, players could not include warcasters, warlocks, character warjacks/warbeasts, colossals, or gargantuans. Instead, they would have an opportunity to requisition those models for their army banners by spending Requisition Points (RP). The warcasters and warlocks available to be requisitioned, however, would vary each round, as would the cost in RP to acquire them. This was perhaps my favorite tweak to the normal rules—it really drove home the idea that these characters are highly valued military assets. Their varying availability gave the sense that these characters were often engaged in other pressing missions. It also gave the players another important strategic element to consider, because having a warcaster or warlock present when your opponent did not could have a significant impact on the outcome of a game. Even an outnumbered banner could pose a significant threat when bringing the only warcaster or warlock to the table.
Army banner composition was kept secret from other players, meaning that unless a player had a way to scout enemy banners, he would only discover the composition of the enemy banner during setup for a game against an opponent. Once players had constructed their army banners, it was time to choose their initial starting locations on the map.
![]()
For this campaign, Creative Director Ed Bourelle helped create a basic outline of the map for me to work with. And when I say basic, I mean he basically helped me create a black-and-white hex grid to work from. While having all the fancy bling is cool and something to strive for, in the end you should never let the desire for flash prevent you from actually doing what needs to be done. And despite being quite plain to start, the map he made was just what we needed to get the fun kicked off and moving.
To choose starting positions, each player rolled 2d6 and added their faction’s Strategic Value to the roll. The player with the highest number chose first, and then we moved down the list in sequential order with players rolling off for ties. Each player gained the tile they chose as well as every tile adjacent to it. Players couldn’t choose a tile that was adjacent to either another player’s starting tile or to a special location tile.

After all players had chosen, they claimed their starting tile by placing their Command & Control Center (a structure that represents their primary HQ) on it. In addition to their CCC, players also began the game with two Supply Depots. Supply Depots are critically important, as they provide players with Supply Points (SP) to buy more troops, purchase additional structures, and to rally scattered banners to the map. The player’s Supply Depots and their starting army banners were placed in any tile the player controlled with the rule that a tile could only contain one structure and one friendly army banner at a time.
Once the players had set up, it was time to begin Round 1!
Each Campaign Round was broken up into five phases:
1. Move Phase
Players submit movement orders for each army banner they have deployed on the map. Once all orders have been received, players then execute their orders. All movement occurs simultaneously.
2. Battle Phase
Battles that result from army banner movement are resolved and reports turned in to the GM.
3. Resolution Phase
Defeated banners from the Battle Phase retreat, casualty rolls are made and territory capture rolls are made.
4. Resource Phase
Each player receives Supply Points from their Supply Depots and map locations.
5. Purchase Phase
Players spend Supply Points on requisitioning warcasters/warlocks for the next round, purchasing new constructions, upgrading existing constructions, and purchasing new troops for their armies.
When issuing orders, players could choose the following:
1. Standard March
The army banner moves 1 space.
2. Forced March
The army banner moves 2 spaces, unless its first move brings it into contact with an enemy banner. If the banner fights in the following battle phase, the controlling player must roll a die for each model/unit in the army before the start of the deployment phase. On a roll of a 1 the model/unit is not deployed normally. Instead, it makes a Full Advance from its controlling player’s table edge during the Maintenance Phase of the player’s 2nd turn.
3. Fortify
The banner does not move. If attacked by an enemy banner, the controller of the banner who Fortified can place d6 Trench/Wall terrain templates anywhere on his half of the table after table sides have been chosen but before any models have been deployed. These features must follow all normal terrain placement rules.

While all movement is simultaneous, if two or more enemy banners move into the same tile they immediately stop to engage in battle.
The round saw several players making a conservative push out from their starting areas with only a single battle, as Plummer and Simon both made a play for the Royal Cygnaran Observatory.
Thanks to clever positioning, Simon was able to call on his other banner for support, granting him 15 additional points. Unfortunately, even being up on points was not enough. A single tenacious halberdier was able to hold the Observatory at the end of the game, giving Plummer the win and forcing Simon’s banner to retreat.
In a cruel twist of fate, however, during the Conquer step of the Resolution phase, Plummer failed both his conquer rolls for the tiles his banners were in, meaning that despite his hard-fought victory, he had gained nothing! To add insult to injury, Plummer was the only player to fail any capture rolls, so he was forced to watch as his opponents eagerly gobbled up tiles.

It was here that Hungerford pulled away to a strong lead, his Minions grabbing the Rimmocksdale Lake and Ironhead Station tiles, both of which grant additional SP! Of course, it was later revealed that the clever farrow mind of Hungerford had used bribery to connive Lyle into letting him take Rimmocksdale Lake in return for a promise of military services later in the campaign. How long the slippery Hungerford may hold to this bargain, no one is sure—least of all Lyle!
In the resulting Purchase Phase, the players made good use of their SP to increase their forces, several players purchasing new army banners and Supply Depots.
Though it was clear the players were heating up for engagements in round 2, nature had other plans, and the players found their armies slowed by heavy rains, making rapid movement for all but the smallest banners impossible.
How will the players adapt to this sudden and unexpected turn of events? Check back next week to find out!
’Til next time!