Painting Admiral Boomhowler
by Charles Foster III
Hello, painters, and welcome back to another hobby Insider. This week, we’re setting sail with the Brineblood Marauders preview box by painting up Admiral Boomhowler! So, hoist yer colors, grab yer paint and brushes for ballast, and heave to!
Inside Red Cloak
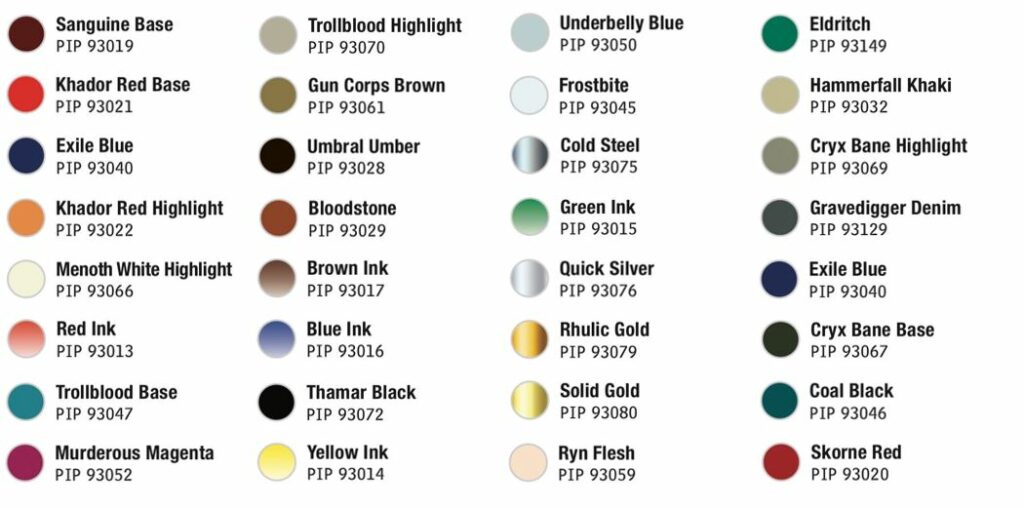
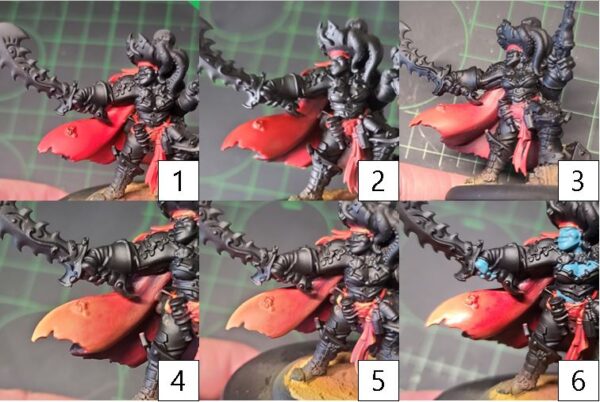
Step 1) I decide to start off the inside of the cloak with a nice fiery red. I’ll begin with a solid basecoat of Khador Red Base.
Step 2) To begin my shade of the area, I use Sanguine Base for the first layer of shading. I apply the paint thin and blend it into the recesses and shadows.
Step 3) To darken the shadows, I add another layer of shading by mixing Sanguine Base with Exile Blue and applying to the deepest shadows.
Step 4) With my shading complete, it’s time to move on to my highlights. I start by mixing Khador Red Highlight and Khador Red Base in a 2:1 ratio.
Step 5) Next, I continue the highlights by mixing Khador Red Highlight and Menoth White Highlight in 1:2 ratio. (This color should almost look peach.) Don’t worry if this looks just a little bit off, as the next step will bring it all together.
Step 6) To bring all of the colors together, it’s time to give it some glazes. I take Red Ink and add water in a 1:14 ratio. I then apply this thinned-out ink evenly across the model, making sure not to let any of it pool up. This technique is known as glazing. I want to shift the colors on the model to a more saturated red tone; to achieve this, I will apply about 12–15 layers of glaze, being sure to let each layer completely dry before moving on to the next. Pro tip: Using a hair dryer on low and from a distance can speed this step up. But don’t rush this step—if it doesn’t dry completely before you move on to the next layer, it is possible to damage the previous layer of glaze.
Trollblood Skin Tones
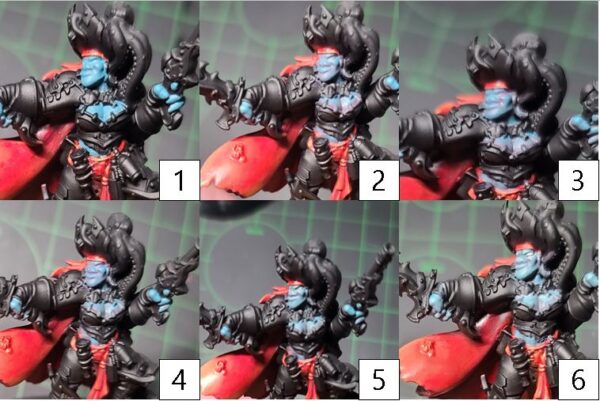
Step 1) With the cloak complete, it’s time to tackle the skin on Admiral Boomhowler. Start by laying down a solid basecoat of Trollblood Base.
Step 2) Next, start shading the skin areas using a 50/50 mix of Trollblood Base and Sanguine Base.
Step 3) To create some definition around the eyes and mouth areas, create a wash by mixing Trollblood Base and Murderous Magenta together.
Step 4) Finally, to balance the skin tones, make a final shade using a mix of Trollblood Base and Cryx Bane Base. Apply this to the deepest shadows of the face and other skin areas.
Step 5) Start the highlights on the skin with a 50/50 mix of Trollblood Base and Trollblood Highlight. Apply this to any raised surfaces or anywhere else the light might catch.
Step 6) For a final highlight, use Trollblood Highlight sparingly to the tops of the cheeks, jaw, brow, and skull.
Woodgrains
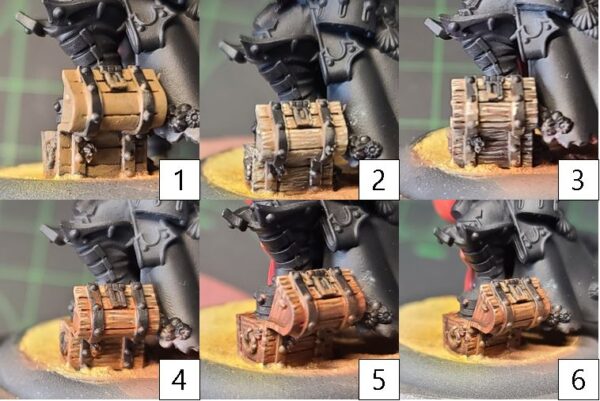
Step 1) If this is your first time joining us for a painting Insider, welcome! For those of you who have been traveling along for some of the painting journeys I’ve hosted, this is, in fact, the third Insider in a row where I’m going to rely on my tried-and-true woodgrain technique by starting with a solid basecoat of Gun Corps Brown.
Step 2) Next, I start with Menoth White Base to draw out the grain structures of the wood: small lines with the occasional bump or two to keep it from looking too uniform.
Step 3) To create depth in the wood texture, I use Umbral Umber and do the same thing I did in the previous step: draw small lines following near the Menoth White Base. I make sure to leave some areas of the Gun Corps Brown still showing in order to create multiple layers of color.
Step 4) To generate great wood tones, I mix Bloodstone, a drop of Yellow Ink, and Brown Ink in a 3:1:2 ratio. I then blend a glaze with this across the woodgrain structure, essentially staining the wood.
Step 5) To deepen the contrast, I repeat the previous step once more but only going about half of the distance of step 4. This will blend the areas together.
Step 6) To creat a final shade, I add a single drop—if not just a half-drop—of Blue Ink to the previous mix. (Too much blue can overpower the color, so use caution when adding in this ink.) Using this mix, I blend in one final layer of shade in the darkest areas.
Step 7) To finalize the wood areas, I add a drop of Thamar Black to the mix from the previous step. I apply this color to the darkest areas and the spaces in between any planks to thoroughly define the separation of the boards.
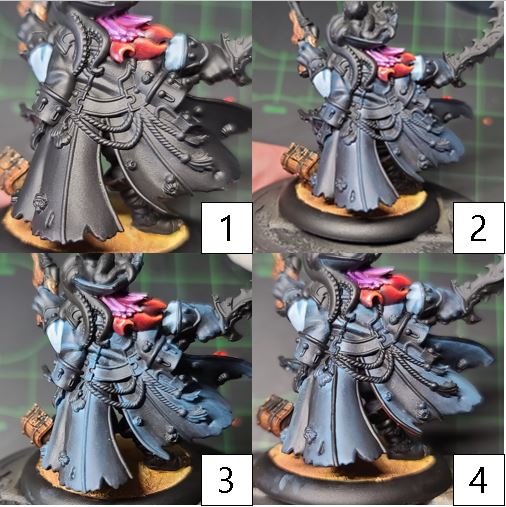
Black Leather
Step 1) If you used black primer, you can skip the basecoat stage and paint directly over the primer. If you’ve gotten paint on the areas, or if you primered anything other than black, basecoat the area in Thamar Black.
Step 2) For the first layer of highlight, mix Coal Black and Exile Blue with a small amount of Thamar Black and use this to apply some broad highlights. If you go a little overboard, you can glaze in some Thamar Black to soften the effect.
Step 3) For the second layer of highlights, add Underbelly Blue to the previous mixture and apply additional highlights of the new color along the rims and tops of the area. This color can be a little overpowering, so be cautious not to go overboard.Step 4) Finally, to finish off the area, add Frostbite to the previous mixture and carefully use this to apply sparse highlights to the area’s uppermost edges.
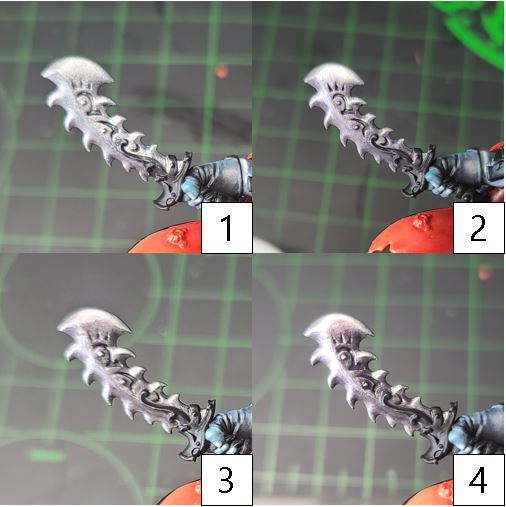
Silver Metal
Step 1) Next up, it’s time to start on the metals. I begin with Cold Steel as my basecoat for all of the silvers.
Step 2) I start shading the silver areas by mixing Brown Ink with an equal part Exile Blue and applying this to the shadows of the area.
Step 3) To darken the shadows and add a complementary tone, I mix Brown Ink, Green Ink, and Cryx Bane Base and apply this color to the deepest recesses of the white metals.
Step 4) Finally, after the model has been sealed with matte sealant, I return to the area for an edge highlight with Quick Silver. This will really make the white metals pop.
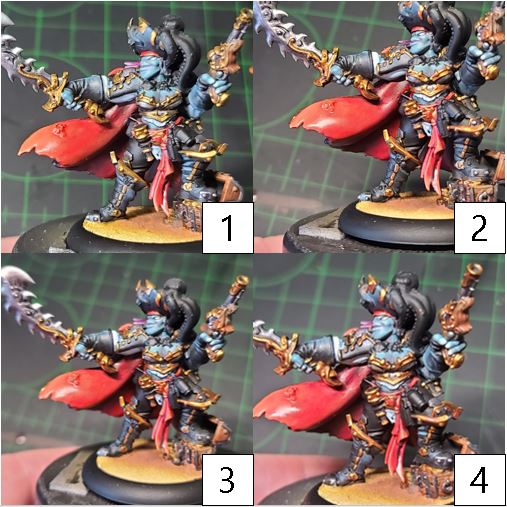
Gold Metal
Step 1) Now for the gold metals. Start by laying down a solid basecoat in Rhulic Gold. Don’t forget the coins under Admiral Boomhowler’s feet!
Step 2) For the first layer of shade, combine Rhulic Gold with Yellow Ink and Brown Ink in a 3:1:2 ratio. Blend this color into the recesses and the underside areas of the gold.
Step 3) To get the depth of color for the golds, create a final shade of Umbral Umber, Sanguine Base, and Brown Ink. Apply this shade only to the deepest and darkest areas of the gold.
Step 4) Solid Gold makes the prefect highlight to the previous steps. Apply to all of the raised areas and edges.
Step 5) Finally, after the model is completely sealed with a matte varnish, apply a mixture of Solid Gold and Cold Steel for some hard-edged highlights to make the gold color really stand out.
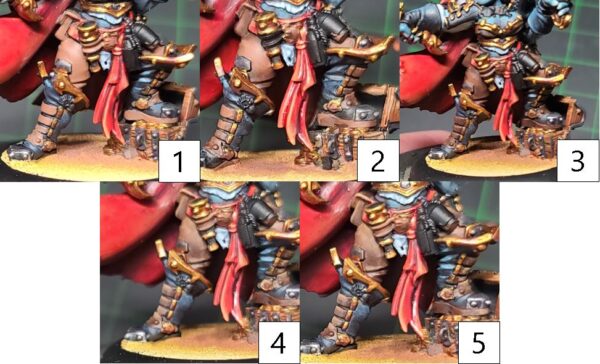
Brown Leathers
Step 1) With the metals complete, I turn my attention to the leathers on Admiral Boomhowler. I start with a basecoat using Idrian Flesh.
Step 2) To start my shade on the leather, I take Umbral Umber and blend this color into the shadows.
Step 3) Continuing to deepen my shadows, I use a mixture of Brown Ink and a small amount of Thamar Black for additional shading.
Step 4) Next, I start my highlights on the leather with Bootstrap Leather, keeping the highlights to the raised areas and edges.
Step 5) Finally, I finish off the highlights using a mixture of Bootstrap Leather and Rucksack Tan.
Top of the Octopus
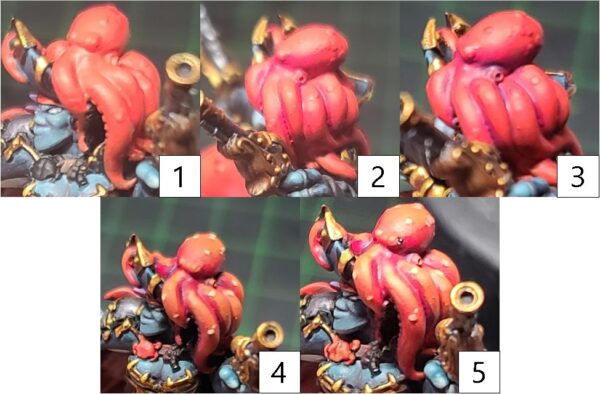
Step 1) Time to tackle the top of the octopus. Let’s split this into two parts: the topside and the lower portion with the sucker cups. For the top, start with Khador Red Highlight mixed with Khador Red Base for a great basecoat.
Step 2) Next, mix Murderous Magenta and Skorne Red together and blend it into the shadows as your first shade.
Step 3) To deepen the shadows, mix Beaten Purple and Exile Blue and apply to the darkest areas.
Step 4) Start the highlights by mixing Khador Red Highlight and Menoth White Highlight. Don’t worry if this looks a little too peach in color—just like the inside of the red coat, we will add a glaze and bring it all together.
Step 5) To create the red saturation and tones for the octopus, we need to put glazing on the model. Use Red Ink and add water in a 1:14 ratio. Take this thinned-out ink and apply it evenly across the model, making sure to not let any of it pool up. Apply about 12–15 layers of glaze. As before, make sure each layer dries completely before adding the next!
Bottom of the Octopus
Step 1) With the top of the octopus colored up, I shift my focus to the sucker cups. I start with a mixture of Carnal Pink and Menoth White Highlight.
Step 2) Next, to create some contrast, I use Murderous Magenta thinned out with water to create a wash and apply this to the thin layers across the area.
Step 3) Finally, I add in highlights on the raised areas using Ryn Flesh mixed with Menoth White Highlight.
Barnacles
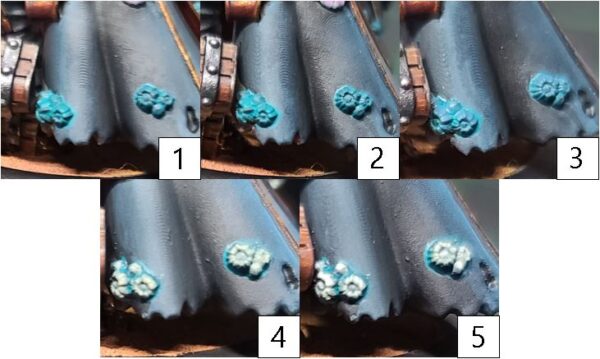
Step 1) With the octopus looking pretty good, it’s time to paint in all the barnacles around the model. Start by mixing Gravedigger Denim with a small amount of Eldritch. To enhance the effectiveness of this step, you can thin out some of the paint to an almost glaze-like consistency and apply this slightly to the areas the barnacles are attached to, indicating the growth of the crustaceans.
Step 2) Time to work up the colors on the barnacles by adding a highlight of Gravedigger Denim.
Step 3) We’re working toward a brighter color, so for the next highlight, mix Gravedigger Denim and a small amount of Hammerfall Khaki.
Step 4) For the penultimate highlight, apply Menoth White Base to the uppermost areas and raised surfaces.
Step 5) Finally, to give it that sun-bleached brightness, use Menoth White Highlight as the final highlight.
With the barnacles painted in, the only thing left to do is paint up the little knick-knacks as you see fit!
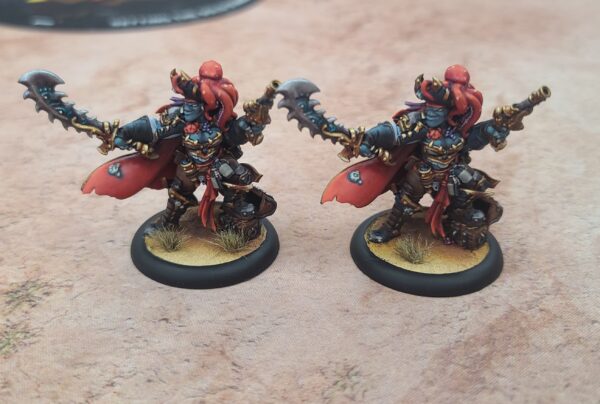
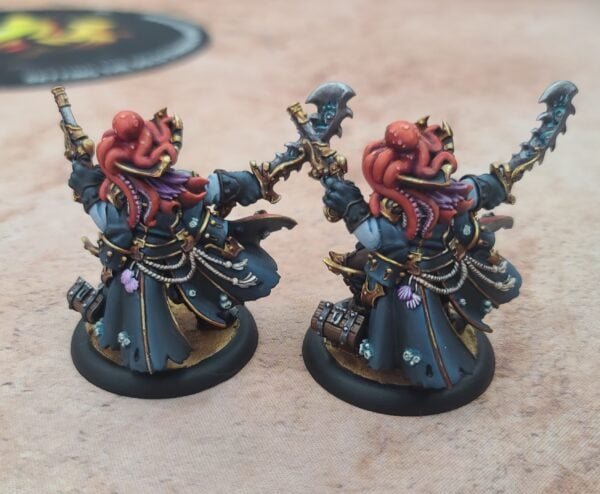
Admiral Boomhowler is now ready to take command of her fleet and the tabletop! Join me next time as I continue my foray into the year of the pirates with some Talion Charter pirate solos!
The post Painting Admiral Boomhowler appeared first on Privateer Press.

