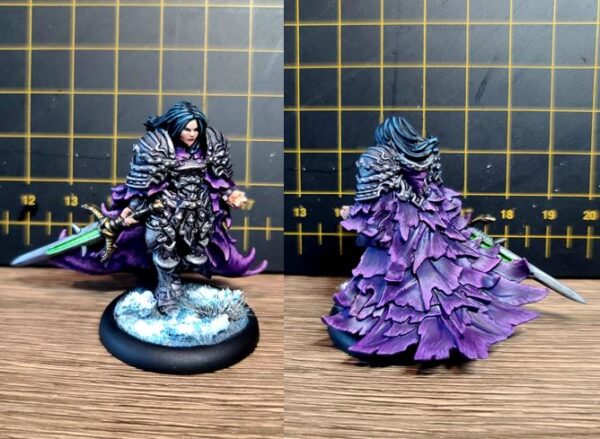
Painting Alexia, Queen of the Damned
Hello, Painters!
Welcome back to another hobby Insider. Last time, I promised to share with you my painting insights on Lord Rockbottom; sadly, that will have to wait a little bit longer. Matt Wilson came by and dropped a pile of the new Mercenaries for MKIV in my lap, and I couldn’t wait to get some paint on them. So, this week I’ll be tackling my Alexia, Queen of the Damned! Grab your brushes and your paint and follow along.
Winter Bases
I got a lot of positive responses on the winter bases from my Dusk warjacks Insider, and I really think a frozen base lends itself well to this model’s aesthetics. So, here is how I did it for the Alexia, Queen of the Damned…
Materials Used
- Vallejo Earth Texture Acrylic Arena Desert 25.217 Desert Sand
- Vallejo Ground Texture Acrylic Nieve 26.820 Snow
- Crushed cork board to simulate rocks
- Sculpting tools
Paints Used on the Snow Base
- Gun Corps Brown
- Coal Black
- Bastion Grey
- Sickly Skin
- Blue Ink
- Exile Blue
- Cygnar Blue Highlight
- Frostbite
- Thamar Black
- Morrow White
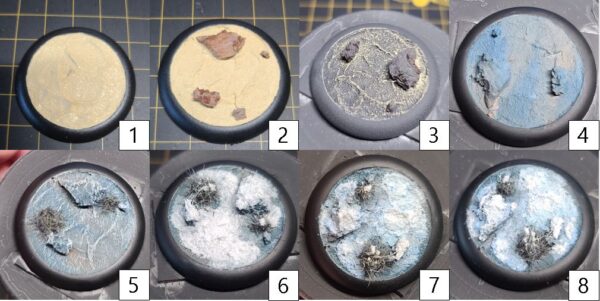
Step 1) I start my bases by using a small amount of masking tape to cover up the hole on the 30 mm base.
Step 2) Next, I use a sculpting tool and portion out an amount of the Earth Texture Desert Sand by Vallejo to fill in the base size. Distribute this material evenly across the base. Once this dries completely (in about 30 minutes or so), it will create the perfect base on which to create a winter wasteland.
Step 3) While the base material is drying, I crush up a few small pieces of cork board and apply them to the base. The Ground Texture Acrylic will dry to an almost rock-like hardness when it’s done, so no extra glue is needed for this step.
Step 4) Once I have the desired outline for the base, I let this material dry for 30–45 minutes. Once all of the material is completely dry, I then use black primer to give the model two or three passes to get an even primer coat on the model.
Step 5) After the primer dries, it’s time to move on to getting some color on the base. I create a mixture of Coal Black and a small amount of Exile Blue and Bastion Grey, all in even parts. I then apply this mixtures and Gun Corps Brown throughout the base, wet-blending the two areas together across all of the surfaces. It’s okay to be messy in this step, as it is the bottom layer.
Step 6) I allow the previous step to completely dry before proceeding. I next use Sickly Skin and drybrush the entire base. This creates a nice definition for any areas that aren’t going to be covered by the snow texture in the next step.
Step 7) If you have any grass tufts or static grass you want on your model, now is the perfect time to add them.
Step 8) Time to make it snow. Using an old brush, I apply the Vallejo Snow Ground Texture to anywhere I want to have snow. This material will shrink slightly as it dries, so don’t be afraid to apply plenty of it. Make sure to add a small amount of snow to the static grass to enhance the elements of the base. If you’re looking to save some time, you can just call your base done at this step. I want to deepen the effect, however, so it’s time to add blue shading to the snow.
Step 9) Be sure to let the previous step completely dry before adding the blues. To get the effect I’m going for, I need to thin out some paint to create my blue colors. Here are the mixes I used:
- Dark Blue Wash—Blue Ink, Exile Blue, Thamar Black, and water in a 1:1:1:16 ratio for a very watered-down mixture.
- Medium Blue Wash—Cygnar Blue Base and water in a 1:16 ratio so that the paint becomes a wash.
- Light Blue Wash—Cygnar Blue Highlight, Frostbite, and water in a 2:1:14 ratio.
In truth, there isn’t a specific formula to this step—I just add all three mixes across the entire base, using the Dark Blue Wash on bigger rocks and the darkest areas to create better shading and more definition. Then I use the Lighter Blue Wash on whatever I think would look like the freshest snow.
Step 10) Once all of the washes have dried completely, I use a small amount of Morrow White to reclaim some of the upper areas of the snow. Alexia will look great in her frozen wasteland, so now let’s get some paint on the actual model.
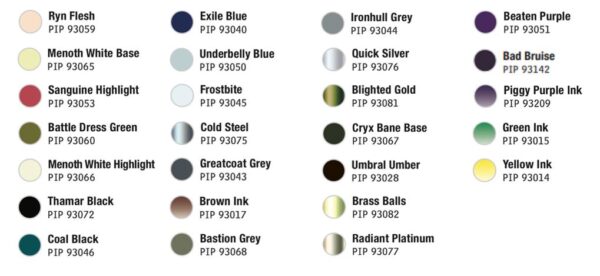
Colors Used
Face/Skin
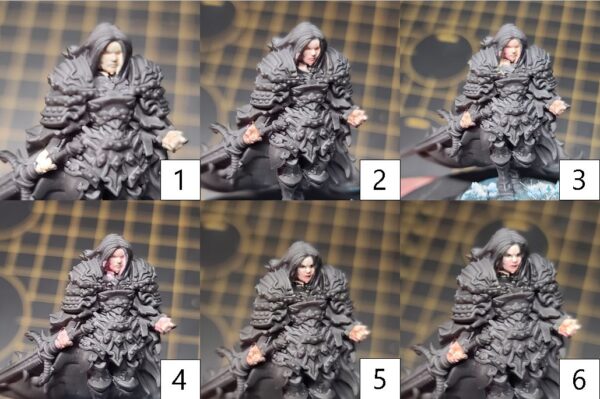
Step 1) I start working on the skin tones with a basecoat of an equal mixture Ryn Flesh and Menoth White Base.
Step 2) Next, I shade by adding Sanguine Highlight and a dot of Mixing Medium to the base color and blending in my first layer of shadow.
Step 3) I continue shading the face and skin areas, adding Battledress Green with more of the base color and adding a few drops of Mixing Medium.
Step 4) I add a final shade by applying thin lines of Sanguine Highlight mixed with Battledress Green to the deepest areas.
Step 5) With my shading complete, I turn my attention to highlights. Add Menoth White Highlight to the original base mixture (Ryn Flesh and Menoth White Base) and apply it to the raised areas of the face.
Step 6) Finally, to complete my highlights, I apply Menoth White Highlight to the tips of the ears, nose, and brow as well as to the top of the face and any raised areas of skin.
Hair
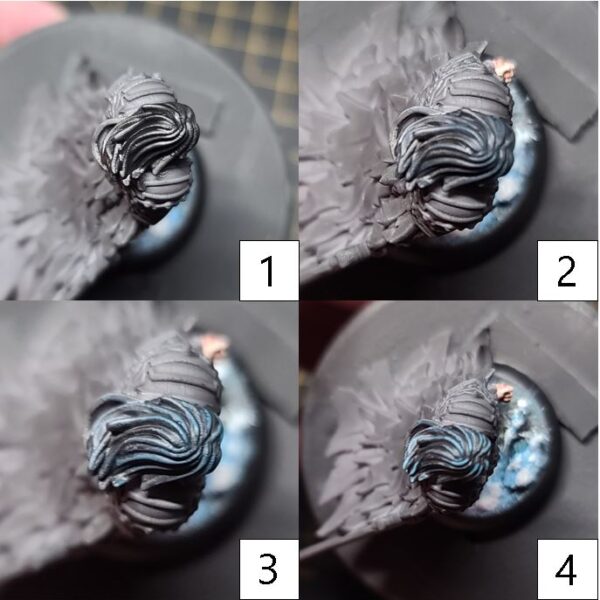
Step 1) To begin Alexia’s hair, start with a solid basecoat of Thamar Black.
Step 2) Next, mix Coal Black and Exile Blue with a small amount of Thamar Black and use this to apply broad highlights to the majority of the area.
Step 3) For the next highlight, add Underbelly Blue to the previous mixture and apply additional highlights of the new color along the rims and tops of the area. Make sure to leave areas of the previous color showing through.
Step 4) Finally, add Frostbite to the previous mixture and carefully use this to apply sparse highlights to the area’s uppermost edges. Think of this as the light creating the Maybelline sheer-and-shine look.
Dark Steel
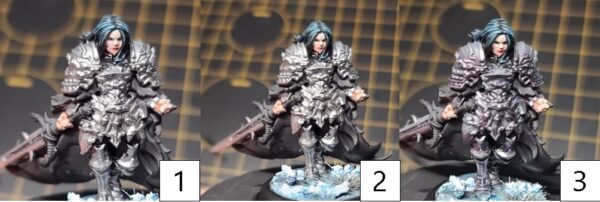
Step 1) There are a lot of metal surfaces on Alexia’s armor, so to break up the metals, I think it best to add some variance by using two different shades. For this step and the next, basecoat the entire armored area in Cold Steel.
Step 2) To create darker-looking metal areas, I thin out a little Greatcoat Grey with a lot of water and create a glaze. I apply this to any of the areas I want to be a darker surface. I stick primarily to the inner plates for the darker colors and focus the lighter steel colors on the raised areas. Make sure to keep the glaze from pooling up in any of the recessed areas—I want to keep the glaze thin and shift the color of the metal.
Step 3) Next, I shade the dark metals using a mixture of 50:50 Exile Blue and Brown Ink. I blend this down into the recesses of the darker surface to create a nice contrast of shadow on the metal.
Step 4) Finally, once the model is sealed with a matte varnish, I return to this area to highlight using Cold Steel. I try and be as reserved as possible with this highlight to avoid blending in with the brighter steel of the next section.
Light Steel
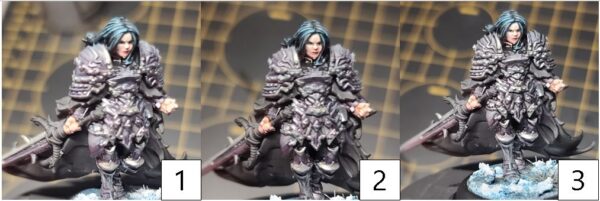
Step 1) For the uppermost metal plates on Alexia’s armor, I want to do a lighter steel. With the Cold Steel basecoat from the previous steps, I start my brighter color white metal by glazing Bastion Grey over the areas. I take special care to, once again, not allow the paint to pool up in area or to drip onto the armor painted previously. Patience is best here.
Step 2) To shade this lighter steel color, I blend Ironhull Grey into the darkest areas, focusing on the recesses and where the plates overlap.
Step 3) To make sure these surfaces appear to be brighter than those in the previous step, I start with a highlight of Cold Steel.
Step 4) Finally, once the model is completely sealed, I return to this area and apply a final pass using Quick Silver. I take time to focus on any rivets and hard edges to create depth.
Blighted Gold
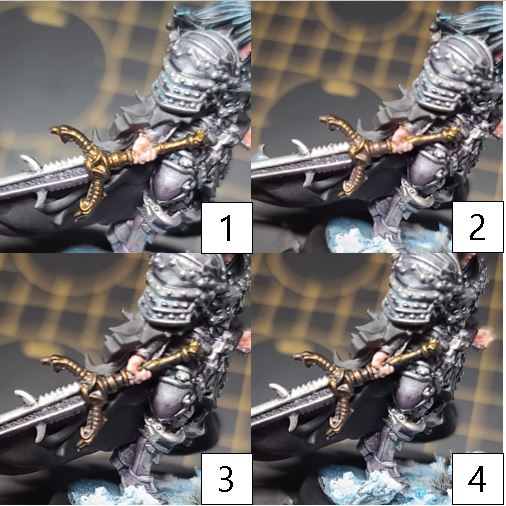
Step 1) Next up, it’s time to paint Alexia’s Witchfire. Use Blighted Gold to lay down a nice solid basecoat on your model.
Step 2) Using a 1:6 ratio of Cryx Bane Base: Brown Ink, apply your first shade to the gold area.
Step 3) To get the dark color of the Blighted Gold, apply a second shade of Umbral Umber and Coal Black in a 2:1 ratio to your model.
Step 4) Start the highlights on your model with a layer of Brass Balls.
Step 5) Finally, after you seal your model with a matte sealant, return to the gold and put a final highlight on the highest edges and where the light would hit using Brass Balls mixed with Radiant Platinum.
Cloak
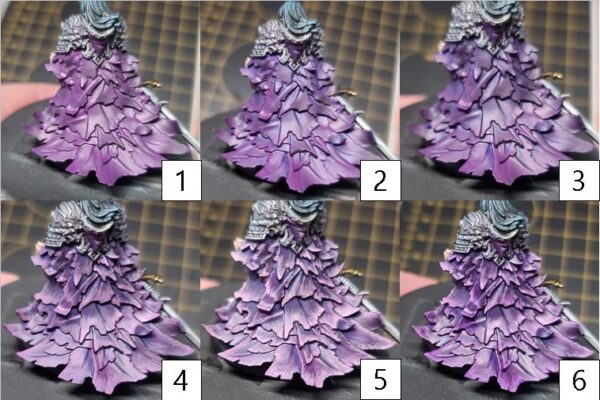
Step 1) Now it’s time to get some color on all that fabric on her back. I start my cloak with a basecoat of Beaten Purple.
Step 2) To create some depth, I start shading the area with Bad Bruise.
Step 3) To take the depth further, I add a few drops of Thamar Black to the Bad Bruise and apply to the deepest areas.
Step 4) To highlight the area, I start by mixing a few drops of Menoth White Base and Beaten Purple. Apply this throughout the cloak.
Step 5) For the last highlight, I add a few drops of Menoth White Highlight to the previous mixture and apply to the highest points and raised edges. You can stop here if you like what you got, but I think I’m going to take it one step farther.
Step 6) To blend it all together, I thin out Piggy Purple Ink in a ratio of about 15 drops of water to ink. I glaze the cloak with this mixture. Take care not to let the color pool up, as it is only meant to tint and smooth the colors together. I let each layer dry completely before applying the next layer. In all, I give it about four layers to add a nice smooth blend to the cloak.
Necrotite Glow
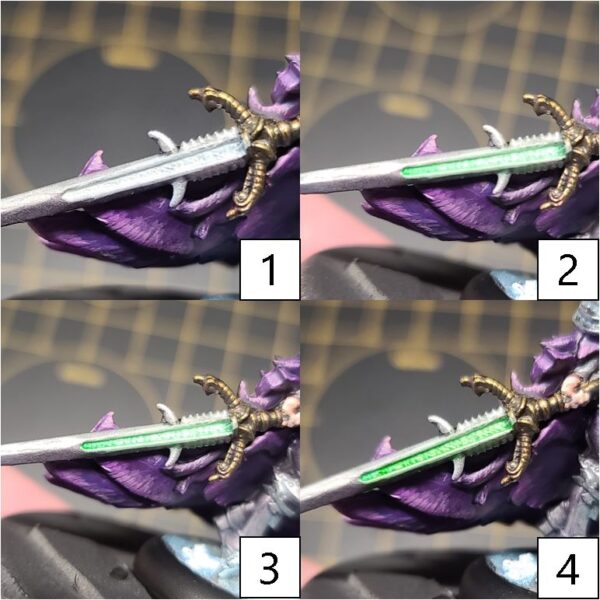
Step 1) Now comes the moment I’ve been waiting for: time to make it all come together with a necrotic glow. Thin down some Menoth White Highlight with water and apply it to gaps and runes in the Witchfire blade. The key to a good glow is to take your time and build up a few layers patiently in this area.
Step 2) Next, mix Green Ink and Yellow ink to get a necrotite green color and use this to lightly glaze the runes. Be patient and be sure not to let any of this pool up in areas. This isn’t a wash; we only want to shift the color of the Menoth White Highlight, not drown it out.
Step 3) Once the previous step has completely dried, I return to the area with Menoth White Highlight and apply some highlights to simulate the glow. Again, patience is the key to making this look its best, and thin layers building up the white slowly really is the way to go.
Step 4) I finalize this glow look by adding in a little more Yellow Ink to the ink mixture used in step 2 and applying this as a second glaze to complete the effect.

What a great-looking model! I’m super stoked by how this came out. The only thing left to do is drop her into an army and get her on the table.
Join me next time as we take on another one of the new MKIV Mercenaries!
The post Painting Alexia, Queen of the Damned appeared first on Privateer Press.
