
Painting Your Tablescapes Tiles – Scrap Yard
Part 1. Introduction & Materials

The Scrap Yard Tablescapes offer a wide variety of possibilities. The ground can be painted as a battered field, flock could be added for a greener pasture in order to reflect how nature is creeping back or you could opt as we did for an arid land of sand. The debris can be a simple mess of rust, or could be painted in a more lively fashion to reflect recent additions, and of course any combination of the two or in between.
Unfortunately, I did not have the time to head to my local scrap yard for references. Once again Google Images is your good friend and will offer an array of pictures that you can use for inspiration. Your favorite post-apocalyptic video game or movie will also be filled with excellent references. Nothing like a game of Fallout or a viewing session of Mad Max to inspire you. If you are looking for reference of nature creeping up on these pile of debris, I would suggest doing a search under Pripyat. Pripyat was the city built for the workers of Chernobyl. In the recent years, numerous pictures have been published of this most infamous ghost city.
So as previously said, we opted for a desert setting with more colorful debris. The reasoning here was twofold. On one side, by choosing a desert setting, we can go easy on the detailing, letting the dry pigments do most of the work for us. On the other side, the livelier colors where chosen simply in order to achieve a harmonious color contrast combination going with the classic yellow, blue and red.

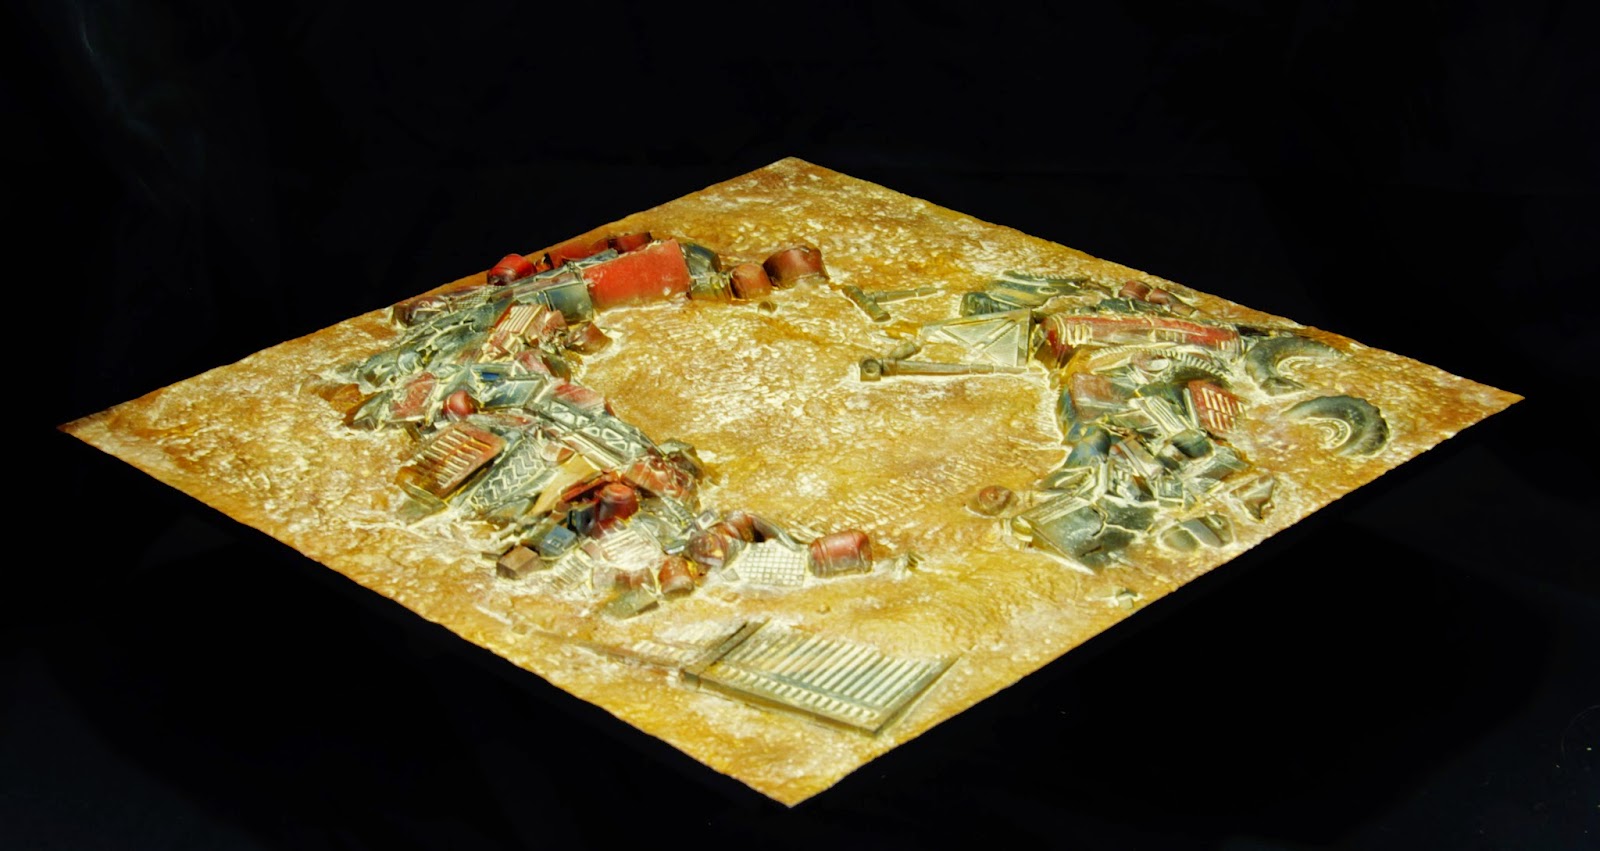
When looking at this tile, we see a large amount of debris. Those are composed of various elements such as panels, crates, grids, tubing, tires, pipes, barrels and chains only to mention a few. These can become overwhelming if we try to overdo it. In this case, as you will see, we will keep it simple.

For this tile, we went with a coat of black Stynylrez from Badger. It will allow us to play with the intensity of color.

To facilitate our work, we will paint the debris first. By doing so we are less worried by the overspray. When we will apply the ground color, the overspray around will simply start our dusting effect. We chose only 2 colors, red and blue. These will contrast nicely with the yellow ground. Obviously, you can go crazy and paint every element in different colors, but remember that you have several other tiles to paint as well. Your choice will have a direct impact on the time spent on this project. The blue elements are in Spellsinger Blue and the red in Angelic Blood, both from Minitaire. The metallic elements were painted with a neutral silver as well. In this case, we are looking for an opaque coat to reflect the material. We do not want too much modulation of the color with the primer as with the ground work as we will see later.

The elements are shaded and highlighted to give more depth to the surfaces. The blue is highlighted with Minitaire Dusty Ground and shaded with Minitaire Royal Blood. The red is highlighted with Minitaire Skull White and shaded with Minitaire Raven Black. The contours are also repainted with Minitaire Raven Black to get rid of the overspray. The tires are also painted in black. No need to push it further, once more, the pigments will take care of the rest.

We could go nuts with details. There are so many different elements that we could spend hours simply detailing these debris. Instead, we will let the dry pigments do most of the work for us later. In this case, only white lines were applied to break some surfaces. Nothing heavy, just a little touch to add a bit more depth. The white was shadowed with a really light touch of Raven Black. But remember that you could add details, labeling or various industrial decals on the surfaces, and it all depends on the time you are willing to spend on your tiles.

The first color for the ground, Minitaire Earth, is applied irregularly. We are looking for a near opaque coat but we let a little bit of the primer show through. As said, do not worry about the overspray. It simply create the base for the dusting effect. Some chipping is added using a piece of blister foam, and P3 Thornwood Green.

A thinned layer of Minitaire Saddle Brown is applied across the ground. Once again it is applied in an irregular fashion. We do not want to cover the entire ground. We simply want to add more depth of color and gain a more realistic feel.

Minitaire Ancient Bone is applied in the same fashion as the previous step. Again we are not looking for a full coverage but simply in gaining more depth.

Minitaire Dark Leather is our last ground color applied, once again, in the same fashion as the two previous steps.

Our sand is a bit too desaturated at the moment. We want something more vibrant. A filter of Minitaire Jaundice is applied all over the ground. Simply thin your chosen color heavily and spray away. A filter is a great way to lightly adjust the vibrancy, tone or saturation of a color.

The color was not vibrant enough for us yet, and so a filter of Minitaire Mustard Gas is applied to bring the intensity to the right level. Minitaire Raven Black is also applied in various area to reflect explosion blasts.

A wash of Terracotta Earth pigment from Secret Weapon is applied all over the surface, including the debris. For a pigment wash, make sure to varnish your surface first. For the actual wash I prefer using a mix of 30% isopropyl alcohol and water as a base. There is enough alcohol to fix the pigment but not enough to eat through your varnish and paint. Furthermore, by using less alcohol, it is easier to adjust the pigments once dry.
Unfortunately, the orange was a bit too bright and the final result was less than ideal. So on an urgent desire to fix the issue, the picture was omitted and a filter of Minitaire Saddle Brown was applied on the entire surface, debris included this time.

A new pigment wash of Yellow Earth from Secret Weapon is applied making sure it is more concentrated on and around the debris. You can simply absorb the excess with a paper towel once applied. You can start to see the various elements being more defined with the pigments delimiting the areas but we still need more depth.

A final wash of Burning Sands from Secret Weapon is applied all over the surface to create that light sand dusting effect. This lighter color makes all the details raise up.
And voilà, we have another completed Tablescapes Tile. Remember that the possibilities are endless. Even though you can follow this tutorial step by step, try to make it your own. Go light or heavy with details, make it rusty like there is no tomorrow, or more colorful as we did. Chose an arid desert setting, or more fertile ground. The choice is yours. Simply make sure to enjoy painting your tiles.