
Painting Boss MacHorn
by Charles Foster III
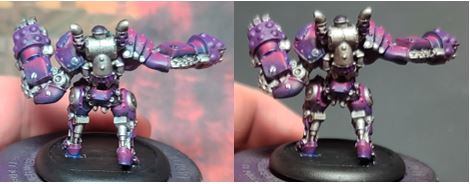
Nothing feels better than seeing all of your models in a game painted when they hit the board. Although I’m still a long ways off, I’m excited to keep moving forward as I paint my way through the Riot Quest line. This week we will tackle painting Boss MacHorn. Having done a few models with darker pallets now, I want to kick this one up a notch with some bright colors.
Colors Used

Model Prep/Airbrush

Step 1) Per usual, I still start off by priming the model in black.
Step 2) Next, I airbrush on a solid coating of Beaten Purple. If you don’t have an airbrush available, no worries—this color can be hand-painted on as well.
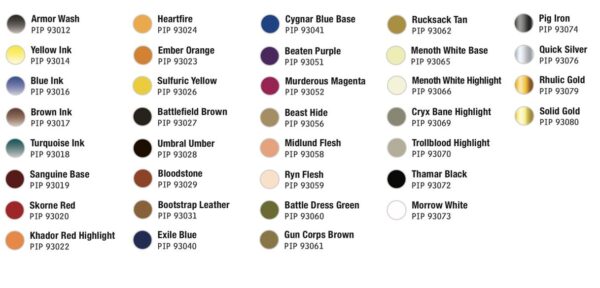
Purple Armor
Step 1) Start by shading the purple armor with Cygnar Blue Base.
Step 2) Use Exile Blue to apply as a second shade. Really focus on the deep recesses to define the shadowed areas.
Step 3) Eager to make this purple armor pop, I highlight the previous steps with Murderous Magenta.
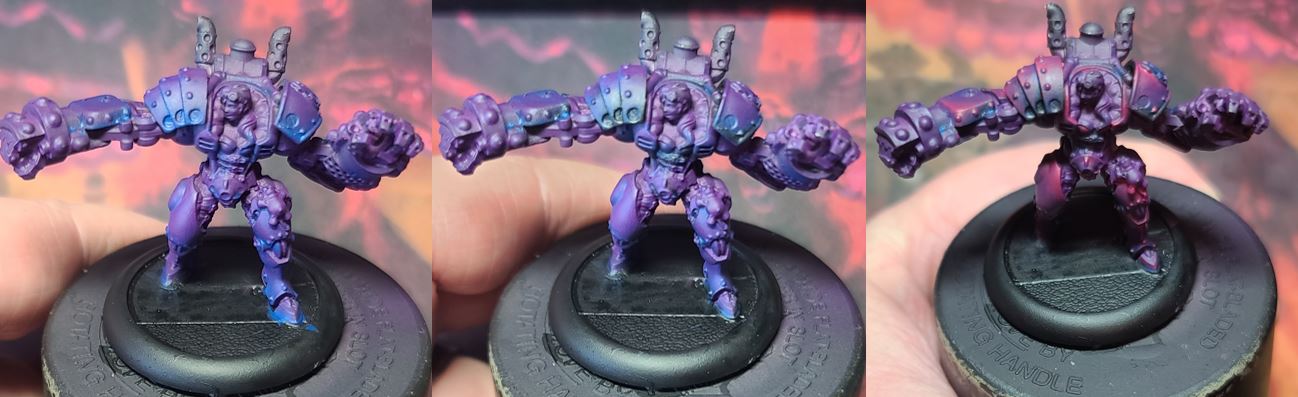
Skin Tones
Step 1) After I’ve finished up the armor, it’s time to start on the skin tones with a basecoat 50/50 mix of Midlund Flesh and Ryn Flesh.
Step 2) Take your time shading using Midlund Flesh mixed with Battledress Green and some Mixing Medium for translucency. Don’t worry if this looks a little off; the colors will make much more sense when we add the next shade.
Step 3) Raise the tone of the skin by mixing Midlund Flesh, Skorne Red, and a few drops of Mixing Medium for the final shading.
Step 4) I finish off the skin tones with a highlight 50/50 mix of Ryn Flesh and Mixing Medium, which helps keep the transitions smooth.
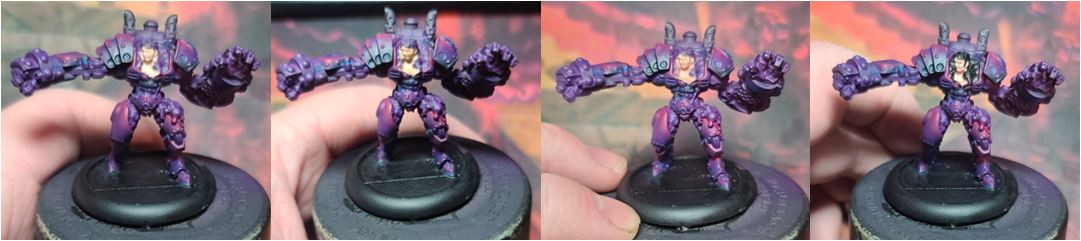
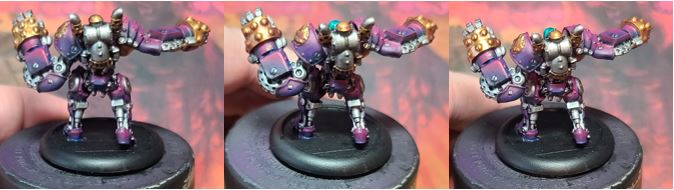
Electric Blue Hair
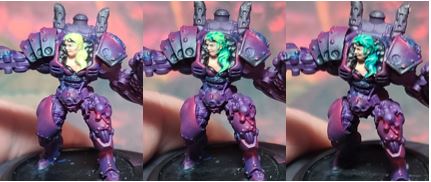
Step 1) Now that we have the skin tones complete, let’s start MacHorn’s blue hair by mixing Menoth White Base with Sulfuric Yellow. Keep this mix simple with a 2:1 ratio of Menoth White Base to Sulfuric Yellow.
Step 2) You can get a really cool base blue color by applying Turquoise Ink to the recesses of the hair so they visually stand separate from one another.
Step 3) One thing you can do to deepen the shadows and accent the shape of the hairstyle is to add a second shade with Blue Ink.
Step 4) Use a mix of Thamar Black, Turquoise Ink, Blue Ink, Mixing Medium, and water to create a final shade. Restrict the focus of the shade to the tips of the hair. Very small amounts will go a long way when using this color.
White Metals
Step 1) After the hair, I move on to the white metals of the model. Lay down a solid basecoat of Pig Iron in 1–2 thin layers. Take your time to ensure a nice solid, even coat.
Step 2) I lay down a shade by thinning out Armor Wash with water and applying it like a glaze.
Step 3) Next, I apply a final highlight of Quick Silver to the highest edges.
Yellow Metals
Step 1) Everything is starting to come together. After the white metals, let’s move on to the yellow metals and apply a basecoat of Rhulic Gold.
Step 2) Next, let’s add a shade by combining Brown Ink, Yellow Ink, and Rhulic Gold. Don’t be shy with this color—apply a good amount of shade to define the areas.
Step 3) You will want to add another shade using a mixture of Umbral Umber, Sanguine Base, and a small amount of Brown Ink. Paint this color into the deepest areas and blend it back up to give your gold color a unique look.
Step 4) After the previous mixture dries, I highlight this using Solid Gold.
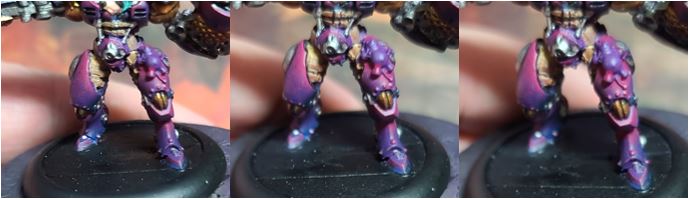
Tan Pants
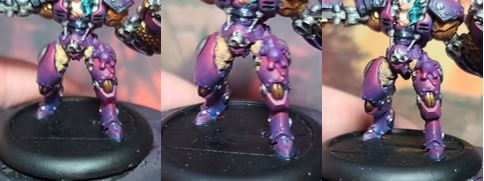
Step 1) I start by basing the cloak area in Rucksack Tan.
Step 2) Next, add in the first shading layer using Gun Corps Brown.
Step 3) To deepen this shade, I go in with a little Battlefield Brown, making sure to get into the deeper areas.
Step 4) The last step is to mix Rucksack Tan and Menoth White Base. Apply this only to the highest edges.
Leather Belts
Step 1) Under a few of the areas on MacHorn, you’ll find some leather straps that will need attention. Rather than just doing a simple wash, I decided to paint this out. Start with a nice coating of Bootstrap Leather.
Step 2) Time to add our first shade by mixing Brown Ink with the Bootstrap Leather to make a nice brown wash.
Step 3) Use a little bit of Thamar Black mixed with Brown Ink for a final shade. Focus your attention to defining the lines that separate sections of leather from one another.
Step 4) Finally, add a highlight by mixing a 1:1 ratio of Bootstrap Leather and Beast Hide.
Demon Thing

Step 1) The last major area we need to focus on is the small demon bat on MacHorn’s left leg. I start by basecoating this area in Trollblood Highlight.
Step 2) I do a light shade by mixing Cryx Bane Highlight and Battledress Green.
Step 3) Next, using Menoth White Highlight I go in and add some highlights to the area.
Step 4) For the wings and the mouth, I start with Sanguine Base.
Step 5) For a bit more color and depth, add a layer of Skorne Red over the Sanguine Base.
Step 6) Using Rucksack Tan, I pick out the horns. You can add a little Menoth White Base if you would like to add highlights to the horns.
Step 7) Finally, I hit the hard edges with Morrow White.
Orange Glow
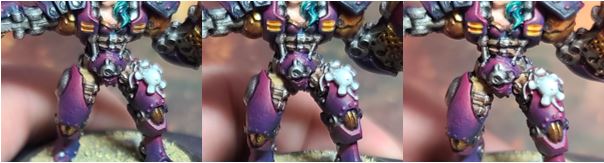
Step 1) I think a little orange would make a good accent color here, so let’s add some for a little glow. I start by thinning out Khador Red Highlight with water and getting it into the vents.
Step 2) I leave a little of the layer below showing but add a layer of Ember Orange as a highlight.
Step 3) To really make the color jump, I add a small dot of Heartfire to the edge as a final highlight.
Basing
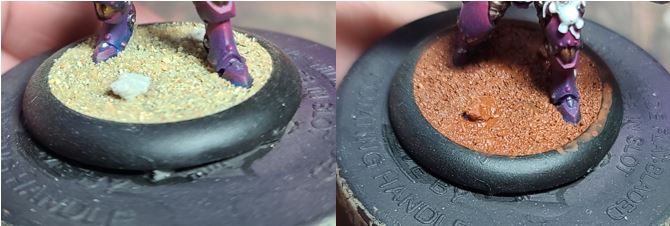
Step 1) Add in sand and ballast with Elmer’s white glue and let it dry completely.
Step 2) Water down a bit of Bloodstone and apply it across the base material to let it soak in.
Step 3) Once it’s dry, I drybrush on a little bit of Rucksack Tan.
Step 4) I drybrush on one final highlight of Menoth White Base.
Step 5) Glue on some static grass.
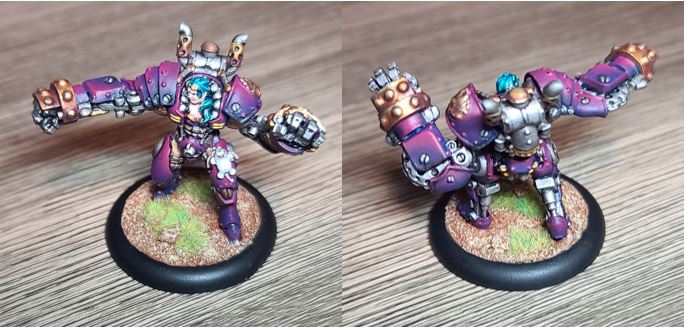
With the base finished up, yet another model joins the painted shelf. And that means we need some new competitors for what model to paint next!
Captain Crawtooth vs. Bumbles

Until next time, painters!
The post Painting Boss MacHorn appeared first on Privateer Press.